How To Hang Wallpaper
DEAR TIM: Can you to tell me how to hang wallpaper? I think wallpaper will really make a few of my rooms gorgeous. If you can teach me how to wallpaper, I am convinced you will save me money and allow me to discover a hidden talent. What are some of the most important steps to do when you wallpaper? Are there special tools one uses when installing wallpaper? Molly W., Meredith, NH
DEAR MOLLY: In the limited space of this column, I will be able to give you the view of how to hang wallpaper from 35,000 feet! Entire books have been written on the topic, so I will do my best to give you enough to get started.
I urge you to do further research to find any books, videos or DVDs that really explain the wallpapering process.
You are correct that wallpaper can transform a room. My wife and I are huge fans of wallpaper, and have it in many rooms of our home.
You can create a vibrant mood or theme using wallpaper that just isn't possible with paint or even multi-color paint schemes.
CLICK HERE to get FREE & FAST BIDS from local wallpaper hangers in case you're getting cold feet.
Just A Few Tools
Let's get started with the tools. Fortunately, you don't need many tools to wallpaper.
Here's a list that will get you going on this job:
- retractable razor knife with snap-off blades
- 4.5 or 6-inch drywall taping knife
- smoothing brush or plastic smoother
- 4-foot level
- grout sponge
- measuring tape
- paint roller & pan
- paint brush
Click the Image Below to get all, or some, of the tools now:
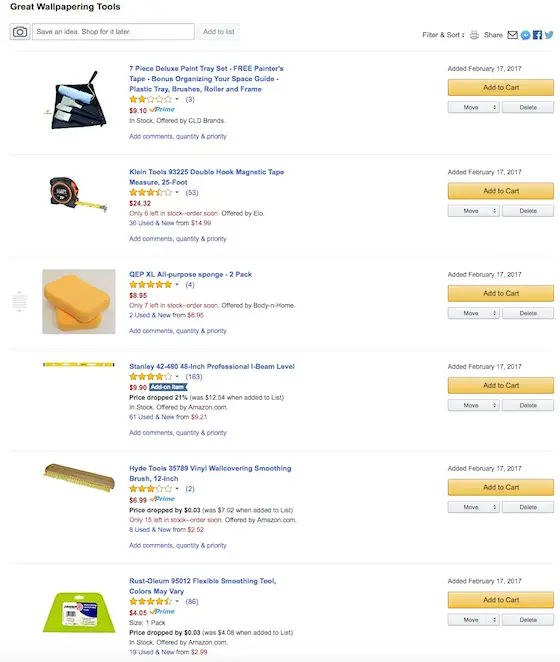
CLICK HERE to get all the tools I recommend in one place. It's easy and fast.
Believe me, a professional wallpaper hanger will have many other tools, but these will get you into the ball game.
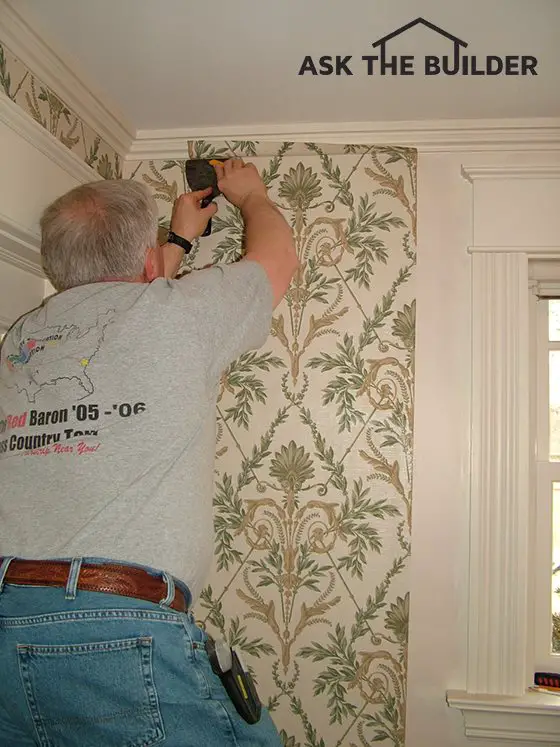
Cutting wallpaper to fit around older woodwork is challenging, but can be done with patience and the right tools. PHOTO CREDIT: Kathy Carter
The first thing to do is prep the walls. All holes need to be filled and any little bumps need to be scraped off. When wallpaper dries, it clearly shows any imperfections in the wall surface.
You must paint the walls with a special wallpaper primer. These paints size the walls ensuring the adhesive does not penetrate deeply into the wall. Another advantage using these special primers is the extra work time.
The primers leave a glossy sheen that allows the adhesive to stay in the liquid state for up to 15 minutes allowing you plenty of time to wiggle each sheet of wallpaper into position.
It is really important to hang the wallpaper plumb. If you fail to do this, most patterns on the wallpaper will scream that you made a mistake when you look at where the wallpaper hits the ceiling.
The pattern will either run uphill or downhill. The wallpaper needs to be replumbed each time you come out of an inside corner.
Always make a faint pencil line about one-eighth inch away from the actual edge of the wallpaper holding the wallpaper consistently away from the line.
If you place the edge of the wallpaper on the pencil line and the seam between the two pieces of paper pulls away the slightest amount, you will see the ugly gray line between the two pieces of wallpaper.
Many modern wallpapers come prepasted. I have found that using a premixed paste activator is a superb way to activate the adhesive. You apply these clear liquids to the back of the paper using the paint roller.
CLICK HERE to get FREE & FAST BIDS from local wallpaper hangers in case you're getting cold feet.
Fold the paper immediately back on itself so the activator and glue are not exposed to the air. The moisture causes regular wallpapers to expand.
The wallpaper needs to expand on the worktable, not the wall. If you hang a piece of wallpaper before it expands, you will get all sorts of bubbles on the wall.
It usually takes only five minutes or so for the wallpaper to relax and expand once you apply the adhesive activator. There are non-woven wallpapers that do not expand. They can be applied to the wall immediately after activating the paste.
When placing the sheets of wallpaper on the wall, work the side edge first. Do not allow the wallpaper to fully contact the wall and then try to slide it to the plumb line or the adjacent piece of paper. If you do this, you will stretch the paper and create all sorts of problems. Get the edge in the right position, then allow the rest of the sheet to lay against the wall.
Use the special smoothing brush carefully to flatten the wallpaper against the wall. Brush carefully away from the edge making sure the seam is still tight and there are no air bubbles in the paper.
Trim the excess paper on the top, bottom and edges with the handy snap-blade razor knife. These tools are magical as they allow you to get into very tight spaces to make difficult cuts.
Trimming wallpaper might be the most challenging part of the job. Some wallpapers are very tender and tear easily once they are moist from the activated adhesive. You need to work carefully, yet quickly as some pieces of wallpaper that wrap around doors and windows in older homes can have as many as ten or fifteen technical cuts per strip of wallpaper!
Use the wide flexible putty knife to help guide the razor knife along long cuts at ceilings, baseboard and adjacent to windows and doors. Gently push the wallpaper tight into the corners with the putty knife and cut immediately next to the putty knife blade with the razor knife.
Be very careful cutting around electrical switches and outlets. If you allow the blade of the razor knife to contact the screws of the devices, you can get shocked or severely cut as you panic pulling the razor knife away in a shower of sparks and molten metal.
CLICK HERE to get FREE & FAST BIDS from local wallpaper hangers in case you're getting cold feet.
Column 718
Tim built custom homes and did ultra-custom remodeling for 20+ years before launching his Ask the Builder media presence. He was selected as one of the Big 50 by Remodeling magazine in 1993. This award gave birth to Ask the Builder in October 1993. Tim also operates https://DrawPlumbingPlans.com. His @askthebuilder YouTube channel was the first home improvement channel on YouTube.