Pouring Concrete Sidewalks
DEAR TIM: This summer I want to install a concrete sidewalk. Is it possible to do this job completely by myself? What are the most important steps I need to follow? What are the biggest pitfalls to avoid? I am industrious, so I am convinced this job is not too hard to do. Mary Ann L., St. Helen, MI
DEAR MARY ANN: Do not underestimate the skill set, nor the amount of hard, physical labor this job will require. If the total area of the sidewalk is not over 150 square feet, and the concrete delivery truck can be parked adjacent to the forms, I feel you can do this job.
You need to realize that concrete is very heavy, and once water is added to the sand, gravel and Portland cement at the ready-mix concrete plant, a chemical reaction starts whereby the concrete begins to get hard. You have a limited amount of time to place and finish the concrete once the ready-mix truck arrives at your home. To make matters worse, the amount of time to work with the concrete decreases as the air temperature increases. So try to do this job when air temperatures are in the 50 - 59 F range.
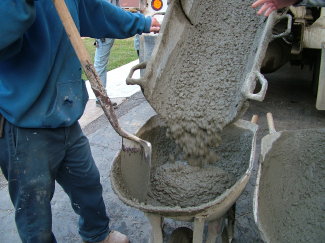
Don't put too much concrete into a wheelbarrow. See how much you can comfortably handle. PHOTO CREDIT: Tim Carter
The soil upon which you will pour the concrete must be well-drained and compact. You can use a hand-tamping tool for this task. If the soil is a thick clay, add 2 inches of small, rounded gravel to the area where you will pour the concrete. This gravel will help improve drainage.
The sidewalk should be poured at least 4 inches thick. If you increase the thickness to 5 inches, it will dramatically increase the durability of the sidewalk. Installing reinforcing steel will also significantly strengthen the concrete. Use 1/2-inch-diameter steel bars placed 2 foot on center in both directions, just like the grid in a crossword puzzle. The steel bars need to be in the center of the wet concrete. Do not allow the steel to lay on the soil or gravel and be covered with the wet concrete. It is best to suspend the gridwork of steel on small pieces of flat rock or some other solid material that allows the concrete to flow under and over the steel as you place the concrete in the forms.
Be sure to assemble all of the tools you need and check that they are in great condition. You will need a wheelbarrow, a round-point shovel, a concrete rake or traditional, hard gardening rake, several straight 2x4s, a magnesium finishing trowel, a wood hand float, a push broom with medium bristles and a jointing tool.
It is vitally important that you order the right concrete mixture. The absolute minimum standard is 4,000 pounds per square inch (psi) strength. I would recommend you consider 4,500 psi concrete delivered at a 4.5-inch slump and be sure it is air-entrained. Slump is a measurement of the amount of water added to the concrete at the ready-mix plant. The higher the slump number, the easier it is to place the concrete as it flows more like water. A 4.5-inch slump will be like working with a slightly stiff cake batter.
Do not add water to the concrete once it arrives at your home. This added water weakens the concrete because the Portland cement particles get diluted in the mix. Do not sprinkle water on the concrete as you work with it. It is a good idea to slightly dampen the soil and the gravel just before you pour the concrete. This prevents suction from pulling the water out of the concrete mix and into the soil, making it hard to place and finish the concrete.

As you place the concrete in the forms, use the concrete rake and 2x4s to smooth out the concrete, so it is flush with the top of the forms. I would start the pour at the far end of the sidewalk, away from the truck. At some point, the truck driver may be able to use his long chute to drop the concrete right into the forms. This saves back-breaking work and lots of time. Be sure you do not fill a wheelbarrow full of concrete. It can weigh hundreds of pounds, and you might drop the load or hurt yourself.
Once the concrete is poured, you must work the top of the concrete with a wood float or the magnesium float. You swirl these tools on the partially stiff concrete; this motion drives the stone aggregates down into the slab and brings the sand and cement component to the top. Ideally, you would like to have the stones about 1/4 inch below the finished surface of the concrete. You can use the push broom to create a nice, finished texture. Pull the broom lightly across the smooth concrete to get the desired look.
Concrete shrinks as it cures and hardens. It shrinks 1/16th inch for every 10 linear feet. You must create control joints at even intervals so that you do not get random cracks across the new sidewalk. These control-joint lines are installed with a tool that cuts a crisp line in the wet concrete. Run the tool along a board that crosses the forms at a 90-degree angle to keep the line straight. The depth of the cut is critical. It must be a minimum of 1/4 the thickness of the slab. At the bare minimum, your cut line should be 1-1/4-inch deep. Space these lines no more than 4 feet apart.
As soon as you are satisfied with the finish, you must apply a curing compound to the fresh concrete. This product locks in the water that was used to mix the concrete. The concrete uses this water to complete the chemical reaction that continues for many months. This hydration reaction is what allows the concrete to reach its final design strength.
Column 613
3 Responses to Pouring Concrete Sidewalks