Removing Grout
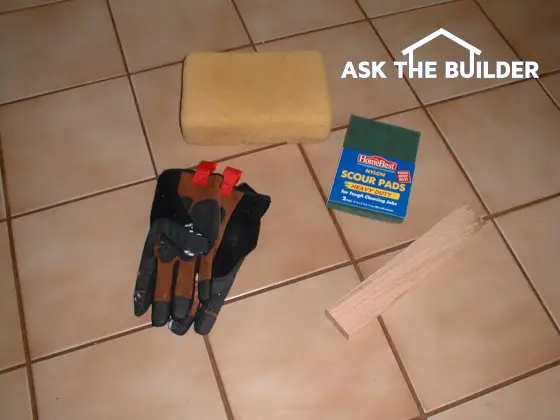
These four items will help you. The piece of wood with a fairly crisply cut ends will scrape big pieces of grout. The green scouring pad is great on grout film. The gloves and sponge will help as well.
DEAR TIM: Help! As I watched my ceramic tile floor being grouted it looked fantastic. But after the installer left and the floor dried, there was excess grout on many tiles and a haze over all of the tiles. Is the floor ruined? What can I do to make the floor look perfect? What went wrong? Is there a way to avoid this mess? Theresa B., Avon, OH
DEAR THERESA: More often than not the new tile floor can be made to look like new. But there is a chance that the floor may be ruined. Let's hope and pray the installer did not use an epoxy grout. If he did, the floor might be toast as these grouts aren't called epoxy for nothing! Epoxy grouts are fairly easy to identify before they become a problem. The installer has to mix two separate components to activate the aggressive epoxy adhesive. I would think you might have seen this happen.
The most common grout used for ceramic tile is Portland cement based. There are different types and it is not uncommon to see a fortified grout that contains an additional acrylic water activated adhesive. Liquid additives are also available that enhance standard cement grout. These additives increase the bond and wearability of the grout. They also make it a little tougher, but not impossible, to remove excess grout and the haze that are disfiguring your new floor.
The first thing to do is to respond quickly. As the clock continues to tick, the grout and additives gain strength and get harder and harder to remove. Do not attempt to remove any of the grout or film with a metal scrapper or steel wool. You can permanently scar and damage the tile surface with these tools. I prefer to use solid oak sticks that have crisp squared off edges, nylon or synthetic fiber scouring pads found at almost all grocery or ceramic tile stores, tile grout sponges and vast quantities of fresh clean water to remove the excess grout from the tile.
Use the oak sticks to scrape off excess grout from the tile surface and to remove high grout spots within a grout joint. Vacuum the loose grout as you go. If you leave this grit on the tile surface while you scrub during the next step, you run the risk of scratching the tile surface. If the crisp edges of the oak sticks become dull, simply trim the end of the stick to produce a new edge. Wearing gloves will prevent blisters and minimize the risk of getting splinters from the oak sticks.
Once the excess grout is cleaned from the surface it is time to remove the grout haze. This is accomplished by scrubbing the surface of the tile with the synthetic scouring pads. Apply a generous amount of water to the tile surface and begin to scrub. To test the effectiveness of the pad, work on just two or three tiles. The clean water should rapidly turn to the color of the grout as you scrub with the pad. Use the tile grout sponge to remove the colored water from the surface of the tile. Rinse the tile surface with clear water. Use old rags or a few paper towels to immediately dry the tiles. You should see improvement if not perfection. If so, continue cleaning the rest of the floor. There is a very good chance you will need numerous scouring pads to complete the job.
Restore the "clean" to your grout. Just go to STAIN-SOLVER to see the beautiful, quick results.
This mess could have been prevented. A professional tile setter would never have left the job in this state in the first place. Furthermore, he would have identified the type of tile he was working with before he started to grout. Some tiles are not glazed and/or have very porous surfaces. These tiles need to be sealed first or you can choose to apply a grout release agent over the tile before you grout. These grout release agents prevent stains caused by the grouting process and are a very good idea when the grout color is different from the color of the tile.
Tiles or slate that have a rough or textured surface require special precautions. It can be a nightmare to remove grout and haze after the fact. These products must be grouted with the greatest care to prevent problems. In these instances you should grout slowly and cautiously making sure that all excess grout is removed from the face of the tile or slate.
I know this is going to sound crazy, but try it. Take one gallon of warm water and dissolve a cup of sugar into it. Take this sweet solution and pour it onto excess grout on a floor. If you have wall tile with too much grout, then soak paper towels in the solution and place them on the tile.
Keep the tile wet with the sugar water for at least two hours. After this dwell time is complete, use a nylon scrub pad and scrub a small area. You should see instant results. It may take more than one application of sugar water to completely remove the grout film.
Column 390
4 Responses to Removing Grout