Tub Caulk Tips
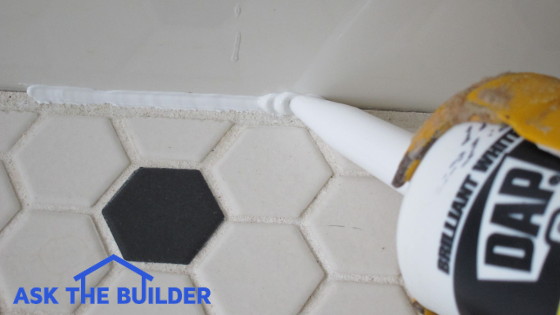
The contact point between the tub and floor tile in the bathroom is but one place you need to caulk when sealing a tub correctly. PHOTO CREDIT: Tim Carter
DEAR TIM: The caulk around my tub is pretty gross. It’s missing in places where the ceramic tile meets the tub. What’s an easy way to remove old caulk? What are the secret tips to caulking a tub? What kind of caulk should I use? Where should I caulk? What are the biggest mistakes a person makes when recaulking a tub? Lafawnduh S., Boise, ID
DEAR LAFAWNDUH: Leaks around tubs can often be traced to bad caulk jobs or missing caulk. The trouble is, many people are unaware how to properly caulk tubs. While it’s not hard to do, don’t be fooled by many of those TV shows and smiling personalities that promise you it’s so easy to do! There is some skill involved, and indeed you need to know a few secrets.
Let’s start with removing the old caulk. Using a razor knife, you should try to cut away as much of the hardened caulk as possible. The flat razor scrapers that are used by painters to remove paint from glass work pretty well for this job. Just take your time and slide the blade between the caulk and the surfaces it touches.
Make repeated light strokes with the razor knife, not one cut stroke using lots of force. If the knife slips, you can damage yourself quickly or something in the room. You want the tool under control at all times.
If the caulk is too hard to cut, it can be softened with liquid caulk removers. These work best if you soak narrow strips of paper towels in the solvent and lay them on the caulk. Then immediately cover the paper towels and caulk with a wide piece of blue painter’s tape so the solvent doesn’t evaporate. Come back the next day and the caulk should be easy to remove.
Once the old caulk is gone, then it’s time to clean the tile and tub and dry it. Use small amounts of water and the cleaner of your choice to remove any traces of dirt, soap film, grease, etc. from the tile and the tub. Use white vinegar to remove hard water deposits. All surfaces that are going to receive caulk need to be clean and dry.
Here’s one of the secrets. In some situations, water can get behind the tile and tub and soak the substrate. If this happens, it will be virtually impossible to get the new caulk to dry and cure. The water behind the wall will keep the new caulk in a semi-liquid state and when you next use the shower or tub, the caulk will wash out. I’ve seen this happen.
You can use a fan, a hair dryer, or some other blower to get the crack between the tub and the tile to dry. If left to dry without these aids, it can take a week or more! This means you’ll need to have another location to bathe and shower.
The places that need caulk are the joints where the tub and tile meet up with one another, and where the tile abuts faucets, spigots, shower arm pipes, floor tile, etc. Think about where water splashes and where you might see it outside the tub after you use it.
All these places need to be sealed so water can’t flow or seep behind walls, under floor tile or migrate to where it can cause mold and wood rot.
I like to use water-based caulks that are labeled for tub and shower use. There are general-purpose caulks, but they don’t seem to be formulated for the high-moisture environment you have in a regular home shower and tub area.
The biggest mistakes you can make while caulking a tub are failure to have the surfaces clean and dry. Remember, caulk is basically just glue. It’s sticky. It adheres to things, but if the surface is not clean, it will not bond well.
Failure to tool the caulk so it’s feathered out well at the edges is another big mistake. The caulk joint needs to be smooth. Avoid smears on the surfaces. Caulk must needs to look professional. This end result comes with practice. I suggest you actually set up two scrap pieces of ceramic tile at a 90-degree angle and practice.
Watch the video I have at my website that shows you how to tool caulk. Type: Caulking Video into the search engine at www.AsktheBuilder.com to find it quickly.
It also helps to have a fantastic caulk gun. All too often, I see homeowners use cheap inexpensive caulk guns. They squeeze the handle and the caulk blasts out of the caulk tube making a huge mess.
I’ve used for years a professional caulk gun that has a 26:1 mechanical advantage lever. I just have to gently squeeze the handle and a precise amount of caulk flows evenly from the tube. You’ll be stunned how much difference it makes in the finished product when you use a great caulk gun.
Column 909