Adding Glass to a Front Door
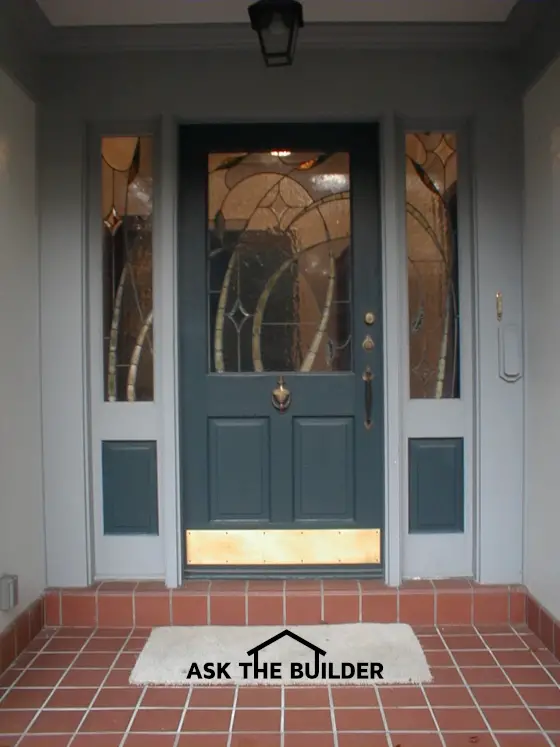
I added the stained glass panels to this door. Believe it or not, this used to be a traditional six-panel door. I completely removed the top four panels, the vertical stiles and the horizontal rail. The entire process took less than one day. I did the same with the sidelights.
Adding Glass to a Front Door
DEAR TIM: I know this sounds odd, but is it possible to remove the wood panels in a traditional solid wood six panel door and replace them with glass? There is no doubt in my mind that this would make the entrance hall in our house brighter and make the front of our home more attractive. Is it easy to do? What is the most energy efficient way to accomplish this? Ron M., New Providence, NJ
DEAR RON: If it is odd to do this, then my wife has been right about me all these years. I have performed this door surgery before on many occasions and all of the patients survived and are in excellent health! What's more, I am getting ready to install beveled glass panels in my own six panel wood front door. Not only will you add light and value to your home, but you will also get an avalanche of positive comments from friends, neighbors and anyone else who gets to see the finished product.
Keep in mind that the building code mandates that glass in doors must be tempered. This is a safety feature that prevents serious injury in the event someone thrusts their hand or arm through the glass. Tempered glass does not break into shards that slice and spear.
It is not as hard to accomplish this job as you might think. You will need a steady hand, a circular saw with a fine toothed blade, a sharp wood chisel, a hammer, a miter box, some small finish nails and a small quantity of decorative molding. Many of these tools you might already own. If not, you can rent the circular saw and purchase the others. The first thing you need to do is decide what kind of glass you are going to use. To save as much as possible on your energy bills, I suggest that you install insulated glass in place of the solid wood panels. Once this is in place you can then apply a custom made stained and/or beveled glass panel on top of the insulated glass on the interior side of the door. This decorative glass can be held in place by a decorative stop molding or it can be simply caulked in place. The decorative molding will be more dependable if the door slams shut on occasion.
The glass panels need to be made to size before you start the job. What's more, you need to make sure they are the right size before you start taking apart the door. If you remove the raised panels and then find out that the glass is the wrong size, you will have a huge mess on your hands. Be sure that there is a 1/8 inch gap between each of the four sides of each glass panel and the wood door core. Without this gap, seasonal expansion and contraction can shatter the glass.
Have you found the perfect exterior door? Make sure you install it perfectly using my Exterior Door Replacement Checklist. I offer a 100% Money Back Guarantee.
The removal of the raised panels requires that you carefully cut along the interior edge of the stiles and rails of the door that surround each raised panel. You will notice that the wood has a profiled edge as it dives down towards the raised panel. Set the circular saw cutting depth to 5/8 inch. The entire blade of the saw should be cutting inside the profiled edge of the stiles and rails. Do not allow the saw blade to cut into the flat surface areas of the door. Stop the blade at each corner and complete the cutout with the chisel. When the small profiled area is cut away you will be able to easily remove each raised panel.
Once the panels are out of the way, paint the bare wood that has now been exposed. This protective coating will prevent any wood rot that may begin from driving rains that try to get between the new glass and the wood. Apply a bead of acrylic siliconized caulk to the inside edge of the remaining profiled edge and set the glass in place. The insulated glass panel is held in place by the small wood molding. If possible, try to get one that matches the profile of the one you cut away. Use the miter box to cut the pieces to fit and fasten the moldings to the door with 3 or 4 penny finish nails. Do not drive the nails into the glass. The average door surgery lasts about three hours if there are no complications.
Tim built custom homes and did ultra-custom remodeling for 20+ years before launching his Ask the Builder media presence. He was selected as one of the Big 50 by Remodeling magazine in 1993. This award gave birth to Ask the Builder in October 1993. Tim also operates https://DrawPlumbingPlans.com. His @askthebuilder YouTube channel was the first home improvement channel on YouTube.
Absolutely love this!!! Can I ask you where you ordered your glass from? Local or online? Thanks in advance!
Awesome! Is there anywhere that you have explained this with pictures or on youtube perhaps? Thank you!