Bath Remodel Remove Mud Shower Pan
DEAR TIM: I’ve decided to do a major bathroom remodel job. One of the things that needs to be demolished is a full ceramic tile shower with a seat and a concrete mud floor. I’m feeling pretty good about removing the tile from the walls and ceiling, but I don’t know the best way to remove the tile floor and the concrete mud floor. Have you ever done this before? What’s been your weapon of choice? What tips can you offer to minimize the pain both to my body, the family and our possessions? Mark P., Tampa, FL
DEAR MARK: I’ve walked the walk. You’re about to undertake a nasty job that few look forward to. The good news is that if it’s a standard-sized shower, then you’ve only got about 10 square feet of misery to face.
I’ve demolished my fair share of these mud shower pans over the years. The most recent job I did involves one where a negligent builder and tile setter installed a full tile shower over a concrete basement floor with no waterproof membrane whatsoever. This shower also had a seat in it and the water flowing over the seat entered hairline cracks under the front lip of the seat and leaked causing all sorts of wood rot and mold.
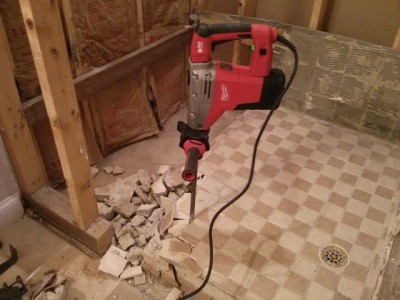
Use a handy power tool like this hammer drill / chisel and your mud shower pan floor will soon be chunks of rubble. Photo Credit: Tim Carter
If your new bathroom is going to have a new tile shower, realize that the tile needs to be place over a waterproof membrane or prefabricated shower-base system that directs all water that leaks under the tile back into the shower floor drain just as a hard china or stainless steel sink works in a bathroom or kitchen.
Don’t ever allow a contractor tell you that caulking used in conjunction with cement board or water-resistant gypsum board is sufficient to prevent leaks. There is no substitute for a waterproof membrane under the mud floor or shower seat upon which you lay the tile.
To remove your current mud floor here’s a partial list of what you may, or will, need:
- four-pound hammer
- assorted pointed masonry chisels
- work gloves, goggles, dust mask and hearing protection
- powered rotary hammer / chisel tool
- hand-pump garden sprayer
Years ago, I removed the first mud pans of my career by hand. It was mind-numbing work that was brutal. Fortunately, power tool manufacturers created tools that resemble miniature jack hammers you see road contractors use to break apart concrete slabs.
These power tools can be rented and they’ll transform the mud shower pan to small baseball-sized pieces of rubble in minutes. I prefer to use a pointed bit to start the job.
The job goes fast if you have at least one side of the shower pan exposed. In almost all cases this is not the case as you’ll discover the shower pan is boxed in by three walls and a stubby curb. If you can figure out a way to remove the curb you step over to get into the shower, the demolition of the mud floor will proceed much faster.
When you have at least on side of the mud floor exposed, start to chip about 1.5 inches away from the edge. The mud and tile will now have a place to move to. As the pounding bit drives down into the concrete slab, it pushes the chunk of concrete out to the side. If the mud pan is locked in on all four sides you can see that this movement can’t happen.
If you can’t open one or more sides, then you should start to create a hole near the shower drain. Use the garden sprayer to keep the work area wet to keep the dust to a minimum. Plug the drain hole of the shower with a rag so no cement sludge or bits of tile or concrete get into the drain system.
Once you create the hole, then you can use the same procedure as described above where you place the tool bit near the edge of the hole trying to break off small chunks with them breaking off towards the hole. When the hole gets to be about one foot in diameter, you’ll notice the work will proceed at a much faster rate.
Be very careful when first operating the power tool or even when using a hammer and chisel. When you strike ceramic tile hard, it almost always shatters and small pieces of sharp tile go flying. I’ve been cut more than once by these very sharp shards of tile. This is why safety glasses are a must and goggles are even better. A trip to the emergency room to remove a piece of tile from your eye could easily cost you over $1,000.
Don’t underestimate the ability of dust to travel through your home. This fine dust can harm people, animals and your possessions. If you can enlist a helper to keep spraying water as you work with the other tools, that’s best.
Be sure to put down drop cloths to protect nearby floors from the small pieces of grit that get produced by all this mayhem. To help motivate you, realize that jobs like this not only build muscle, they build vast amounts of character and bragging rights at the next neighborhood BBQ or party.
I think there’s even a t-shirt you can order from CafeExpress online: I Survived the Demolition of the Mud Shower Pan! If not, maybe you need to start selling them.
Column 1138
Tim built custom homes and did ultra-custom remodeling for 20+ years before launching his Ask the Builder media presence. He was selected as one of the Big 50 by Remodeling magazine in 1993. This award gave birth to Ask the Builder in October 1993. Tim also operates https://DrawPlumbingPlans.com. His @askthebuilder YouTube channel was the first home improvement channel on YouTube.