Borders for Wallpaper and Flagstone Mortar
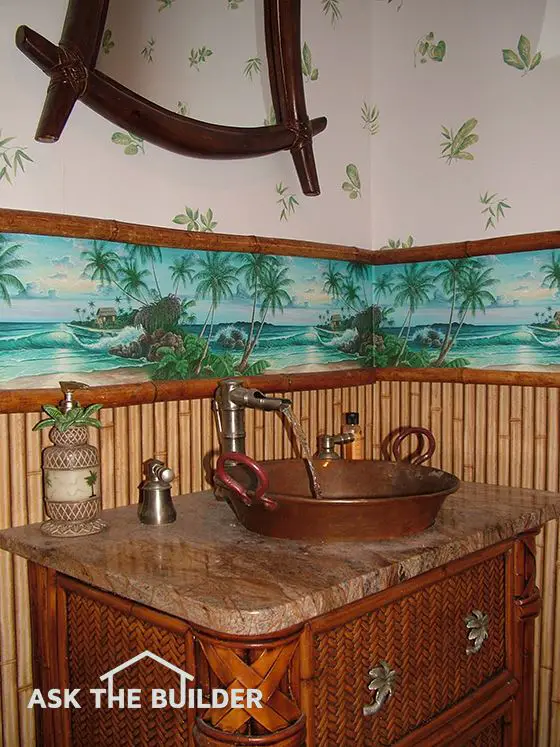
This wallpaper border with palm trees added the right touch to this powder room. (C) Copyright 2018 Tim Carter
Wallpaper Borders
QUESTION #1: Hello Tim. Trends and designs change and I’m convinced wallpaper will rise from the ashes. I’d like to start the resurgence and install some wallpaper borders in a few rooms in my home. What can you share to make this job go smoothly? Have you ever put in a border halfway up a wall? What are the biggest mistakes you can make working with wallpaper borders? Mandy P., Wheeling, WV
Mandy’s right about trends coming back, though I’m not holding my breath for the avocado kitchen appliances and the pink and gray bathroom ceramic tile! It’s important to realize that I don’t know if wallpaper borders ever really dropped out of favor. They’re an inexpensive way to add themed character and eye candy to otherwise bland painted walls.
I’ve installed countless rolls of wallpaper border in my lifetime. I was very lucky that my wife selected interesting ones that accented each room. My favorite border of all time was one that had palm trees on it in a tropical setting. I installed it about 48 inches up off the floor in a themed half bathroom.
Are Wallpaper Borders Hard To Install?
Another key point you should know is hanging giant strips of wallpaper is challenging. Some of the old comedy movies showing actors getting wrapped up in the sticky paper are not too far-fetched. Wallpaper borders, on the other hand, are very simple to work with. It’s almost impossible to goof up.
The biggest mistake you can make, in my opinion, is to ignore any written instructions that might come with the border. It’s very important to use the correct adhesive. Some borders come pre-pasted. Instead of using water to activate the adhesive, I’d suggest a clear paste activator. These inexpensive products brush or roll on with ease.
What Is Booking?
Be sure you allow the border to expand once the adhesive has been activated. Pros call this booking. This simply means you fold the back of the border onto itself so the adhesive is not exposed to the air. Allow the border to rest or expand for about ten minutes before putting it on the wall.
When Should The Wall Be Primed?
I’d highly recommend painting the wall with a special wallpaper primer a week before you install the border. These glossy paints allow you to remove the border in the future with little effort. If you apply the border to normal painted drywall, there’s a good chance you’ll rip off the facing paper of the drywall when you attempt to remove the border.
One of the biggest rookie mistakes I see is when a person wraps the border around an inside corner where two walls meet. When the border dries, it pulls away from the inside of the corner leaving an unsightly 1/4-inch gap.
You solve this problem by pressing the border into the corner very tightly. Use a sharp razor knife to make a straight cut through the border about 3/8-inch away from the inside corner. Overlap the border that was about to run across the wall just 1/4-inch over this small strip of paper that wrapped around the corner. Trust me, you’ll never see this overlap after the job is complete.
I’ve created a page on my website for you that has wallpaper border installation videos and other tips. Go to: wallpaperborders
Flagstone Mortar
QUESTION #2: Tim, winters are mild where I live. The temperature rarely drops below freezing. I’ve decided to install some traditional flagstone on a patio. I understand how to cut it and fit the pieces. I’m wondering about the best mortar to use to install it. I plan on putting the flagstone on a concrete slab that has reinforcing steel in it so it will last for a long time. Mark H., Mobile AL
Mark’s lucky. Mild weather is the best for installing flagstone or any stone or brick that you’d mortar to a concrete slab. If I could pick my conditions, I’d want to do this work on overcast days with no wind and the temperature about 55 F.
I’d recommend a mortar mix that’s rapidly becoming mythical. This happens with many techniques in the building industry. I’d use a mortar that’s got a healthy amount of hydrated lime in it.
Hydrated lime has untold benefits not the least of which is its ability to make the mortar easier to work with. Shrinkage cracks are minimized using hydrated lime. Lime has self-healing properties if small cracks develop over time.
Here’s a recipe that’s worked well for me on all my jobs:
- 15 gallons of medium sand
- 6.38 gallons of Portland cement
- 1.12 gallons of hydrated lime
Blend all of these together in a wheelbarrow until well mixed and the color is uniform. Then add enough water so the final mix resembles mashed potatoes, not runny applesauce.
I’ve got lots of FREE extra flagstone mortar tips for you at my website: flagstonemortar
Column 1273
Tim built custom homes and did ultra-custom remodeling for 20+ years before launching his Ask the Builder media presence. He was selected as one of the Big 50 by Remodeling magazine in 1993. This award gave birth to Ask the Builder in October 1993. Tim also operates https://DrawPlumbingPlans.com. His @askthebuilder YouTube channel was the first home improvement channel on YouTube.