Build a Workbench in 30 Minutes
DEAR TIM: My New Year's resolution is to start to repair things around my home. I desperately need a workbench in my garage, but have little money and skills. Can you help me build a workbench that will really serve me over the years and not break the bank? What kind of materials should I use? What tools do I need? Is it really possible for a lass like me to build a workbench just after the New Year in a couple of hours? Molly O'Sullivan, Tewksbury, MA
DEAR MOLLY: Not only is it possible to build a sturdy workbench, but you can also do it in about 30 minutes once you gather the few materials. The best part is the workbench is going to last for years and years.
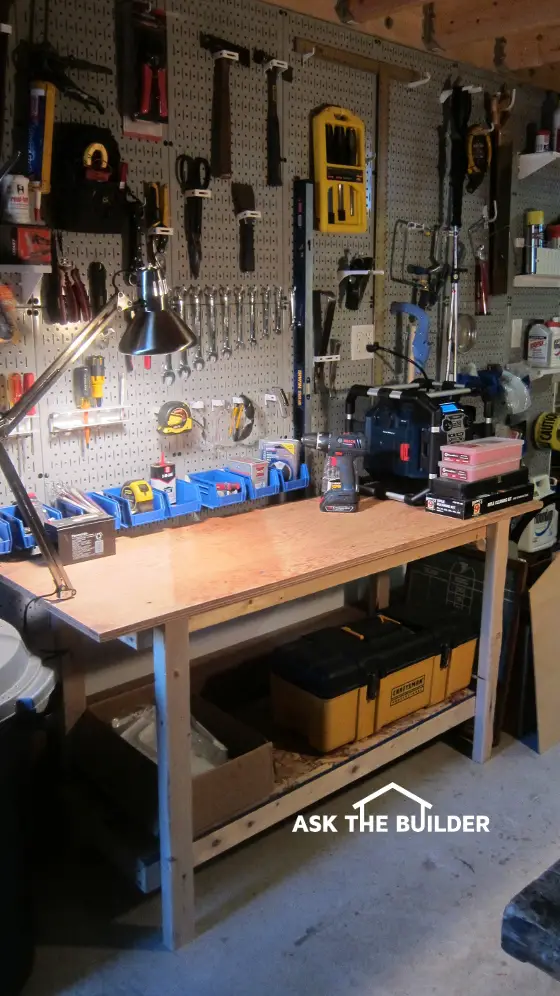
This simple, yet sturdy workbench was cut and assembled in less than 30 minutes! Photo Credit: Tim Carter
I've constructed many workbenches over the years. Some I've done for customers, but I've also built several for myself. As you might expect, there's a wide variance of opinion as to the best attributes for a workbench.
Some will say the overall size is the most important. Others will say the workbench has to be super strong. At the end of the day, it all depends on what you plan to do at the workbench. Answering that question will act as your North Star as you think about how you need to build your workbench.
My guess is that you're not going to be rebuilding large diesel engines on the workbench, so it doesn't have to be able to support thousands of pounds. If you copy the design I just concocted, I think you'll be fine.
Not too long ago, I built a cozy workbench for my own garage using just one sheet of plywood and four 2x4x8s. I also needed about forty 3-inch-long drywall screws and twelve 1and 5/8-inch drywall screws.
I decided to go back in time and just use simple power tools to construct this rough bench. My guess is you have these same tools I used: a circular saw, a drill, a framing square, a phillips screw bit to insert in your drill, a 1/8-inch drill bit for wood, a measuring tape and a straightedge or chalkline.
The depth of the workbench top is very critical if you plan to butt it against a wall that will have tools hanging on pegboard. You do not want to make the workbench any deeper than 24 inches. If you exceed that depth, you'll quickly discover it's very hard to reach things on the wall. You may want to reduce this depth to 22 inches if you're small and have short arms.
The bench I made for my garage was only 5-feet long. While that seems small, it's really plenty big for most projects. If you have the space, feel free to make yours longer.
The height of the workbench is the hardest thing to calculate. You need to determine if you plan to work at the bench sitting or standing. It makes a huge difference. I prefer to stand. Since I'm only 5 feet 8 inches tall, I've determined that workbenches that are 32 inches high are perfect for me.
Don't be fooled by the height of kitchen countertops. They're usually 36-inches high. But you rarely are working on an object 5 or 6 inches high in your kitchen. You'll discover as you work on objects on your workbench that if the workbench is too high, your shoulder will raise up to an uncomfortable height, and you'll lose leverage.
To build the base for my workbench, I simply made two boxes that measured 16 inches by 48 inches by 3.5-inches tall. These boxes work to stabilize the legs and they support the workbench top and the bottom shelf. The 2x4s used were stood up on their edges to make the boxes.
I then cut four legs at 31 and 1/4-inches long. The legs go at each corner of the boxes with the top flush with the one box and the bottom of the leg 4 inches from the bottom of the lower box. The legs are screwed to the outside of the boxes on the 4-foot face. Be sure you use the framing square to ensure the legs are square with the boxes. Install three long screws where the legs contact each box.
I prefer to use 3/4-inch fir plywood for my workbench tops. It's a little more expensive, but it's very durable. You can use oriented strand board if that's all you can afford.
If you want a really durable workbench top, you can add a layer of oak flooring to the top of the workbench. This will add more cost to the project and considerable work. I feel you'll be very happy with just the fir plywood. So far it's working out great for me.
Column 967
Tim built custom homes and did ultra-custom remodeling for 20+ years before launching his Ask the Builder media presence. He was selected as one of the Big 50 by Remodeling magazine in 1993. This award gave birth to Ask the Builder in October 1993. Tim also operates https://DrawPlumbingPlans.com. His @askthebuilder YouTube channel was the first home improvement channel on YouTube.
Hello - and Thank You for Posting this WorkBench File!
Timing is perfect - as I will be building two of them, in the near future. Especially appreciate that you have listed Height and Width suggestions 🙂
Cheers, and Please keep up the great work / help, for us all!
Bernie
I have built at least 6 workbenches with the same "basic" plan. However, I have always used a 4 x 8 sheet of 1/2" to 3/4" plywood & 1/4" hardboard for the bench top. Simply rip a 4x8 sheet of plywood, glue the 2 pieces together using a good quality wood glue to form a 24" x 96" work surface. (or whatever length you need). Dont forget to weight the plywood down while the glue is drying. Rip the hardborad & glue 1 piece of it to the plywood to form a smooth working surface. Save the 2nd piece of hardboard to "re-surface" your bench after it becomes beat up after years of use. Just glue it on to the existing hardboard top on your bench.
Oh...BTW- Dont forget to build the "base" so that the top has an overhang. You'll want to add a vise at one corner of your bench. You can also glue & screw a piece of 1 x 2 along the back edge of the bench. It can serve to prevent things from rolling off & also as a tool holder if you drill various size holes in the top. i.e, drill bits, pencils, punches. You get the idea.
John
Wow! neat work area........