Build Free Standing Tree House
Joe had noble intentions to build a dream playhouse for his son, but he made lots of critical errors. You can build a real tree house for adults to stay in with great engineering. Copyright 2020 Tim Carter
Free Standing Tree House
IMPORTANT NOTE: Be sure to CLICK or TAP HERE to listen to my podcast about this topic where I answer Joe's questions. I also have very important drawings THERE you should see.
DEAR TIM: I've built a free-standing treehouse for my 9-year-old son but I'm a novice in carpentry. I recorded a video showing my nearly finished project I’d like you to watch. I'm wondering if using 3/8-inch galvanized bolts in 4x4 posts was sufficient. I had a professional carpenter visit yesterday and he said he would not worry about it, that the structure should last twenty years. But my son means the world to me and I just want to be sure that I haven't created a death trap. Thanks for your help. Joe H., Travelers Rest, SC
The instant I read Joe’s overnight email I watched his video. I’ve got it archived on my AsktheBuilder.com website. You should watch it too because it’s filled with love and concern. But it’s also filled with serious building errors. I don’t want you to make the same mistakes Joe made when you build something for your child or grandchild. Joe's video is below.
Seconds after watching the video, I emailed Joe. Had he included a phone number, I would have dialed him up it was that important. I told Joe to STOP WORKING on the treehouse and wait for a recording I’d make to help him fix the errors. I also told Joe I’d draw up a few simple sketches illustrating what he needed to do. I used to draw these years ago sitting at a dining room or kitchen table for customers and future ones as I explained how I was going to build something for them.
Let’s run down the list of errors Joe made. The first one, in my opinion, was a lack of research before he got out his tools. I say this not knowing exactly what Joe did, but if he did do any, he either got very bad advice or if he saw great advice he failed to follow it. The Internet is overflowing with conflicting building advice and if you don’t know what’s right and what’s wrong, it’s easy for you to go down the wrong path.
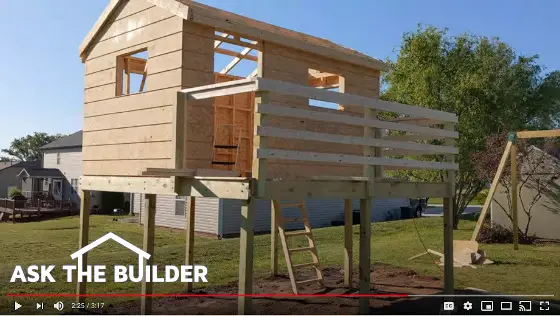
Allow me to describe what Joe built. For simplicity, he built a 12-foot by 12-foot deck in the air. The top of the platform is about 6 feet in the air and the entire structure is supported by eight 4x4 posts.
This is where all the problems started. It’s important to realize I see “professional carpenters” make this first mistake all the time. Joe bolted the outer 2x6s to the 4x4 posts. He had two 3/8-inch diameter bolts at each post. Can you imagine how much weight is bearing on these bolts? The entire surface area of the top half of the two bolts at each post only adds up to 1.17 inches times the thickness of the 2x6. Realize the actual point loading is much more severe because the surface area of bolt contact through the 2x6 is a half-circle not a flat spot like you might find on top of a post or column!
Joe should have used a notched 6x6 post so the outer 2x6 beam rests on solid wood. The weight would be directly transferred to the buried concrete piers in the ground. I suggested he fix this error by attaching a treated 2x4 to each 4x4 post. This new piece of lumber would extend from under the 2x6 down to the top of the concrete pier in the soil.
As I watched more of the video, I saw Joe had used what appeared to be galvanized drywall screws to attach the joist hangers to the outer beams. Drywall screws are not structural screws. You can purchase special structural bolts made to fasten joist hangers to beams.
Later in the video, Joe brought up how when you stand up on the deck it sways back and forth. No doubt it would! With very little effort a group of boys celebrating a victory in a mudball war with friends on the ground could get the entire structure to collapse as the legs would fold under with very little effort.
This defect can be solved with ease by installing full-length diagonal bracing on both sides of two opposing corners of the structure. A treated 2x6 could be fastened to the top of each corner 4x4 and angle down to the bottom of the center 4x4. This is how builders of structural steel buildings prevent racking. They’ll use solid steel or tensioned steel cables for the diagonal brace.
Another serious defect was Joe’s railing at the top of the deck. He took 4x4 posts, notched them, and just bolted these to the sides of the 2x6 outer beam. When you notch a piece of wood, it’s only as strong as the remaining piece of wood. In his case, he no longer had 4x4s, but a 2x4 railing. This is completely unacceptable. There are special metal connectors that are made that will exceed the minimum code requirements for deck railing safety. I showed these to Joe, and you can see a video about these just below.
There are other issues that you should know about. First, the treated lumber you purchase today has a high concentration of copper in it. This copper, when it gets wet, starts to corrode steel. All bolts, nails, screws, and metal framing connectors must be coated with the best galvanizing to prevent corrosion.
Realize that treated lumber dries out and shrinks. While building a deck or tree house you may feel things are nice and snug, but six months later there’s play in connections. Shrinkage also can cause cracking at stress points within the structure. Lastly, don’t even think of using lag bolts. These are the worst fastener. You can over tighten them and reduce holding power. Only use through bolts that have washers and nuts.
Watch Joe's and Tim's videos above, then CLICK or TAP HERE to LISTEN to Tim's advice in his Free Standing Tree House Podcast.
Column 1353
Tim built custom homes and did ultra-custom remodeling for 20+ years before launching his Ask the Builder media presence. He was selected as one of the Big 50 by Remodeling magazine in 1993. This award gave birth to Ask the Builder in October 1993. Tim also operates https://DrawPlumbingPlans.com. His @askthebuilder YouTube channel was the first home improvement channel on YouTube.
I've made all those mistakes but luckily only on a tiny deck outside my laundry room door. However, I do have a question - how do you know he used drywall screws on the joist hangers? I couldn't tell even when I paused the video (not that I'm an expert in screws either!).