Building on Rocky Land
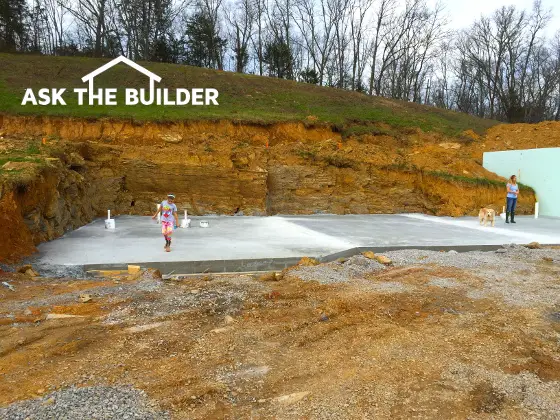
You can clearly see the bedrock in the hillside where this new home is being built. (C) Copyright 2017 Tim Carter
Building On Rocky Land TIPS
This article led to Tim doing a video conference with Ms. Chantell Mason's school classes. They had questions on building on rocky soil. Read about this amazing video conference in Tim's April 29, 2018 Newsletter.
- Groundwater moves sideways towards home
- Create a space or trench between footing and rock wall
- Waterproof foundation and use drain tile
- Top of foundation should be 18 inches above grade
- CLICK HERE to Get Tim's FREE & FUNNY Newsletter!
DEAR TIM: The lot where I’m building my new home is quite rocky. The soil cover is somewhat thin, perhaps only 3 feet deep at most.
Fortunately there’s no blasting required to dig into the rock. What are some of the challenges I’ll face dealing with this rock?
What are a few of the best practices to ensure I’ll have a dry basement for years to come? What’s the biggest mistake my builder could make and how do I prevent it? Tim J., Spring Hill, TN
DEAR TIM: Congratulations on your new home project!
Power Is In The Question
You’re asking all the right questions so far and it’s my hope all goes well throughout the entire process. My college degree is in geology and I had quite an interest in both hydrogeology and engineering geology while in school.
Free & Fast Bids
CLICK HERE to get FREE & FAST BIDS from local builders who can help you.
My Geology Degree
Hydrogeology is the study of groundwater and engineering geology focuses on how man-made structures of all types interact with soil and rock. If you’ve ever had the pleasure to fill a water jug or bottle from a natural spring, then you know that water loves to follow tilted and flat pathways within bedrock.
TNT / Dynamite
It’s not too hard to build a home when you’re dealing with rock unless you need to blast. Blasting can be quite expensive.
Two lots above my own home have never been built on because several previous owners have spent tens of thousands of dollars blasting holes in solid granite only to exhaust their budget and go bankrupt. You’re lucky that excavators can dig through your rock.
Footings On Rock Video
Watch this video to see how to put a foundation on solid rock.
Groundwater Moves Sideways
I feel the biggest thing you need to understand is rainwater penetrates topsoil and starts to head down into the ground. But depending on the subsoil makeup and depth to bedrock the water tends to begin to travel sideways or downslope along the contact zone between the soil and bedrock.
Your builder’s job is to install a fantastic foundation drainage system that collects this water as it gets close to your foundation and then channels it away from your home to a low spot on your land.
CLICK HERE to get FREE & FAST BIDS from local builders who can help you.
Create A Sluiceway
Not too long ago, I was sent a photograph where an uniformed builder poured a structural concrete basement slab directly up against the bedrock at a building site. He then placed the foundation on top of this slab.
This poor design allowed water to pool on the footing slab. Immediately ground water collected against the foundation and seeped into the basement. Be sure your builder doesn’t make this rookie mistake.
The builder should have kept the footing away from the solid rock so a trench or sluice was created that could capture and channel the water.
One Foot Rule
It’s best to place the footing of the foundation at least one foot away from the side of the excavated hole. This spacing gives you plenty of room to place a perforated drain pipe alongside the poured or cast-concrete footing.
The drain pipe is then covered with clean washed gravel that’s similar in size to a large grape.
Solid Pipe With Holes
I prefer to use the solid plastic pipe that has 1/2-inch holes drilled in it in two rows. The holes should face down and the pipe should be placed on a 2-inch-thick layer of the clean gravel.
Backfill With Gravel & Straw
This pipe should then be backfilled with the clean washed gravel that has no sand in it. The thicker this layer of gravel, the better. Before it gets covered with soil, put a thick layer of straw on it or cover it with a layer of roofing felt paper. This prevents the gravel from getting clogged with silt from the soil.
Waterproof Foundation Walls
The foundation walls need to be waterproofed, not just damproofed. Damproofing is just a spray coating of hot asphalt. It does a great job of stopping water vapor passing through the foundation walls, but if the concrete foundation cracks, the thin asphalt coating will not bridge the crack.
CLICK HERE to get FREE & FAST BIDS from local builders who can help you.
Membrane Bridges Cracks
Waterproofing foundation systems are designed to deal with foundation cracks. I used a magnificent system on my last house that was a blend of rubber and asphalt.
It was applied about 1/4-inch thick on the foundation walls and then covered with a rigid dense fiberglass panel. This fiberglass protected the rubberized asphalt from backfill damage and it channeled water directly down to the foundation drain tile.
Sharp Rocks Ruin Utilities
You need to be very careful when backfilling any trenches that contain utilities. Buried water, gas, electric, cable, etc. lines need to have a 6-inch bedding layer of sand that they lay on in the trench. Never put a utility line in a trench in direct contact with rocks.
Then once the utility lines are laid, an 18-inch protective layer of sand should cover them. Sharp rocks coming into contact with these lines can injure them and cause lots of pain and suffering.
Foundation Too Deep
Each week I’m reminded of the biggest mistake most builders make when they build. Many builders, no matter what the soil type, dig the foundation hole too deep and set the house too far into the ground.
All too often the top of the foundation is just a few inches above the grade line around the house.
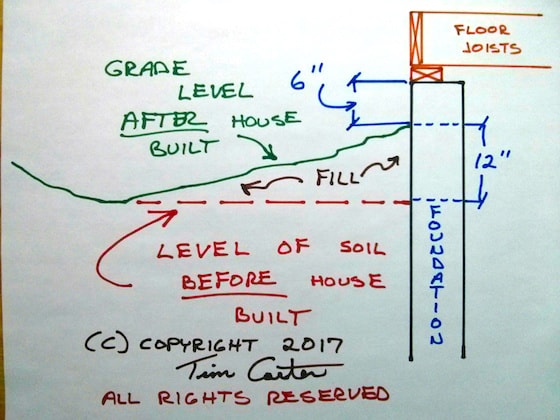
I made this drawing. You can see the foundation wall with a typical sill plate and floor joist. The red line is the lot before the excavator shows up. The top of the foundation should end up 18 inches ABOVE the red line. Use the dirt from the hole to create the slope away from the foundation. (C) Copyright 2017 Tim Carter ALL RIGHTS RESERVED
If you look at homes built around the early 1900s in many cities you’ll discover the top of the foundation was often 3 feet out of the ground! This was done for any number of reasons and it might be considered extreme today.
18 Inches
The top of the foundation should, in my opinion, be no less than 18 inches above the highest point of land within ten feet of the foundation. This allows you to have plenty of foundation above the grade line and create a good slope so water drains away from the foundation.
Email Pain
If you could read my incoming email each week you’d agree this is a primary pain point felt by many new homeowners. I see photographs each week of foundations that are only 3 or 4 inches above grade and the soil around the house is flat or slopes towards the house. No wonder these homeowners have water pouring into their basements and crawlspaces! Don’t let it happen to you.
CLICK HERE to get FREE & FAST BIDS from local builders who can help you.
Column 1208
Tim built custom homes and did ultra-custom remodeling for 20+ years before launching his Ask the Builder media presence. He was selected as one of the Big 50 by Remodeling magazine in 1993. This award gave birth to Ask the Builder in October 1993. Tim also operates https://DrawPlumbingPlans.com. His @askthebuilder YouTube channel was the first home improvement channel on YouTube.
If you are building on a lot where your foundation will be sitting partly on bedrock and partly on soil you will need to strengthen the footers to take this into consideration. Because of the bedrock you will get uneven settling and resultant cracks in the foundation. My daughters home sits partly on bedrock and partly on soil, they have V shaped cracks in the foundation because the part of the house that sits on soil has settled more than the part sitting on bedrock.
how do i tie the foundation to the rocks below
We are considering building on land with a rock ridge running through it. Our plan has been to build the house on pillars with a foundation around the perimeter to start the stone facade. Are these rocky ridges stable. Do you see any subsidence in them?
We have just bought a site. The whole site is just a solid rock. Advice me on how to build a two bedroom house and do gardening (veges and lawn)