Building Stairs
DEAR TIM: I need to rebuild a simple interior staircase. What is the simplest and easiest way to tackle this project? When you cut those deep notches in the side stringers does that weaken the staircase? Are there any products or techniques that can simplify stair construction? Tony G., Reedsburg, WI
DEAR TONY: I sure hope you paid attention in math class and have some basic carpentry and sketching skills. You are going to need all of these to successfully complete the project. Stair construction can be very challenging and confusing. It is important that you follow all safety recommendations and building code requirements. If you pay attention to detail you will be able to complete the staircase in one day. If not, you better have a ladder nearby.
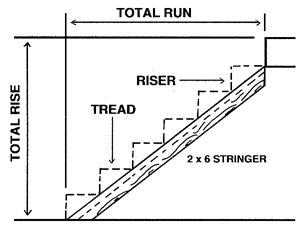
Take a notepad and make a simple cross section drawing of the existing staircase. Note the vertical distances between each step, and the vertical distance between the first and last step and each floor level. Measure the depth of each tread at the same time and record these measurements. Double check your measurements and drawing for accuracy. Note any gaps between each side stringer, and where these components touch the bottom floor and the sub-floor header.
If you are lucky, the vertical measurements between each stair tread and the depth of the treads will be consistent. Using a piece of rectangular (10 inches high by 14 inches long) cardboard you can make a stair angle guide that will allow you to recreate the top and bottom stringer cuts and the position of the treads before you remove the old staircase.
Author's Note: If you need step-by-step color photos of the stair-building process, you should consider my Stair Building eBook. This helpful guide is the answer to all of your frustration over the stair building process. Click the link and you will be amazed at what you will discover.
Place the cardboard rectangle against one side stringer with the 14 inch edge resting on one of the middle stair treads. Slide it back, so the 10 inch edge just touches the stair tread nosing above. Place a yard stick or other long straightedge on the stair tread nosings. Slide it up against the piece of cardboard. Use a pencil and trace a line on the underside of the straightedge. The result should be a triangle whose sloping leg connects one stair tread nosing with the one below. The bottom leg of the triangle will be your tread length and the vertical leg will be the riser height.
As you demolish the old staircase, make every attempt possible to salvage the side stair beams or stringers. The top and bottom angle cuts on these side stringers are the most challenging part of the project. If there were no gaps where the old ones met the floor and sub-floor header, you can use the old stringers as a template. This will save you hours of agonizing work and wasted lumber.
Trace the pattern of the old stringer onto your new side stringer. I like to use 2 x 10 or 2 x 12 lumber for strong staircases. I never cut notches in my stringers as this weakens the staircase. Cut along the traced lines and place the stringer in position. It should fit perfectly. Temporarily tack the stringer into position, so it will not fall. Starting at the top of the stringer, use your triangle template to mark the location of the top of each tread and the face of each stair tread nosing. Make adjustments, as necessary, to match your original drawing. Remember, the sloping line of the template must be parallel or in line with the edge of the stringer at all times.
There are some wonderful wood and steel products that simplify stair construction. You can purchase adjustable triangular wood blocks that screw or nail to a 2 x 6 or 2 x 8. Once applied to the stringers, you end up with the notched look but not the traditional weak staircase! These triangular wood assemblies allow you to create an infinite amount of riser and tread combinations to fit any situation.
You can also purchase simple L shaped brackets that are nailed or screwed to the side stringers. The stair treads rest on these strong metal brackets. These handy devices eliminate any need to notch the stringers or plow grooves to accept the treads. They can be found at most lumber stores that sell metal deck framing components.
Column 215
Tim built custom homes and did ultra-custom remodeling for 20+ years before launching his Ask the Builder media presence. He was selected as one of the Big 50 by Remodeling magazine in 1993. This award gave birth to Ask the Builder in October 1993. Tim also operates https://DrawPlumbingPlans.com. His @askthebuilder YouTube channel was the first home improvement channel on YouTube.
I ripped out my old carpeted staircase except for the stringers and am putting down new stained treads and painted risers. I've run into an issue as I do on every project I do in my house. The house has settled at the point of the staircase. The floor tilts left to right and so do the stringers (about 5/8" on a 4' run). Funny, I've walked up and down them for 5 years and never noticed. I could jack up the house at that point but I'm afraid I'll create more problems with cracked ceiling, walls, etc. So my question is do I simply run treads and risers on the unlevel stringers or do I put in new level stringers? My fear is that the level staircase will look at odds with the contour of the unlevel floor around the staircase. Thanks
Appreciate the info!