DIY Ceramic Tile Kitchen Backsplash
DIY Ceramic Tile Kitchen Backsplash - While it looks quite complex, it’s not as hard to install a ceramic tile kitchen backsplash as you might think. Copyright 2022 Tim Carter
DIY Ceramic Tile Kitchen Backsplash - Not Too Hard
Six months ago my son purchased a new house. He had been looking to move from his apartment for well over a year. The white-hot real estate market made it quite difficult to locate a house in his price range. Each tired and worn-out house we toured with him needed quite a bit of work and I cautioned him that if he thought it was hard to buy a house, wait until he needed to hire contractors to do most of the work to transform a house into a home.
Fortunately out of nowhere a brand-new house came on the market just a few miles from his apartment. It was built by an older builder that was on-site each day ensuring all the work was done perfectly. It was one of the best-built homes I’ve ever seen here in New Hampshire and I advised my son to stretch and purchase it. He did and six weeks later we were helping him move in.
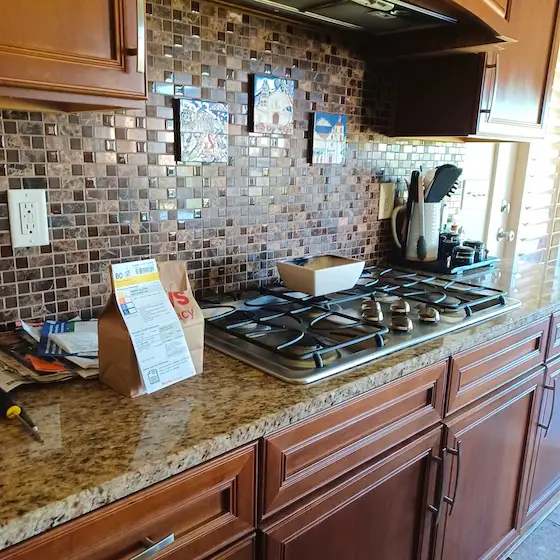
But as often happens in many new spec-built homes, the builder leaves things undone. One of them happened to be the kitchen backsplash. The kitchen has magnificent granite countertops with a 4-inch-high granite backsplash, but that’s not what my son wanted. He wanted a full backsplash that extended from the granite to the underside of the wall cabinets.
I had told him the day we looked at the house that installing a ceramic tile backsplash was a simple job. “Son, you can do it yourself with my guidance. I’m more than willing to help, but I want you to do most of the work for a host of reasons.” He knew I had helped his older sister build her home in Bar Harbor. It’s always been a dream of mine to help my kids do projects on their homes so it was now his turn.
Tile Backsplash Adds Pizazz and Jazz
Are you in the same situation? Do you want to jazz up your kitchen, make it look better, and easier to clean up around the sink and stove? Great! Let me help you install a tile backsplash just as I helped my son. Let’s get started!
The first step is to select a tile that has trim pieces. In almost all situations you need special pieces of tile that have finished edges. These pieces are required where the tile ends along a wall and doesn’t butt up against a cabinet or something else that would hide the unglazed edge of the tile.
If the tile you absolutely must have doesn’t have glazed trim pieces, you can hide the unglazed edge with a thin piece of painted wood trim, a fancy metal trim molding, or carefully formed grout that disguises the unglazed tile edge. There are hundreds of photos and images online that will inspire you as to how to deal with this small conundrum.
Basic Installation Tools
You’ll need a few tools. The size of the tile determines the size and shape of the notches in the trowel that spreads the mastic that holds the tile to the wall. Most of the time you’ll discover a v-notched 1/4 x 1/4-inch trowel will do the job. The tile manufacturer may have written instructions calling out the size of the trowel notches. You can also get amazing guidance from the Ceramic Tile Education Foundation about all aspects of installing tile.
While a diamond wet saw is what I’d use to make many cuts, it’s not practical for you to buy one for this one project. You can use a tile snapper to make most straight cuts on normal tile. Harder porcelain tiles and glass tile can’t be cut with a snapper. You may want to purchase an inexpensive 4-inch angle grinder and equip it with a dry-diamond cutting blade.
The last tool you’ll need is a rubber float to spread the tile grout. I’ve got a four-part video series on my AsktheBuilder.com website that shows you how to use this tool and how to install the grout so it never crumbles or cracks. I urge you to watch this video series.
Cut Accurately Around Electric Boxes
You need to exercise diligence when installing the tile around electric outlets and switches. The tile must extend to all the edges of the electrical box that’s in the wall. This allows the small metal frame of the outlets and switches to rest on the surface of the tile after the tile is in place. Doing this ensures the faces of the outlets and switches is flush with the top surface of the cover plates. Be sure to turn off the circuit breakers before you unscrew the outlets and switches from the electric boxes!
As you install the tile, don’t allow any of the mastic or thinset to ooze up into the spaces between the tile. If it does, remove it immediately using a toothpick or thin putty knife. This space must be kept open so grout can fill the spaces and gaps between the tiles.
If you want to ensure success do a tiny test panel. Purchase enough tile to cover a small piece of drywall that measures 18 by 24 inches. Hone your beginner skills tiling and grouting this scrap piece of drywall. You’ll be stunned by how simple it is to get professional results.
Column 1482
Tim built custom homes and did ultra-custom remodeling for 20+ years before launching his Ask the Builder media presence. He was selected as one of the Big 50 by Remodeling magazine in 1993. This award gave birth to Ask the Builder in October 1993. Tim also operates https://DrawPlumbingPlans.com. His @askthebuilder YouTube channel was the first home improvement channel on YouTube.