Little Known Deck Building Tips
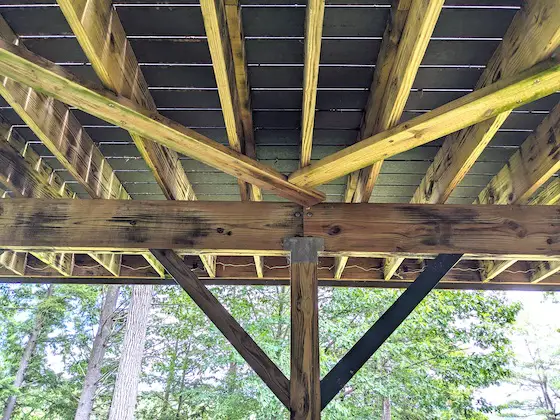
DIY Deck Building Tips | You don’t often get to see the underbelly of a deck. There are very important structural elements in this photo a DIYr might never incorporate into her/his deck. Copyright 2023 Tim Carter
DIY Deck Building Tips - Prevent Deck Collapse!
Are you about to build a deck yourself? Perhaps you’re going to hire a professional. My guess is you don’t know as much about the process as you should know. Add to the mix the cable TV shows that go on and on and on about how simple it really is.
To be honest, it’s not all that easy to build a great and safe deck. There are countless small tips that you’d probably never know about. I get it. There are lots of small tips about being a doctor, nurse, accountant, forklift driver, and countless other professions that I don’t know about. Allow me to share with you some very important things that just might ensure your new deck doesn’t collapse.
It’s important to realize that decks are not at all different than the floor in your home assuming you don’t live on a concrete slab. Unfortunately, you typically don’t get to see how a floor is framed unless you have an unfinished basement. There you can see the floor joists, possibly ancient cross-bridging, and how the joists are connected to beams and the foundation wall.
One thing most people fail to think about is that a deck is exposed to the weather whereas the floors in your house are immune from the weather if you keep doors and windows closed when it rains. The treated lumber you’re about to buy contains lots of copper. This copper is leached out each time it rains and becomes a corrosive liquid brew when it comes into contact with iron or steel that’s not protected with lots of zinc, chrome, or nickel.
In other words, all of the bolts, screws, nails, joist hangers, framing connectors, etc. that you intend to use must be of the highest quality. Poor-quality electroplated galvanized nails or screws could begin to corrode in just a few years. Double-dipped hot galvanized metal is a smart choice. Stainless steel should be on your radar if you’re building close to a saltwater marine environment. Don’t underestimate this sinister corrosion that starts the day you finish your deck and then it rains.
Think twice about allowing treated lumber to touch the ground or soil. I’ve witnessed treated lumber rated for direct burial rot and be damaged by wood-destroying insects. You want to be able to always see your treated lumber. Use high-quality galvanized post bases that elevate the deck posts up off your concrete piers.
Avoid bolting horizontal beams to the sides of deck posts. When you do this, all of the weight of the deck is concentrated on the tiny surface area of the top of the bolts. It’s far better to use 6x6 posts where you create a notch at the top of the post. The beam sits on the notch and is through bolted to the tongue of the post that extends to the top of the beam. Note I said through bolts, not lag bolts. Through bolts have machine threads and you use a large flat washer and nut to connect the pieces of wood together.
Deck post notching is easy if you use 6x6 treated posts and a builder's level. The beam that supports the deck joists will rest upon the flat area of the notch at the top of each post. Copyright 2023 Tim Carter
The floor in your home resists racking back and forth because the sheets of 3/4-inch subflooring interlock are all nailed to the floor joists. If you use composite decking as I have on my deck, the decking is not screwed to the joists except at the ends. Hidden clips hold the decking to the floor joists.
To prevent racking, you need to install diagonal bracing under the floor joists. I happened to use two 2x6s that extend from the corners of my deck and meet at the center forming a huge letter V under my deck. Where the 2x6s touch the floor joists above, I installed two massive 4-inch-long timber screws with a giant flared head. This bracing method is time-tested and has been used to make house walls stiff to resist side-to-side motion.
Be sure to apply modern tape on top of your deck joists before installing the decking. The tape minimizes water infiltration into the joists where the fasteners connect the decking to the joists. Water that enters alongside the fasteners creates larger and larger cracks over time allowing more water to enter the joist causing premature failure.
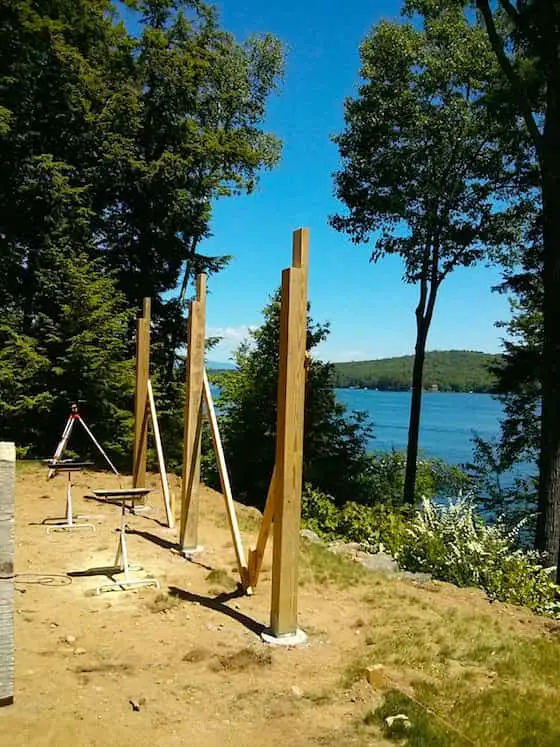
Are you struggling how to get your concrete piers in the perfect location? Here’s an old trick a fellow carpenter taught me. Purchase a few long 2x4s that you use to create the shape or outer dimension of the deck. Say your deck will be 12 x 16 feet. Nail the 2x4 lumber together, square it up, and install a few diagonal braces to keep it square. If you’re on a slight hill, install temporary legs to make the top of the 2x4 box level and in the position where your deck will eventually be. Now you can use a plumb bob or level to project down to the ground exactly where your support posts will be. Take the time to calculate where the concrete pier needs to be so the support post is centered on the pier.
If you don’t know how to square up a deck or the simple frame I just described, watch the following video. Don’t worry, your high school math teacher will not spin in her grave. She’ll actually be proud that you figured out a way around that tough algebra.
Column 1513
Tim built custom homes and did ultra-custom remodeling for 20+ years before launching his Ask the Builder media presence. He was selected as one of the Big 50 by Remodeling magazine in 1993. This award gave birth to Ask the Builder in October 1993. Tim also operates https://DrawPlumbingPlans.com. His @askthebuilder YouTube channel was the first home improvement channel on YouTube.