DIY Deck Stairs
DIY Deck Stairs | These are custom-cut stair stringers. It requires some thought and math to make them work. Photo Credit: Tim Carter
DEAR TIM: I need to build some simple outdoor steps to replace ones that fell apart and rotted, even though they were made with treated lumber. I’m fairly handy and have a decent grasp of the math but would love some tips to get professional results. I’d also like to prevent the new steps from falling apart so what can be done to ensure that doesn’t happen. Blondie C., Raleigh, NC
DEAR BLONDIE: Most weekend warriors shudder at the thought of having to build steps because it appears to be fairly complex. In reality, you just need some simple grade school math skills to master the process. As for the rot issue, there’s good news as to how to prevent or eliminate it.
Over the years, different companies have developed all sorts of products that allow you to take regular lumber and add metal brackets and connectors to simplify the construction of stairs. These are not as easy to install as they seem, but some of them are perfect for the average person. Just realize there are many many options when it comes to DIY deck stairs.
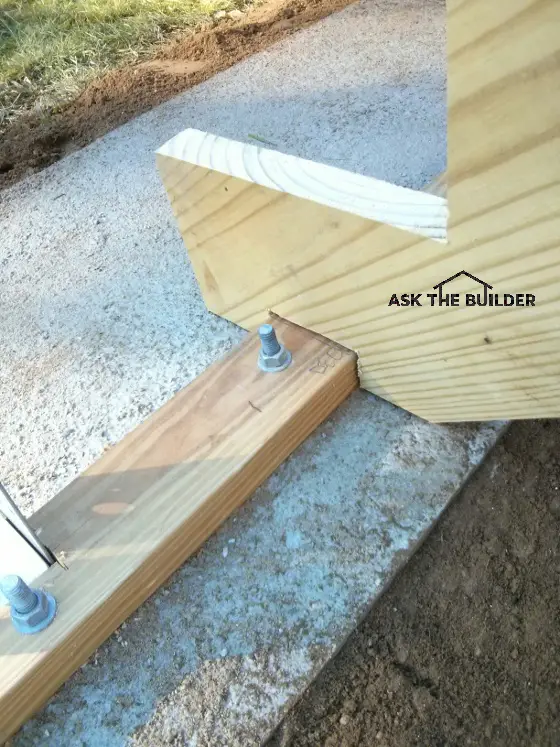
The treated lumber 2x4 bolted to the massive concrete landing pad prevents the stairs from sliding forward once you notch the base of the stringer like I did. Copyright 2017 Tim Carter ALL RIGHTS RESERVED
You can even purchase precut stringers from some lumberyards and home centers. Some old-fashioned lumberyards may even make custom-cut stair stringers for you if you provide them with certain measurements. You then assemble the parts at your home.
If you have the ability to modify the landing area where the bottom of the stairs will rest, then you can take advantage of my most valuable tip. I’ve discovered over the years, and some of this was from input from master stair builders and architects with decades of experience, that the most comfortable stairs to go up and down are ones that have 7 and 1/2-inch risers and 10-inch treads. These are also some of the safest steps to travel.
Decades ago, the building code had a very common-sense approach to the formula used to build code-compliant stairs. Because there’s an infinite amount of possible riser / tread combinations the code said something like, “The combination of any two risers and one tread must not be less than 24 inches and not exceed 26 inches.” You’ll note that the 7.5-inch riser and 10-inch tread produces the sweet spot between the two extremes coming in at 25 inches.
Realize that the wood stringers used to support the flat treads and vertical risers are the beams that support the weight of the steps and anything that travels them. Think about hauling a heavy refrigerator or piano up a set of steps. To ensure the stairs don’t collapse, it’s wise to have the stringers spaced around 12 inches on center.
This is vital if you take giant 2 x 12’s and notch them to create the flat tread area and vertical riser. When you cut away lumber to create these 90-degree cuts or notches, you transform the 2 x 12 into a 2 x 6 or less! Long sets of steps may need support mid span so they don’t feel spongy as you go up and down them.
The rot issue has perplexed many a homeowner because you’re not the first person to ask for help about this. When you take regular dimensional lumber like 2 x 12’s and cut notches into them for the treads and risers, you expose, at an angle, the tiny vertical tubes that make up the average tree.
If you were to use a microscope and look at the end of a log, you’d see thousands of tiny tubes. Imagine taking a handful of drinking straws and holding them in your hand. That’s what a tree looks like on end.
If you glued the straws together and then put them in a miter saw set at a 37-degree angle and cut them, you’d end up with enlarged openings for water to enter. This is exactly what you have on each flat space you cut for a stair tread after you cut the lumber with your saw. Water that gets under the stair tread then easily flows down the open tubes in the lumber.
Even though the lumber was treated, the treatment process may not have reached deep into all the tubes and now you’re allowing water to seep into the wood. This water promotes the growth of fungi that eat the wood fibers.
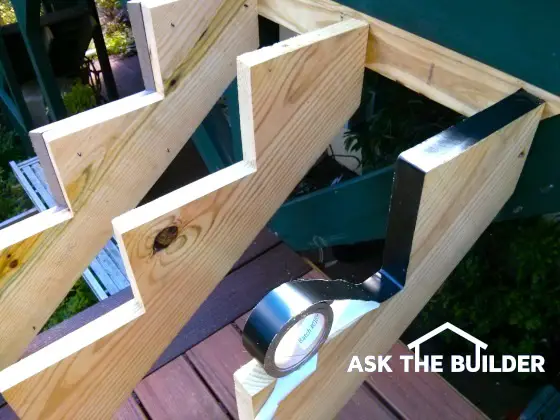
One way to stop the water from entering the wood is to cover the flat and vertical cuts with a continuous piece of joist protection tape that stops water from getting into the wood. This tape is readily available and I prefer the ones that use butyl adhesive rather than asphalt. You can purchase this tape at most traditional lumber yards and online at Amazon.com. CLICK HERE to purchase the tape I used on my own deck stairs.

If you can’t locate this tape, then you may want to apply two coats of paint to the notched cuts of your stair stringers. This paint will plug up the tiny tubes and prevent much of the water from entering the wood. Three coats of paint is better than two.
Finally, be sure to use screws instead of nails when fastening all the lumber. Nails tend to lose their holding power over time because most exterior lumber expands and contracts from the endless cycles of getting wet from rain and then drying out. This causes cracks to develop in the lumber and the cracks get wider and wider with each successive wetting.
If you did as I asked in my August 31, 2016 AsktheBuilder Announcement, this is where you landed. Thanks for clicking on the link.
Column 1159
15 Responses to DIY Deck Stairs