Do it Yourself Roofing
DEAR TIM: My husband and a friend are planning to install a new asphalt shingle roof on our home this summer. My task is to be the chief financial officer and job superintendent. I need to establish a budget for the project and uncover important installation tips. How do I calculate the cost of the project and what are the most important steps that need to be followed to eliminate roof leaks? Michelle L., East Tawas, MI
DEAR MICHELLE: You and your husband are absolutely sailing into uncharted waters. I am reminded of the clever television commercial where a bare-chested man is sitting at his kitchen table with a dinner knife in his one hand. He is on the phone with a surgeon who is telling him where to start the incision. The man at the table has a perplexed look on his face and says to the surgeon, "Shouldn't you be doing this?"
Installing asphalt shingles is not necessarily hard, although it can sometimes involve strenuous, dirty work. As with many crafts in the home building and remodeling field, there are many small steps and tricks that you must employ to ensure years of leak-free performance from your new roof. To think you will learn them all from this column is a folly. Entire books have been written on the subject and many of the ones I have reviewed have skipped very important steps.
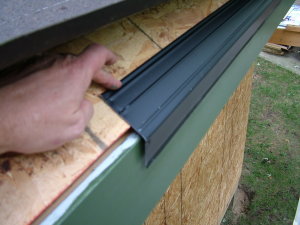
This critical drip-edge flashing is one of the first things that gets installed on top of the slanted wood roof sheathing. It is nailed directly to the bottom of the sloped roof and the roofing felt paper lays down on top of it. Note how the gutter board is already installed, painted and there is a slight gap between the flashing and the gutter board. PHOTO CREDIT: Tim Carter
Let's talk first about the financial aspects of the job. You need to create a detailed material list that will include the needed building permit, the asphalt shingles, underlayment, possible ice and wind-driven rain membranes, nails, flashing materials, drip and rake edge flashings, new or rental tools ladders, roof scaffolding, safety equipment, possible disposal costs if you are tearing off an existing roof, etc.
Roofing materials are sold by the square. One square of material covers 100 square feet of roof area. There is always a certain amount of waste, so calculate the exact square footage of what needs to be covered and add 8 to 10 percent for waste. Once you have selected the actual roofing shingles, refer to their written instructions for the exact type of approved nails. Try to locate hot-galvanized nails that are ring shanked. These have superior holding power in wood roof sheathing.
You can often get superb advice with your material list by opening your phone book. Look under the heading Roofing Supplies. You should find several companies that sell roofing materials to roofers. They typically do not advertise to consumers, but will often sell to them. They can help you make sure you are calculating all the things you will need. Take in drawings and photographs of your existing roof making sure you have all dimensions. Visit these businesses during their slow periods which are often mid-morning or mid-afternoon.
The best tips I can give you are fairly simple. Select the roofing material you are going to use and then obtain the actual written instructions from the local distributor, the manufacturer's website and/or from the package wrapping of a bundle of shingles. Read these until you absolutely understand what you are supposed to do.
Far and away the largest sources of roof leaks are flashings. Roof flashings are transitional roofing materials that connect the actual roofing material to things that are not roofing. You will find flashings where shingles touch up against walls, chimneys, plumbing vents, ventilation vents, intersection points where two different roofs touch one another, skylights, etc.
I suggest that you set up an experiment between now and this summer. I want you to build a test roof in your garage using one or possibly two sheets of plywood. Support the plywood with several 2x4s so that it is stiff just like a real roof. Create a slope by tilting and supporting the panel so you can get the feel of working on a slope.
Cover this piece of plywood with all of the materials you are going to use on your real roof. See how hard or easy it is to maintain straight lines. Try to install all of the flashing types you will have on your real roof. Your garage is the place to make mistakes, not up on the real roof when time, skill and safety are of the essence.
Be sure to be realistic about all of the costs involved in this do-it-yourself experiment. When you add up all of the costs, you may discover you are only saving several hundred dollars over the cost of a professional installation. Remember, a professional works much faster than your husband and his friend. They know all of the shortcuts and they have all of the right tools to make them highly productive.
Plan for disasters. What happens if your husband or his friend get hurt? Who will complete the job? What will that cost? What happens if the inside of your house gets wet from a leak? Will it cost more to fix that problem than what you saved on the roofing job?
Column 605
Tim built custom homes and did ultra-custom remodeling for 20+ years before launching his Ask the Builder media presence. He was selected as one of the Big 50 by Remodeling magazine in 1993. This award gave birth to Ask the Builder in October 1993. Tim also operates https://DrawPlumbingPlans.com. His @askthebuilder YouTube channel was the first home improvement channel on YouTube.