Door and Window Trim Installation Tricks
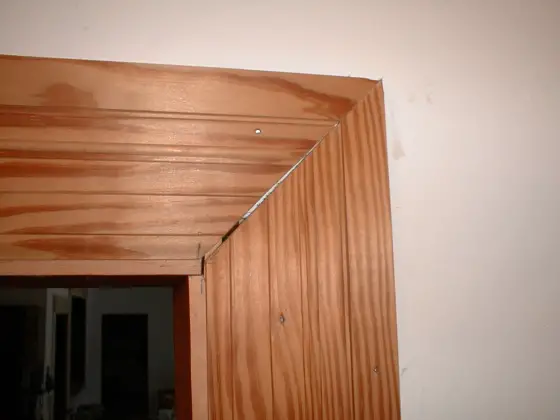
The gap in this mitered joint is unacceptable. The carpenter needed an immediate eye exam or an attitude adjustment.
Door and Window Trim Installation Tricks
DEAR TIM: I would like to install some new and different wood door and window trim. Do I need fancy tools to accomplish this? Can you share some simple tricks that will allow me to get very tight miters where two pieces of wood meet one another? What is the best way to fasten the wood trim to the walls? Cristi S., New Castle, PA
DEAR CRISTI: This is a great project to tackle. It requires a certain amount of coordination and patience, but my guess is that you have ample amounts of both. You do not need fancy and expensive tools to do the job but I must tell you that you will possibly get better and faster results if you do use them. If I could come and help you, rest assured that I would bring my 12-inch power compound miter saw, my impulse finish nail gun that shoots and countersinks finish nails with a simple squeeze of the trigger, and other miscellaneous handy tools!
If you want to use great tools and can't afford to buy them there is a very good chance you can rent them. If you have all of your work planned and all of the materials at the jobsite before you start, you can maximize the time you spend using the rented tools. The trick is to spend a few minutes practicing your miter cuts with scrap lumber or inexpensive trim that may be in the scratch and dent bin at the lumber yard. Once you have the hang of the saw, then it is time to work.
Most rookie trim carpenters have trouble with interior trim miters for several reasons. The trim stock that comes from the lumber mills is designed to lay flat in a single plane on the wall. The trouble is, most walls are not perfectly smooth and rarely are they in the same plane. For example, the window or door jamb may project just a sixteenth of an inch from the wall surface. This causes the trim molding to tilt slightly. This can cause enormous fit problems at the corners when each piece of trim is tilting a different direction!
There are all sorts of ways to solve this problem. One way is to slide thin tiny shims behind the trim at the corners so you fool it into thinking it is lying flat. The shims can be trimmed flush with the back edge of the trim and then any remaining gap between the trim and the wall surface can be caulked. This method works great for trim and wall surfaces that are painted.
But wood trim that is stained and coated with a clear finish is much less forgiving. In these instances you may need to actually carve away some of the wood on the inside face of the mitered trim joint. Once two pieces of wood trim are butted together you can't see this face. Use a sharp razor knife to whittle away the wood core at the mitered cut. Be careful that you do not cut yourself or cut into the front profiled face of the wood. The greatest amount of wood is taken away from the bottom of the trim where it touches the wall. Whittle a little away from both trim pieces that are meeting at the miter and constantly check for fit. It is always best to experiment with two one foot long pieces at just one corner to see how well this method works. Once you feel confident that you know how to adjust the pieces for fit, then start with a full sized piece of trim.
To build even more confidence, trim out the inside of a closet door first. Make your rookie mistakes where no one will see them. Do the most prominent windows and doors in your house only after you have gotten lots of practice or mastered using the tools.
When nailing by hand, you will use regular finish nails. Often a 6 penny nail will be of sufficient length to penetrate the trim and plaster or drywall and then bury itself at least 3/4 inch into solid wood framing. Stop hammering the nail when the head is about 1/8 inch away from the surface of the wood trim. At this point you will need to use a nail set to countersink the nail into the trim. Nail sets come in different diameters and the tip of the tool should always be slightly less that the diameter of the nail head. My impressive impulse nailer will fire and countersink eight nails in the time it takes you to drive and countersink one by hand. As you might imagine, I have fallen in love with that tool!
Column 343
Tim built custom homes and did ultra-custom remodeling for 20+ years before launching his Ask the Builder media presence. He was selected as one of the Big 50 by Remodeling magazine in 1993. This award gave birth to Ask the Builder in October 1993. Tim also operates https://DrawPlumbingPlans.com. His @askthebuilder YouTube channel was the first home improvement channel on YouTube.
Hi thanks for the article. I am doing window casing and have a small dilemma. I made a 45 degree miter sled for my cheapo table saw, so create perfect miters. But, the problem I noticed is that after cutting the 2 pieces, they form a perfect 90 yes, but, one piece (the miter'd angle) is longer than the miter'd angle of the other piece! This wouldn't matter much if they were boards with no profile, but there are a couple decorative profiles in the boards. This means when I line up the profiles, the tip of one of the boards protrudes by 1/8". Maybe I could file this tip off and use wood filler to make it look OK. But, I don't want to do this for every corner going forward. My sled appears to be configured 45/45, although verifying it is physically awkward so I'm not absolutely positive. Any thoughts? All I could figure is that my blades or arbor is a little bent. Thanks.
It's happening because the wood trim is different widths. Trim off the small about that's longer at the outer corner.
If you're cutting both pieces of casing the exact same angle then they should line up with no overlap. Either the angle is changing on you between cuts, or your trim is different widths (although that would be odd, seeing as most casing comes in standard widths)