Formica Repair with Tile
What is Involved?
To install ceramic tile in a countertop you first need a reason. Perhaps a hot pot scorched the surface or someone dropped a heavy frying pan that creates a large chip or ding. Deep scratches may be a good reason to consider tile.
The tile repair method is good looking and if you supply the labor, far less costly then buying and installing a new top. The supplies required to perform a ceramic tile inlay often cost less than $30.00.
The tools needed to accomplish this project are easy to acquire. Hopefully you will have a router, if not, just rent one for a few hours. You will need the following:
- A router with a straight 1/4 inch diameter carbide bit
- A framing square
- An accurate tape measure
- Hot glue gun
- Tile adhesive trowel
- Grout float
- Sponge
That is not an intimidating tool list by any means.
Get the Right Tile
When you select the tile for this repair project, look for one that is good looking and will also wear well. Try to avoid high gloss or shiny glazed tiles. These work fine on walls but not horizontal surfaces where things will slide across the tiles. You surely don't want your new tile to get scratched in a hurry. Select a flat tile or one that is designed as a floor tile. These have a special surface that resists scratches.
Also, look for tiles that look best with a 1/8 or 1/4 inch sanded grout joint. You can buy smaller 4x4 tiles that have rounded edges for this purpose. If you are lucky, you will find ones that are highly decorative. Take your time finding the tile. Visit many stores. All will have something different. Remember, you will be looking at these tiles for a while!
Border Tiles
Some tiles come with decorative border tile that actually frame a tile layout. See if you can find a tile that has these. The look is awesome.
Layout Lines
Once you have the tiles, it is time to lay them out. Obviously, you had to get a rough idea of how many to buy based upon the damaged area of the countertop. The key thing is to always work with full tile. Do whatever is necessary to make the repair area a square or a rectangle that uses full tiles. Cut tiles will stand out like a sore thumb.
Certain tiles are highly accurate in size but often some tiles can vary by as much as 1/16th inch. This may not seem like a lot, but it can make a difference if you are just using four tiles to make a square. This is why I like to use smaller tiles, even 2x2 inch tile if I can find them. The more grout lines in the repair area, the more places you can hide a small tile size defect.
Remember, a grout joint around the outer edges of the tile repair looks better. Butting tile against the top is tough to do and you will have problems at the rounded corners of the cut out.
Test Run
Once you think you know the size of your cutout, you are going to make a test cutout. This is absolutely essential as you only get one chance when you are working on your real countertop.
Get a scrap piece of plywood for this purpose. The first step is to determine the offset of the router. All routers have a plate at the bottom. When this perfectly round surface glides along a straightedge, the bit cuts a perfectly straight path a certain distance away from the straightedge. You need to figure out what this distance is.
Clamp or nail a straight piece of wood to the plywood. Mark the one edge carefully with a sharp pencil. Make a test pass with the router bit set at just 1/8 inch deep. Measure the offset. Use this dimension to expand your required opening on all four edges.
Set the router depth for 1/16th inch greater than the thickness of the tile. Proceed to make the test cutout by attaching wood strips to the plywood at your offset lines. I would actually make a box so that the router cannot travel beyond the desired cutout area.
Make your first cut all the way around the inside of the box to see if you get the desired rectangle or square. If you are successful, then just rout out an area big enough for one tile to check for the proper depth setting. If you are satisfied, then it is time to do the real thing.
Rounded Corners
The router will create rounded corners at each corner of the cutout. These are a must. I recommend a small 1/4 inch bit so that the radius of these corners is small. If you have multiple router bits you can change to a larger one to rout out the center portion of the cutout once the outer edge is created.
Waterproofing
The exposed particle board of the countertop must be protected from water. If you fail to do this, your repair area will blister and bubble in no time. Water based polyurethane works great for this. Be sure to coat the vertical sides of the cutout as well as the bottom. The sides are very important. Wipe off excess urethane from the laminate if you make a mess.
Adhesive
You can use the organic adhesive that looks like thick cake icing or cement based thinset. Thinset is better to use since it will not flex. If the repair area is large, and you set heavy pots on it, there is a remote chance tile may crack if you use the organic adhesives. The tile should set for several hours or overnight before you think about grouting.
Grout
Sanded grouts work fine if the grout line is 1/8 inch to 3/8 inch. I would never go larger than a 3/8 inch grout line. Try to go for 3/16 to 1/4 inch if possible. You can use a light colored grout with confidence. If the grout becomes stained or dirty in the future, just clean it with oxygen bleach. Oxygen bleach is color safe and can be found at www.stainsolver.com.
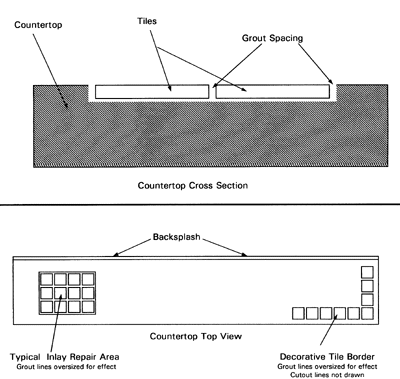
Tile Inlay Countertop Cross Section
The following illustrations should help clear up any confusion about what needs to happen to make the tile inlay work out. The most important aspect is making sure the cutout is the right size. You control the ease of this task by the tile you decide to use. Select a tile with tight grout lines and you could be in for a headache or two! The cross section below is scaled correctly for height but not for width. I have also left off the backsplash. Note the small 1/16th inch space for the adhesive under the tiles. The grout spacing needs to be the same on all four edges of each tile for the job to look right. Butting the tile against the top looks a little funny. A grout border seems to look better. Decorative tiles really are eye catching if you can find ones you like.
 |
Tim built custom homes and did ultra-custom remodeling for 20+ years before launching his Ask the Builder media presence. He was selected as one of the Big 50 by Remodeling magazine in 1993. This award gave birth to Ask the Builder in October 1993. Tim also operates https://DrawPlumbingPlans.com. His @askthebuilder YouTube channel was the first home improvement channel on YouTube.