Framing a Door in Existing Wall
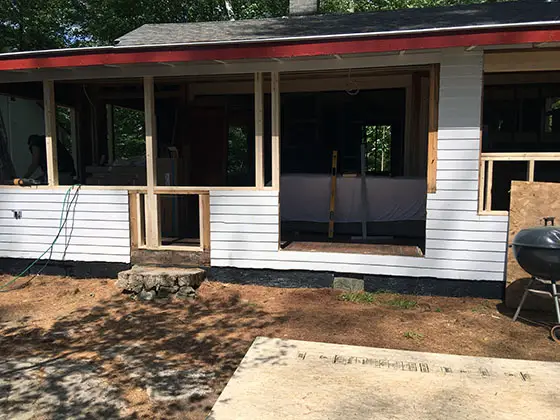
Framing a Door in Existing Wall | This summer cabin in the woods of Maine is going to become a year-round home after the extensive remodel. Photo Credit: Rick Bader
Framing a Door in Existing Wall - It Can Be Done
DEAR TIM: I own a summer cabin that’s been in my family for generations. My wife and I decided to make it our full-time home. It needs lots of work that I intend to do myself. One of the projects is relocating the front door. Is there any magic with respect to framing a door in an existing wall? What are a few of the biggest mistakes you see happen on jobs when a person installs a new front door? I’ll be using a pre-hung door made by a major manufacturer. Rick B., Bridgton, ME
DEAR RICK: I’m your next door neighbor over here in New Hampshire and within a mile of my own home here on Lake Winnisquam there must be fifty or more summer cabins that are vacant eight months out of the year. I’ll bet you and your wife will enjoy the solitude of the new home.
I looked at the excellent photo you sent to me (see above) and it appears that it’s going to be a fairly straightforward modification. The first thing that comes to mind is snow load. I see that you’ve got a fairly flat roof section over that part of the home where the new front door will be so it’s important that you have a great structural header, or beam, over the door that will transfer the roof load to the wall studs on either side of the door.
How many studs to support the head beam?
When framing a new rough opening for a door, many rookie DIYrs wonder about how many studs are required to support the header beam. If the rough opening is 6 feet or less, then you can get by with just one stud on each side of the opening next to the full-sized king studs that go from the bottom wall plate to the top wall plate.
The cut studs that the beam rests on are often called jack studs. If the rough opening is wider than 6 feet, you’ll need two jack studs on each side of the opening. When you use two jack studs on each side, 3 inches of bearing is created on the pair of jack studs for the beam.
Get the opening plumb
It’s very important that the rough opening studs are plumb in both directions and in the same plane. The pre-hung door comes from the factory square and it needs to be installed so the frame is not twisted. If you twist the door frame, the door will not seal tightly against the weatherstripping. If the rough opening is twisted because the wall studs are not plumb in both directions, side to side and front to back, you’ll end up with a twisted opening.
Be sure you create a one-half-inch gap on the two sides and the top of the door for your rough opening. You need this gap to shim the door and you don’t want the roof load touching the top of the door frame.
Be sure the opening is high enough
One of the biggest mistakes you can make is not having the top of the beam across the door not high enough off the rough floor. All too often carpenters forget about the thickness of the finished flooring.
You want the bottom of the pre-hung door threshold to be at the same level as the top of the finished flooring. This gives you plenty of room so the swinging door does not catch on a throw rug you may have on the floor in front of the door. I always cut a piece of 3/4-inch plywood and screwed that to the rough subfloor before setting my exterior doors in place. This raised them up the proper height for 95 percent of the finished floors on my jobs.
Read the installation instructions
Before you start to install the door, take a few minutes to read and fully understand the written installation instructions that come with the door. Pay attention to the types and locations of the fasteners the manufacturer says to use with the door.
Be sure you use a flashing pan under the door or fabricate your own flashing using the membrane tapes made for this purpose. Keep in mind this flashing must be installed so any water that gets under the door flows back to the outside of your home.
What method should be used to insulate the door frame?
You live where it gets quite cold, so air infiltration around and under the door is very important. Once you have the door installed, I’d use the newer expanding foams to seal out air leaks. Be sure to use the foam that’s made for doors and windows. It doesn’t expand so much as to bend and distort the door frame causing the door to bind.
I also prefer to use the newer membrane tapes on the outside of the wall to help to seal water and air leaks. The tape should stick to the exterior wall sheathing or water barrier, cross over the one-half-inch gap between the door and rough framing and then extend onto the door frame. Be sure the tape can’t be seen once the finish trim is installed around the door frame.
If your door has factory-installed brick mold trim, avoid the temptation to just let that lap over the exterior wall sheathing and then nail through the brick mold trim to hold the door in place. Long fasteners need to extend through the door frame into the rough wall framing. This is always covered in great detail in the written instructions.
Don’t do what I see happen on many of the home improvement cable TV shows. Don’t blindly batter the exterior wall with a sledge hammer to relieve your inner frustration demon. You have no idea what’s inside a wall. Remove the inner wall surface and inspect what you’re up against. My guess is you’ll probably encounter some electrical cables that have to be moved.
Lastly, when you go select the lumber you’ll use for the new opening, look for nice straight pieces. It’s best if you can look at the ends of the wall studs and beams trying to find ones where you see the center of the tree and the first rings of growth. These pieces of lumber are usually quite stable and will not warp or twist over time.
Tim built custom homes and did ultra-custom remodeling for 20+ years before launching his Ask the Builder media presence. He was selected as one of the Big 50 by Remodeling magazine in 1993. This award gave birth to Ask the Builder in October 1993. Tim also operates https://DrawPlumbingPlans.com. His @askthebuilder YouTube channel was the first home improvement channel on YouTube.
Got heavy sliding door removed converting opening for a large window. Old frame has king stud and a jack but carpenter cut the king stud to add a beam across for the new double french door on the left side of the window. In between the large window and double french door are 4 jacks holding double beams sitting on a double 2X4s. So there is no actual king studs for both. Did the carpenter done right? It makes me nervous. It has been a week that the doors and windows were temporary nailed. So far, looks ok but will it create a problem in the long run ... Please advise soonest before carpenter makes everything permanent. terribly worried.