French Door Installation Instructions
DEAR TIM: I’ve got a walkout basement garage door I want to convert to a gorgeous french door. I realize I need to shrink the size of the opening to create the correct rough opening for the new door. But that’s the extent of what I know. What other installation instructions can you give me so the door doesn’t leak and it lasts for generations? I’m doing this myself and need your expert guidance. Glenn K., Loudon, TN
DEAR GLENN: This is an ambitious, but doable, project assuming you have the correct tools. Looking at your great photo that you sent I can tell you that I only see two possible trouble areas that could stump the average serious DIYr.
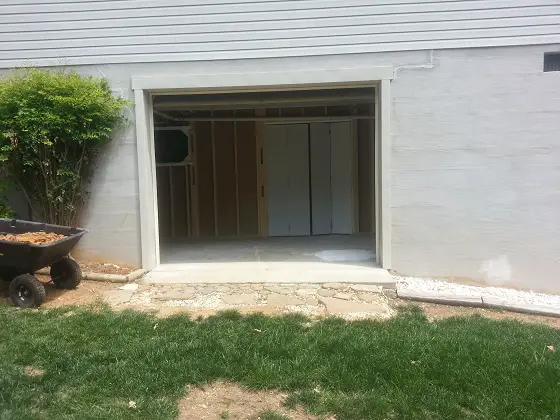
This is an open garage door the owner want to switch out for a french door. It’s not that hard to do. Photo Credit: Glenn Kanak
You’re wise to already realize that water is your enemy. Just yesterday, I did a phone consult with one of my website visitors who had a serious wood rot problem because an exterior door was not installed properly and the threshold was rotting. The wet wood also had become a nesting spot for carpenter ants.
Fortunately you’ve got a concrete slab that will be under the door, but even with that you could have serious moisture problems. One thing I can tell you is to avoid any advice where someone tells you to rely on caulk. Caulk, in my opinion based on decades of experience, should never be the primary thing to rely on to stop water infiltration.
Your water problems are along the top and bottom of the entire opening. As I look at your photo, I see that the existing trim that surrounds the garage door is laying on top of your concrete block foundation. There’s exposed concrete block above the trim extending to the siding that covers your house walls.
You’re going to have to install a large piece of continuous flashing that will cover the block and slide up under the first course of the siding. This flashing will then be bent so it covers the top of the door trim and then bends downward again to cover the top one-half inch of the door trim. You can use a piece of aluminum roll stock if you want for this flashing. You might have to hire a siding contractor to use his metal-bending brake to make this custom piece of flashing in about ten minutes.
You also need to make a decision about where you’re going to place your wall framing in the oversized opening. My guess is that you’re going to want to line up the inside of the wall framing to any wall studs or furring strips that may be on the inside of the concrete block walls.
If you align the wall with the inside and you use 2x4s or 2x6s as your wall framing, you then have additional potential water issues where the exterior of this wall contacts the concrete block wall or the wood trim that appears to be covering the block. Once again, you can’t rely on caulk to seal this contact point for 20, 30, 50 or more years no matter what the warranty on the caulk tube reads.
You may need to rely on the siding contractor with the metal-bending brake to make additional custom pieces of metal that wrap around the offset created by the thicker concrete block and then eventually laps onto your new frame wall. This metal would have to have a hemmed edge where it laps onto your new framing to prevent water from seeping sideways.
A hemmed edge on metal is where the metal makes a 180-degree bend over onto itself, but it doesn’t touch itself. The overlap on the metal should be about one-half inch and the gap between the overlay should be about 1/8 inch. Water attempting to go sideways is stopped by the overlap and is directed to go down to the ground.
All of the flashings you install need to act like the siding on your home that is above the new door or the shingles on your roof. Note how each piece of siding or each shingle overlaps the one below. When gravity pulls water down across the roof and siding this method of overlapping prevents water from entering your home.
The primary, and first, flashing that needs to be installed is a giant one that will be under the entire wall you build. This flashing needs to create a pan that collects any, and all, water and redirects it to the outside over the outside edge of the concrete slab that extends from the basement out through the garage door opening.
I’d make this flashing out of sheet lead that you can buy online. The back edge of the lead must lap up about 3/4 inch onto the bottom plate of the treated wall plate you’ll use for the wall. This flashing must extend past the inside plate by the same distance that your new door extends past the inside face of the wall. This is usually 1/2 inch. This needs to happen so the flashing just touches the inside face of the door threshold.
This base flashing is the foundation to your entire door project. It will keep water from flowing into your basement. The side wall flashings drop down into this base flashing so any water they collect can be channeled to the ground outside the concrete block foundation.
Be sure you use a weather barrier fabric or traditional felt paper to cover the wall sheathing to protect it from wood rot. Think as you build so that you do everything possible to keep water from getting to any wood framing or under it.
Column 1141
Tim built custom homes and did ultra-custom remodeling for 20+ years before launching his Ask the Builder media presence. He was selected as one of the Big 50 by Remodeling magazine in 1993. This award gave birth to Ask the Builder in October 1993. Tim also operates https://DrawPlumbingPlans.com. His @askthebuilder YouTube channel was the first home improvement channel on YouTube.