Front Porch Wood Flooring
DEAR TIM: I need to repair some rotten porch flooring boards. These are tongue and groove and interlock with one another. How in the world do I remove the boards that are in the middle of the floor without ruining the ones next to it? What can I do to treat the new lumber so it does not rot in the future? The existing floor is painted, and I love that look, so how do I make sure the new paint will not peel? Robert M., Baltimore, MD
DEAR ROBERT: Tongue and groove wood porch flooring is a classic look. You know this is true when a modern company copies the tongue and groove pattern and wood-grain texture, but makes the product using a mixture of plastic and wood fibers. The modern composite tongue and groove material looks like and installs like traditional porch flooring, but upon close inspection the trained eye can tell it is not real wood.
Before we discuss removing the rotten wood, let's talk about what caused the wood to fall apart. The cellulose component of wood is an excellent food source for any number of fungi that start to grow within the wood once water is introduced to the wood on a regular basis. The wood would be as good as new if you could have kept it dry or treated it with chemicals that are poisonous to the fungi.
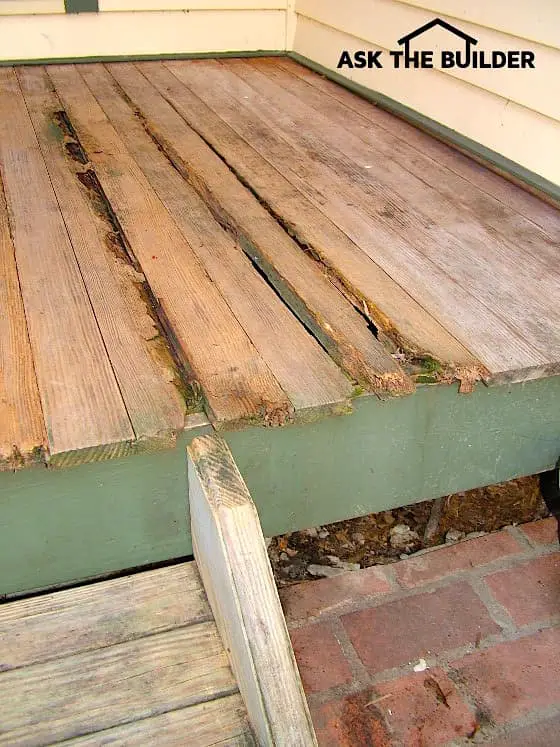
This tongue and groove porch flooring is exposed to the weather. It suffered serious rot because it was not treated with a preservative. ©2017 Tim Carter
Tongue and groove lumber is a very interesting building material. One edge of the piece of lumber has a u-shaped groove cut into it. While the shaping machine is cutting this edge, another blade is shaping the opposite edge so that it has a tongue profile. These tongue and groove edges are cut along the longest edges of a piece of lumber. When you tap a piece of lumber's tongue edge into the groove edge of another piece of lumber, the two pieces of lumber interlock as if they were one piece of lumber. This method of assembly keeps a wood floor very smooth, since each piece of flooring has to move up or down in unison with the piece of wood next to it.
Removing a damaged or rotten piece of tongue and groove flooring is not too hard, but you must take your time. The biggest mistake you can make is randomly prying up the flooring. If you do this, you will very likely crack off the top half of one of the groove edges.
The first step in the removal process is using a circular saw to make two cuts down the length of the rotten piece of lumber. These two saw-cut lines should be parallel with the tongue and groove edges, and be spaced approximately three-quarter inch away from these profiled edges. Set the saw blade depth one-sixteenth inch deeper than the thickness of the piece of lumber. Since the only place the lumber is nailed is through the tongue, this strip of wood you cut will immediately come out.
Once this center strip of wood is taken out, the groove portion of the rotten piece can be removed by tapping it sideways so it unlocks from the tongue next to it. The remaining piece of lumber requires a little bit of finesse or brute strength, whichever you choose to use.
Using a locking pliers, grab onto the remaining piece of lumber at one end and pull firmly. You will pull part of the tongue off the piece of lumber where it crosses over each floor joist below the porch flooring. After this piece of lumber is removed, the only remaining step is to remove the slivers of the tongue that are pinned in place by the nails used to fasten the original tongue and groove strip of lumber to the porch floor joists. Remove the nails carefully and the tongue slivers will pop out with ease.
Before you install the new porch flooring, soak it in a borate solution for several minutes and then let the wood dry. You make a borate solution by mixing powders that contain boron-based chemicals with water. This chemical is harmless to humans and mammals, but is poisonous to many wood-destroying fungi.
Once the wood is perfectly dry, then completely pre-paint it on all surfaces, edges and cut ends before installing it. Be sure to avoid putting excess paint in the groove and tongue edges of the lumber. Too much paint will cause a hardship as you try to slide the last piece of lumber into position. Allow the paint to dry at least one week so it cures well, and can stand the abuse of being handled during installation.
The easiest way to treat the lumber with a borate solution is to make a trough using heavy 6 mil thickness vapor-barrier plastic. Use some scrap lumber that is 1 foot longer than the lumber you are treating to make a frame to support the plastic. Set each end of the frame on a concrete block. Drape the plastic into the frame allowing it to flow onto the ground, and secure the plastic sheeting to the top of the frame using roofing nails and small strips of wood.
Add enough solution into the trough so that it is deep enough to cover as many pieces of lumber you want to treat at one time. Follow the directions on the borate-chemical package for the amount of time you need to soak the lumber. Once you remove the lumber from the solution, allow it to dry in an area where the lumber will not get wet from rainfall or any other water. Let the lumber sit for several days until it is completely dry. Failure to do this will cause the paint to peel.
Column 614
Tim built custom homes and did ultra-custom remodeling for 20+ years before launching his Ask the Builder media presence. He was selected as one of the Big 50 by Remodeling magazine in 1993. This award gave birth to Ask the Builder in October 1993. Tim also operates https://DrawPlumbingPlans.com. His @askthebuilder YouTube channel was the first home improvement channel on YouTube.