How To Build Floating Shelves
Quick Column Summary:
- Install floating crown molding shelves
- Crown molding creates void for support lumber
- Screw lumber strip to wall studs
- Place shelves over lumber cleats
DEAR TIM: I was visiting a friend’s home and saw three decorative shelves that were mysteriously floating on her wall. I couldn’t for the life of me figure out how they were held to the wall. The shelves had gorgeous crown molding under them. I’d like to replicate these shelves in my home. How do I build them, how much weight can they support and how in the world do you attach these shelves to the wall with no visible fasteners? It’s a mystery to me! Melanie D., Evansville, IN
DEAR MELANIE: It’s funny you describe your feeling about these magical floating shelves. I clearly remember my first impression of them when I saw a set many years ago as a young carpenter. Prior to seeing them, all the shelves I had ever seen had clear visible support. My eyes got as wide as silver dollars and I started to inspect them wondering how in the world the shelves connected to the wall. Even though I was an apprentice carpenter at the time, it didn’t take me long to figure it out.
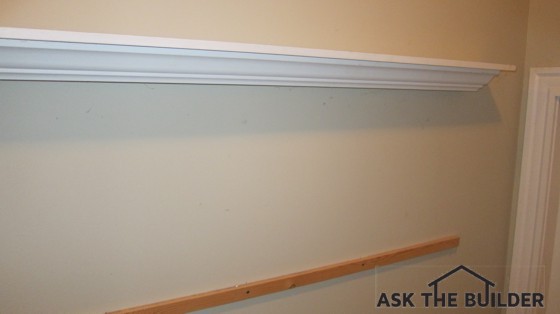
You can see a typical floating shelf and below it the secret hidden board that supports one just like it! Photo Credit: Tim Carter
There are several methods used to connect floating shelves to a wall. Some are much more difficult to use than others. Fortunately for you the shelves you saw at your friend’s house are the easiest ones to construct and support.
The floating shelves that are hard to build and install are more modern ones where a thin solid shelf sticks out from the wall at a 90-degree angle in seeming defiance of gravity. There are a number of ways those shelves are installed, but most methods incorporate carefully placed dowel rods that protrude from the walls. A set of precision holes drilled into the edge of the shelf match up to these dowels. The shelf slides onto the rods hiding them. You can imagine how hard this is to do.
Your job is far easier. In fact, if the materials were all gathered at your home, I could complete the entire task in about two hours or less. You just have to know how to cut the simple outside corner cuts for crown molding to build the bottom part of the shelf that hides a hidden strip of wood the shelf is screwed to. Here’s a link to my quick start guide that helps you cut crown molding: http://go.askthebuilder.com/
It may take you a few tries to get the crown molding angle cuts right, but once you master that, the project is caveman simple. Here’s how it all works. By incorporating crown molding into your shelves, you create a void or hollow spot behind the crown molding. Crown molding is a flat piece of lumber, but when it angles out from a wall, it creates a void space.
In this void space, a small piece of lumber that’s 3/4-inch thick and about 1 and 1/4-inch high will be screwed to the wall. This lumber strip needs to be level and it needs to be able to fit into the void space without causing the shelf to sit away from the wall. It’s very important this piece of lumber is screwed to wall studs.
The screws need to penetrate into the wall studs at least 1 inch. A 3/4-inch-thick strip of wood will do well supporting a 6-inch or less deep shelf. If you desire shelves that are deeper, your wall cleat needs to be more substantial.
The crown molding is nailed at an angle to the underside of your flat shelf material. The flat shelf with the crown molding attached rests on the flat piece of lumber screwed to the wall. You can then nail down along the back edge of the shelf into the hidden wood strip of wood to secure the shelf to the wall.
I prefer to use countersunk screws instead of nails so the shelf can be removed easily in the future. The screws can be painted to disguise them. If the shelf will be natural wood, you can use special small-head trim screws for this task.
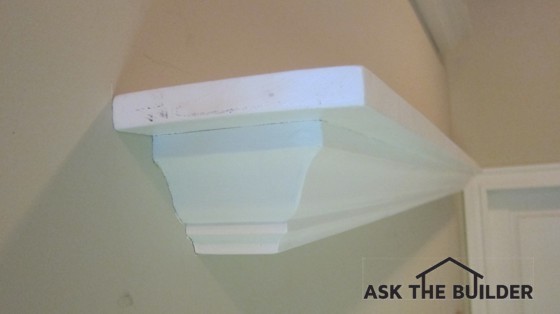
This side view of a floating shelf shows how the crown molding leans away from the wall creating a hidden cavity. Photo Credit: Tim Carter
Floating shelves can support quite a bit of weight. I would have no issues stacking heavy books on a set I would build that might be 8 or 9 inches deep. In that case, I’d use larger crown molding that would allow me to hide a 2x3 wall cleat. This large piece of framing lumber, screwed to wall studs, can support hundreds of pounds with no effort.
If you don’t feel you can handle making the crown molding cuts, you can still build similar floating shelves like you desire. You follow the same method I’ve described but you substitute straight lumber for the crown molding. You can build a hollow box under the flat shelf and apply decorative moldings to the box to add character to the floating shelf assembly. Keep in mind you have the skills to do the crown molding cuts, it just takes a little practice.
No matter what method you choose, I recommend you use glue as you fasten the crown molding pieces or the flat cuts. Nails and glue make permanent connections. Use small finish nails and countersink them. A nail gun does a great job of installing nails into trim work without damaging the decorative face of the finish lumber.
Column 1021
Tim built custom homes and did ultra-custom remodeling for 20+ years before launching his Ask the Builder media presence. He was selected as one of the Big 50 by Remodeling magazine in 1993. This award gave birth to Ask the Builder in October 1993. Tim also operates https://DrawPlumbingPlans.com. His @askthebuilder YouTube channel was the first home improvement channel on YouTube.
Great article. I actually just bought a pre-built shelf that hangs to the wall just as you described. But in case my preferred hanging location does not allow me to screw into studs (the wood strip has holes pre-drilled), will the shelf still be strong enough for books if I use drywall anchors or toggle bolt anchors? Thanks.