How to Cut a Simple Common Roof Rafter
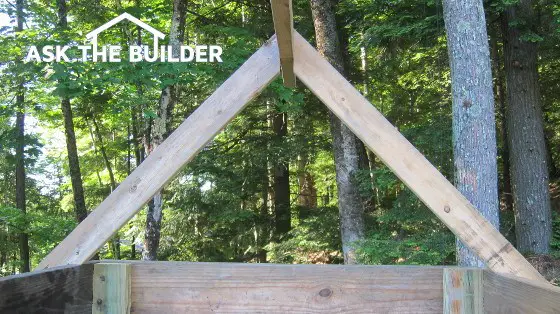
Here you see two simple roof rafters like you might find on a doghouse or a mansion. The process to create either is the same. Photo Credit: Tim Carter
Simple Common Roof Rafters
Quick Column Summary:
- How do you create a roof rafter
- You need 4 simple tools and geometry
- How to determine your roof slope
DEAR TIM: I'm now retired and starting to attack a huge list of projects. One of them is building a simple shed and I have no clue how to cut and create a simple roof rafter. I know it can't be that hard, but I'm confused. Surely you've cut your share. What's the process and do you feel a rookie, with little or no experience, can cut simple rafters to create a basic gable roof? Paul E., Canton, MI
DEAR PAUL: Congratulations on your retirement and deciding to stay active. Based on the emails I receive, you're not alone. Many are looking forward to trading their daily job routine for work that's based on personal passion about things they've been putting off.
You're correct about me cutting my share of roof rafters. Roof framing is one of the aspects of construction I savored as a builder and carpenter. Plumbing was a close second as I'm also a master plumber. But that's a story for another day.
The good news is not only can you cut a simple common roof rafter, but you can also, with minimal guidance, cut hip and valley rafters along with all the jack rafters that connect to them. You know what one of my retirement projects is? I want to create a detailed video series showing how to do all of this.
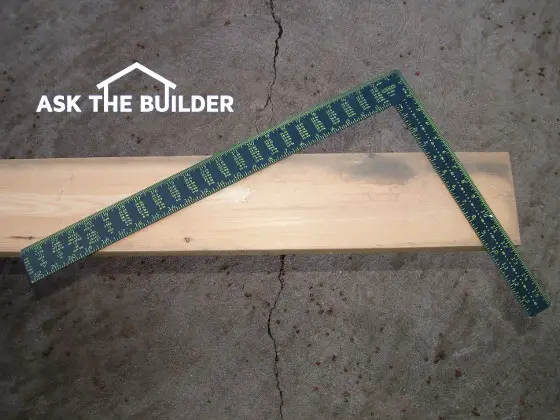
This framing square creates the plumb-and-heel-cut lines. Right now it is set for a 6 / 12 pitch cut. The line on the right will be the plumb cut and the longer line on the left is the heel cut that rests on top of the wall. PHOTO CREDIT: Tim Carter
Here's what you need to know about cutting a simple roof rafter. All you need is a framing square, a tape measure, a pencil and a saw. That's it. It will also help you if you recall some of the basic geometry you hopefully learned in high school.
A roof rafter on a doghouse or a mansion is just the hypotenuse of a right triangle. Draw a simple line drawing of a roof and you'll see that the standard gable roof is just two right triangles that appear as a mirror image to one another.
If you look at a standard carpenter's framing square, you'll quickly see you have two of the legs of the triangle in that tool. It's the two legs of a right triangle that form the 90-degree angle. The third leg, the sloping hypotenuse, can be created by just connecting two of the numbers on either leg of the framing square. That's the magic of creating a roof rafter in it's most basic form.
Common roof rafters are designated by identifying the rise of the roof per foot of run. You may hear a carpenter say, “Your house has a 4 / 12 roof.” What he's saying is the roof on your house rises 4 inches for every 12 inches of horizontal run.
If you lay a framing square on a table and look at the numbers on the outside edge, you'll see they start counting out from the corner. What your carpenter would do is go up the narrow leg of the framing square to 4 inches and go out on the fatter leg 12 inches. If you lay a straight edge between these two points on the framing square, you'll create the sloped part of the triangle.
The first thing you need to do is determine your roof slope. How many inches of rise will your roof have per 12 inches of run? You might want to match the slope of your house roof, or you can go with a 4 / 12 roof slope as that will shed water but it's not so steep as to be hard to work on.
The next thing you need to do is determine the width of the shed. You need this measurement because half of it will be the base of your big triangle. Let's say you're going to have a shed that's 10 feet wide and you've decided to go with a slope of 4 / 12. This means your simple line drawing of your roof will show the peak of the triangle to be 20 inches above the top of the walls. That's because for each foot of horizontal run from the outside of the shed wall, the roof climbed 4 inches. Five times four equals twenty.
In reality, the peak of your roof will be probably 23 inches above the actual top of the walls. This happens because you have to have a heel above the notch you cut in the base of the simple rafter where it sits on top of the wall. Most rafters extend down past the edge of the exterior wall creating an overhang. Roof overhangs are good things because they keep rain water from the sides of the building.
Heel heights vary with the size of the roof rafter, the width of the wall and the size of the birdsmouth cut you make in the rafter so the rafter sits flat on the wall. This is the part of the job that will confound you.
When you lay your framing square on the lumber that you'll use for your roof rafter, all you have to do is use the outside edges of the framing square and align the roof slope numbers you've decided to use starting at one end of the piece of lumber. You'll notice the narrow leg of the framing square makes an angled line across the lumber. Draw that line with a pencil. That will become your plumb cut up at the top of the rafter where it touches the opposing rafter or a center ridge board.
Before you move the framing square, make a pencil line across the lumber along the bottom edge of the fatter leg of the framing square. Slide the framing square down the lumber and align the narrow leg on this mark and repeat the marking process so you create a cascade of small triangles that represent your roof slope. If your shed will be ten feed wide, you'll end up with five of these triangles and sets of marks as you march down the piece of lumber.
Column 1045
Tim built custom homes and did ultra-custom remodeling for 20+ years before launching his Ask the Builder media presence. He was selected as one of the Big 50 by Remodeling magazine in 1993. This award gave birth to Ask the Builder in October 1993. Tim also operates https://DrawPlumbingPlans.com. His @askthebuilder YouTube channel was the first home improvement channel on YouTube.