How To Disguise a Hump in a Wall or Ceiling
DEAR TIM: Either the carpenters that built my home were drunk or worse, or the drywall finisher was an amateur. I have this very obvious hump on a wall as well as my ceiling. The wall feels smooth as you run your hand across it, but in certain light, especially at night, the hump stands out like a sore thumb. What, if anything, can be done about it? Is there an easy fix, or do I have to take the drywall off and adjust the framing? What could have been done to prevent the hump? Scott K., Richmond, VA
DEAR SCOTT: The drywall hump pain you feel is a widespread problem. I know many suffer from it. I've been to parties at homes and have seen the ridges in walls and ceilings that you have at your own home.
You've pretty much identified the culprits in the crime. Much of the blame falls upon the rough carpenters, although it's possible a wall stud could have bowed or twisted after it was installed. I've seen that on rare occasions. Today's framing lumber is not as straight as lumber that was available even forty years ago.
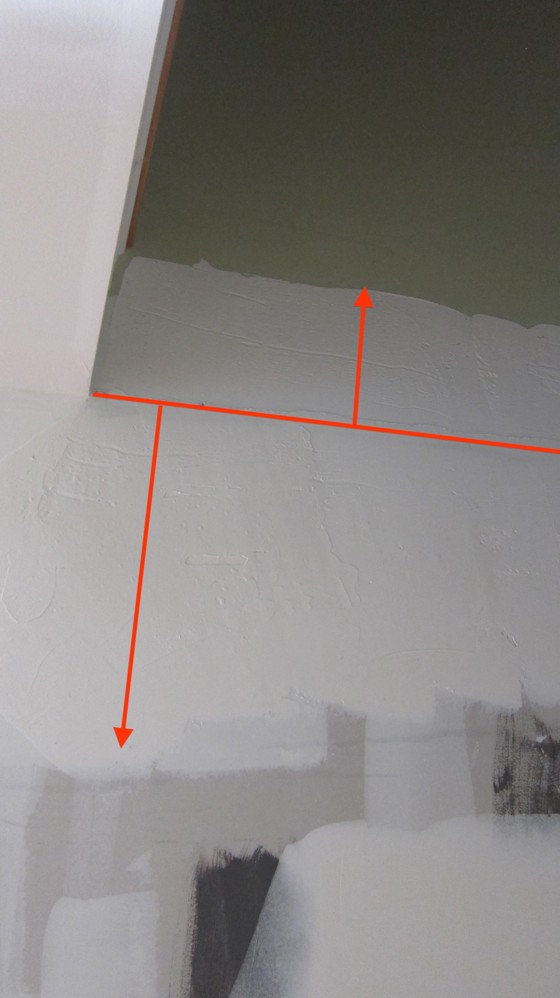
The slanted line runs along the high point of a hump in the wall. The shorter lines with arrow heads show the wide areas of joint compound added to hide the hump. Photo Credit: Tim Carter
The drywall hangers, not the finishers, might also share blame. Usually humps like this are somewhat obvious in the rough framing and the addition of thin pieces of wood to adjacent studs or joists can minimize the problem. The thin pieces of wood help put all the faces of the framing lumber in the same plane. The drywall hangers could have quickly added these.
You can identify humps in the rough framing by placing a long metal straightedge across the framing members at a 90-degree angle to the run of the framing members. In other words, on a standard 8-foot-tall wall, I would place the straightedge horizontally across the wall studs about 4 feet off the floor and see if the straightedge rocked or if there were void spaces where the straightedge was not touching a stud.
Ideally you want all surfaces of all wall studs or ceiling joists to be in the same plane. You can do this easily using metal studs and joists. These framing members, by default, are usually perfectly straight. Engineered-wood studs are also straight. Traditional framing lumber cut from trees can easily twist and have bows in it that contribute to the hump problem.
It's very possible you can disguise the problem now without having to rip off any drywall. I would recommend you purchase a simple 4-foot long metal straightedge. Most hardware stores sell these. They look just like a long ruler.
The straightedge is very flexible when you put pressure on its flat surface, but when it's on the thin edge, you can't bend it at all. You place one end of this thin edge on the center of the hump and the other end just extends out from the hump at 90 degrees along the wall or ceiling.
You should see a hollow spot or void space under the straight edge. If you fill this area with joint compound the hump should disappear, even though the wall surface will not be in the same plane.
The reason you see the hump now is the drywall finisher used an 8 or 10-inch broad knife to add and smooth the finishing compound in this area. He may have tried to extend the wet joint compound further, but I doubt he went out 4 feet from the center of the hump.
The farther you extend the joint compound from the center of the hump on each side of the hump, the less obvious the hump will be. Many years ago real plasterers did this same exercise when they added plaster to the wood lath strips on a wall. They would use a long 6-foot or longer straight rod to smooth out the sand or brown coat that was underneath the finish lime or white coat of plaster.
I've taken apart old plaster walls where the brown coat was very thick in some places and quite thin in others. The master plasterers created the illusion the wall was all in the same plane by just altering the amount of plaster that covered certain parts of the wall.
Your task now is to add joint compound to the wall or ceiling and use your straightedge on it's edge like the plasterers of old used their rod. Your goal is to have the straightedge ride along the center of the hump and slowly and carefully pull it across the wet joint compound. It's messy, but the process fills in the void spots on either side of the hump.
The joint compound will not be smooth as you do this. Don't worry about that. Once it dries you can sand it and use a standard broad knife to fill in any imperfections.
The biggest mistake you can make while doing this is allowing your straightedge to tilt as you pull it across the wall. If this happens, the metal will bend and you'll pull out joint compound that's supposed to stay on the wall.
Column 1002
Tim built custom homes and did ultra-custom remodeling for 20+ years before launching his Ask the Builder media presence. He was selected as one of the Big 50 by Remodeling magazine in 1993. This award gave birth to Ask the Builder in October 1993. Tim also operates https://DrawPlumbingPlans.com. His @askthebuilder YouTube channel was the first home improvement channel on YouTube.