How To Install Shingles
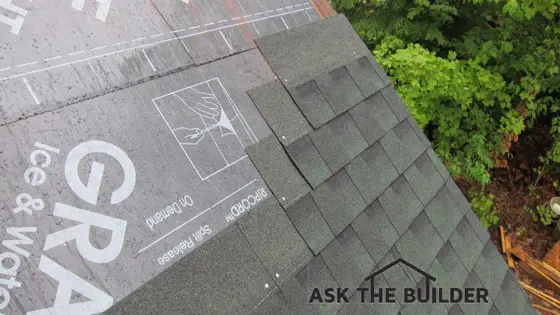
This is a small but steep roof. The staggered offset for each row is exactly what the instructions say to do. Photo Credit: Tim Carter
DEAR TIM: Money is really tight, I have a small house and it needs a new roof. I simply can't afford to hire a roofer. My house has shingles on it now and I can walk on it with little difficulty. I've never installed roof shingles before, but now I need to. What will be my biggest challenges? Luckily there's only one plumbing pipe sticking through the roof. The rest of the roof is just shingles. Can I successfully install a new leak-free shingle roof myself? Andy M., Shawnee, OK
DEAR ANDY: The good news is that you absolutely can install a new asphalt shingle roof. What's more, you can probably do it completely by yourself, and it will be leak-free. Your biggest challenge will be the physical aspect of the job. It's hard work under the best conditions. It's unbearable work if you have to do it in blistering hot conditions or in the middle of winter.
The first thing to do is to decide on the shingles you'll use and obtain the written instructions from the manufacturer. It's never been easier to do this with the Internet. Just about every manufacturer has downloadable instructions for each of the shingle products they make. Just days ago, I downloaded a set of instructions for a specialty shingle I was installing on one of my projects.
Pay close attention to what the manufacturer has to say about installing the shingles on top of an existing roof. Talk with your building inspector and see what the code restrictions are in your town. If you're allowed to add your new shingles on top of your existing roof, you'll save an enormous amount of labor. Stripping off an old roof is mind-numbing brutal work.
If you have to remove your existing roof, get a great pair of gloves and wear them. Start at the top of the roof and remove any cap shingles at the peak of the roof. Use a flat spade shovel as a lever under the shingles. Special shingle removal tools are made for this purpose They have aggressive teeth that help lift the shingles away from the roofing nails.
Be sure you have a contingency plan in place. Don't strip off the entire roof leaving it exposed to the weather as a storm or pop-up rain shower could show up at your house and you'll have a real mess. It's possible to strip just half of one side of a roof from top to bottom and re-roof just that section. I did this years ago on the second house I owned. You can also purchase a large tarp to cover the house, but these have been known to blow away if not secured well.
The process of installing the shingles is not hard. Pay attention to the instructions and install the correct underlayment and any required starter shingles. In the old days, felt paper was the underlayment of choice. Now there are large rolls of underlayment and specialized underlayments that prevent roof leaks caused by ice dams and wind-blown rain. Traditional roofing felt paper works just fine as an underlayment. It's got a fantastic track record stretching back well over 100 years.
I strongly suggest you use metal drip edge at the bottom and along the sides of the roof. This product is affordable and when installed correctly it will really help keep you dry. If you use traditional felt underlayment, the metal drip edge goes on the wood roof sheathing first at the bottom of the roof. You then install the underlayment on top of the metal drip edge and over to the sides of the roof. The metal drip edge on the sloped sides of the roof goes on top of the underlayment. This method helps keep wind-blown rain from getting under the underlayment in fierce wind storms.
You need to chalk lines to keep the shingles running straight both horizontally and vertically. The written instructions will show you how to create the needed offset for each successive row as you march up the roof. This offset is mission critical. This is what keeps water from leaking into your home where two shingles meet.
Pay very close attention to the nailing location and the pattern in the instructions. Use the correct length nail as called out in the instructions. Do NOT listen to advice from friends, store clerks, etc. about what to do. The written instructions are your North Star. Remember, if there's a problem with the roof down the road, the warranty depends on you doing everything as stated in the instructions. Don't take shortcuts.
Cutting and fitting shingles around plumbing vents, roof vents, chimneys, etc. is an art and a science. If done wrong, you will have a leak; of that there is no doubt. If you currently don't have a leak at your plumbing vent pipe, take numerous photos of how the shingles are installed under and around it as you remove the existing roof. Peel back one layer of shingles at a time from the top down and snap photos to see how the roofer before you cut and fit the shingles.
You'll discover that as the shingles come up the roof, some of them go under the flashing boot around the plumbing pipe. Then the shingles start to cover the flashing. Try to avoid exposed nails if possible. If you do have to hammer in nails in the lower corners of the exposed flashing to keep it tight to the shingles, put a dab of roofing cement on top of the nail or an approved caulk.
You can watch numerous roof videos that contain secret tips at www.AsktheBuilder.com. Simply type "roof video" into the search engine at www.AsktheBuilder.com.
Column 948
 |
 |
The above product links are affiliate links. I get a tiny commission if you purchase these from Amazon.
Tim built custom homes and did ultra-custom remodeling for 20+ years before launching his Ask the Builder media presence. He was selected as one of the Big 50 by Remodeling magazine in 1993. This award gave birth to Ask the Builder in October 1993. Tim also operates https://DrawPlumbingPlans.com. His @askthebuilder YouTube channel was the first home improvement channel on YouTube.