How to Replace a Broken Floor Tile
DEAR TIM: I've got numerous cracked ceramic floor tiles and my wife wants them replaced. I'm very lucky in that the builder and previous owner left extra tile for just this reason I suppose. I've never done this before and feel like a lost ball in the high weeds. Can you guide me through the entire process including the grouting so it looks like a pro did it? I'll be forever indebted to you and maybe my wife will bake you a pie. Corey C., Sun Valley, CA
DEAR MARK: Hmmmm, a pie's in this deal? I'm all over that. I realize it's rude to put in a request, but I'm dying to have a succulent pecan pie. Let's talk tile now.
Removing and replacing a single ceramic floor tile is not too hard depending on how it was installed. If it's a tile that's in a 100-plus-year-old house that was set in a mortar bed, it's going to be like extracting a wisdom tooth from a 65-year-old man. If it's a simple floor tile that was installed in a bathroom on cement board with an organic mastic, it's going to be a breeze. It's all about how the tile was adhered to the substrate.
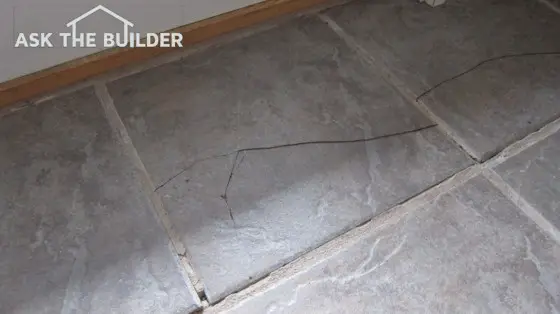
This ceramic floor tile has a big crack in it and is dangerous for those with bare feet. Photo credit: Tim Carter
The first thing I recommend when removing a floor tile is to carefully remove all the grout around the tile. This can be done with a power tool or by hand. Perhaps the best power tool to do this is a newer vibrating multi-tool that's equipped with a rounded carbide bit blade that's no wider than one-sixteenth inch. Use goggles or safety glasses, great lighting and be alert. Take your time so you do not nick or scratch the tiles adjacent to the cracked tile.
If you're going to do this by hand, you need to use a hammer and an older beat up flat-head screwdriver. You slowly and carefully chip away the grout. When done by hand, it can be mind-numbing work.
With the grout out of the way, there's now less chance that you'll damage any adjacent tile during the removal process. If the tile you want to remove is touching up against any other tiles in the floor, the initial stress of removing the tile pieces can put pressure against the adjacent tiles and possibly crack or chip them.
If the floor tile is not touching up against any other tile, you can tap the tile with a dull masonry chisel near a corner and start to crack off small pieces about the size of a dime. After you crack a piece off, do whatever is necessary to get the piece up from the floor.
Once all the tile is out, now you have to excavate the thinset mortar or organic adhesive that was used to adhere the tile to the floor. You can do this once again by hand or with a power tool. The vibrating multitool with a flatter carbide bit or tip will help you do this. If you have to do it by hand, then you might discover a stiff 1 and 1/2-inch putty knife held at a lower angle does a great job.
Once you think you have all the thinset or organic mastic out of the way, test it and see. Drop a replacement tile in place of the cracked one and use a straightedge over the tile to see if you have at least 1/8 inch of space between the entire top of the tile and the bottom of the straight edge. You want the straightedge to be resting on the adjacent tiles on all sides of the replacement tile to check for the air space. Rotate the straightedge at least 90 degrees to check for the needed gap.
I'd recommend using cement-based thinset to adhere the tile to the floor. It doesn't give once dry like organic mastic and will help to prevent future cracks. Be sure the substrate is free of all dust and loose material.
You can purchase small notched hand tools to help put down the correct amount of thinset. The size of the notches depends on the size of the tile you're installing. Go to a store that sells just tile and the manager there will make sure you have the correct tool.
When you set the tile in the new thinset, you need to make sure the entire tile is contacting the thinset and there are no gaps. This may mean you have to put the thinset on different thicknesses if the substrate is not in the same plane as the top surface of the finished tile floor. Gently drop the new tile onto the fresh thinset and lightly tap it in place so it's top surface is flush with all the adjacent tiles. Use the straightedge again to help you here.
 Allow the tile to set and cure for at least 48 hours before grouting it. Protect it so no one walks on it. You need to match the grout color perfectly. To do this, the existing floor grout needs to be clean. The best grout cleaner I've discovered is powdered oxygen bleach. You mix it with water, stir, allow the powder to dissolve and then pour it on the grout. After 30 minutes scrub, rinse and allow to dry to see the new clean grout. The grout must be dry so you can match it to the color cards if it's a colored grout.
When grouting, do not add too much water to the new grout. You want it the consistency of cake batter. When striking the joints, do not use a dripping sponge. Squeeze all the water out of the sponge when dressing the grout joint.
Don't worry about sending any whipped cream with the pecan pie. I can get that on my own. I'd love to see before and after photos of your job and one of the smile on your wife's face when she sees your expert installation!
Column 1070
Tim built custom homes and did ultra-custom remodeling for 20+ years before launching his Ask the Builder media presence. He was selected as one of the Big 50 by Remodeling magazine in 1993. This award gave birth to Ask the Builder in October 1993. Tim also operates https://DrawPlumbingPlans.com. His @askthebuilder YouTube channel was the first home improvement channel on YouTube.