If Punch List OK – Then Pay
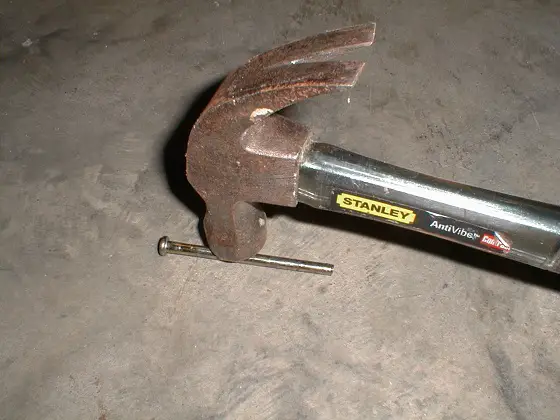
If Punch List OK - Then Pay | Strike a hinge pin just like this with a hammer and doors will stop swinging open or closed by themselves. © 2017 Tim Carter
Punch List Tips
- Finished job = Money - don't pay until complete
- Quick tips on fixing an interior door that swings closed
- WATCH DIY caulking video Below
- Quick fix for a light socket that burns out bulbs quick
- CLICK HERE to Get Tim's FREE & FUNNY Newsletter!
DEAR TIM: The builder of my new home has a punch list that is two months old. I've grown tired of waiting for him to come and make these minor adjustments. But several things need immediate attention:
1. An interior door swings closed when I want it to stay opened.
2. The joint between the tile and bathtub is open and needs caulking again.
3. A hall light fixture consumes light bulbs. I have put in three bulbs in two months.
How can I fix these things or how can I twist the arm of the builder to fix them? Frances D., Redmond WA
DEAR FRANCES: I think many builders fall down when it comes to punch lists for several reasons. First, many lose interest in the job. They need a new challenge and move onto the next home to be built. Second, they're poor business people.
Many builders fail to realize that happy customers generate new sales. Happy customers tell their friends and neighbors about great contractors who finish jobs.
Your builder's absence could be a money issue. If you've already paid the builder all money that is due, only his honor will bring him back to your doorstep. You must ALWAYS hold onto enough money to finish whatever things are not done at your home. When the builder has completed the job and you're happy, then pay him immediately.
CLICK HERE to get FREE & FAST BIDS from local handymen to handle punch lists.
Believe me, the money that's withheld is a strong incentive for the builder to finish.
Less Stress
As much as I would like to see the AWOL builder do this work, I think you can fix the three things you mention and many others on your list in the time it might take you to call the missing builder several times.
Not only will this lower your stress, but you'll also possibly achieve a level of quality equal to or greater than what the builder might produce.
Bend the Pin
The pesky door that has a mind of its own is very easy to remedy. You will need a flat-bladed screwdriver and a hammer for this task. The door is closing because its weight is overpowering the well-lubricated hinges. You solve the problem by introducing extra friction into the hinges.
Bending one or more of the hinge pins will create this needed friction. I prefer to start with the top hinge as it typically has more lateral force on it than the middle or lower hinges. Use the hammer and screwdriver to remove the hinge pin from the hinge. To insure that you do not stress the remaining hinges, fit several wood shims under the bottom of the door so it does not droop when the hinge pin is removed.
Once the hinge pin is removed, take it outdoors and lay it on a concrete surface. Using your hammer, strike the pin in the center of the shaft. This blow will create a bend in the hinge pin. Insert the bent pin into the hinge, remove the wood shims and test to see if the door closes on its own. If it does, remove another hinge pin and bend it as well. Typically you just have to bend one hinge pin to get the desired result.
CLICK HERE to get FREE & FAST BIDS from local handymen to handle punch lists.
Caulking is Easy
Caulking the tile joint at the tub is a simple chore. Buy a tube of water-based mildew-proof caulk and follow the directions on the tube. Carefully rim the tip of the tube so the hole is the same size as the crack.
Watch the following Easy DIY Caulking Tutorial VIDEO:
Apply the caulk carefully so that just a little extra caulk is left above the actual crack. Slide your finger across the fresh caulk to force it into the crack and to smooth its surface. Immediately wipe the joint with a damp sponge several times to remove any excess caulk that smeared onto the tub or the tile.
Bend the Tab
The electrical light that eats light bulbs is a common problem. The brass tab at the base of the socket has been bent down too far.
CLICK HERE to read a past column of mine that explains this issue in great detail.
This may have been a manufacturing defect or the first person who inserted the original bulb over-tightened the bulb. Electrical arcing is probably taking place between the bottom of the bulbs and the brass tab because of poor contact.
It doesn't take long before the arcing eats a hole in the bottom of the bulb. When this happens, the gas in the bulb escapes and the filament burns up rapidly.
Turn off the circuit breaker that supplies current to this fixture. Use a voltage tester to make sure the current is off.
Once you are positive there is no current, use a needle-nosed pliers to pull the tab back up. Do this carefully so as not to break the brass tab. You generally only have to pull the tab back up one quarter inch or so. When you insert a new bulb, do not over-tighten it!
CLICK HERE to get FREE & FAST BIDS from local handymen to handle punch lists.
Column 464
Tim built custom homes and did ultra-custom remodeling for 20+ years before launching his Ask the Builder media presence. He was selected as one of the Big 50 by Remodeling magazine in 1993. This award gave birth to Ask the Builder in October 1993. Tim also operates https://DrawPlumbingPlans.com. His @askthebuilder YouTube channel was the first home improvement channel on YouTube.