Install a Door in an Open Archway
DEAR TIM: I have a large opening between two rooms. This opening makes it impossible to have privacy in either room. I'd like to close up the opening and install a door. What's involved in this process? Is this a project a single mom can tackle successfully, or should I hire a professional? What are the hardest parts of the job so I can decide if I want to do this? The existing walls are just 2 x 4s covered with regular drywall. Maggie L., Fresno, CA
DEAR MAGGIE: You may be surprised with my answer. I feel it's very possible for you to do this job entirely by yourself. The hardest part of the job, in my opinion, is just the technical aspect of hanging the door. But recently I taped a series of step-by-step videos showing exactly how to do that. Believe me, no one part of the job is that hard, it's just that there are many steps you have to take from the start to the finish.
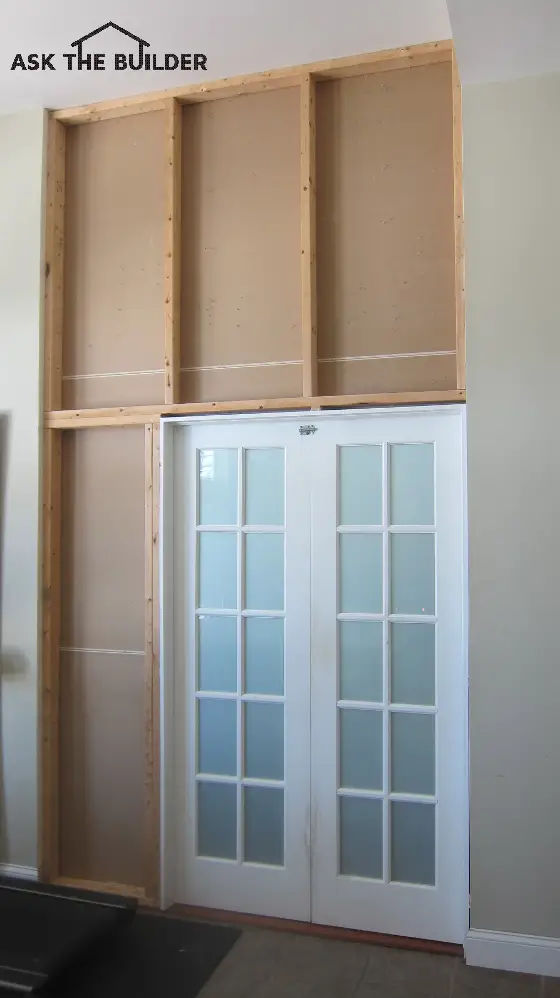
You can see the "bones" of the wall that was created to transform an open archway into a wall with a door. ©2017 Tim Carter
The good news is there's no structural work involved. Any beams that span over the archway between the two rooms have already been installed. All you need to do is fill the opening with wood studs, create the rough opening for your new door, add the drywall to cover the wall studs, install the new door and trim, and then paint.
If your existing opening has been wrapped with drywall, there's probably metal cornerbead at the corners. It's best if you remove this hidden metal from the corners. You do this with a simple metal pry bar. Remove the small piece of drywall that's been nailed to the face of each wall stud on either side of the opening. You're now ready to rough in the wall studs to close up the opening.
You'll build a wall in the opening just like a normal carpenter would. The wall should have a bottom and top plate. These are simply 2x4s that lie flat on the floor and across the top of the opening. The vertical wall studs are nailed to these plates.
When you create the rough opening for the doorway, it's best if you have the actual pre-hung door with you at your house. Make the rough opening 3/4 of an inch higher than the total height of the wood door frame. I recommend that you make the rough opening width 3/4 of an inch wider than the width of the actual door frame.
Take great care to make sure the wall studs you use are as straight as possible. This is very critical at the door opening. Select wall studs here that are perfectly straight. Be sure the rough wall is perfectly plumb.
Temporarily screw or nail the top and bottom plate into position as you check the wall for plumb. Once you feel it's plumb, you then attach strings across the rough door opening going from the four corners of the opening creating the letter X.
If the strings touch one another gently with no gap where they cross, then the rough opening is in the same plane. You need to switch the strings so one is behind the other to ensure that there is no gap at the center of the X. If there is a gap between the strings at the center of the X, that means the opening is in a helix. Correct this by making sure the studs at the door opening are indeed plumb.
Once the drywall is smooth, sanded and primed, it's time to install the door. With the rough opening plumb and in the same plane, this is easy. If you haven't already cut out the bottom plate of the wall as it passes under the rough opening of the door, do it now. You want the bottom plate of the wall to be continuous as you build the wall as it helps keep the door opening in the same plane.
I always attach the hinge jamb first to the rough opening, and then work on the lockset side of the frame. I prefer to use #8 trim screws with a small head that are 2.5 inches long driven at the door hinge locations. Shims are always put above the screws so they don't fall later.
When you ordered the door, you probably got one with a 4 and 9/16-inch-wide jamb. This is normal and allows the frame to project the smallest amount from the surface of the drywall. Be sure the frame is flush or just slightly proud of the drywall on both sides of the wall.
Be sure the gap between the door and the door frame is consistent and you'll be in great shape as you secure the door frame to the rough opening. Trimming the door is just a matter of taking accurate measurements and having a miter saw that cuts the required 45-degree angles. The miters should be this angle because the door you purchase should be perfectly square with 90-degree corners.
No one part of this remodeling project is extraordinarily hard. As with most things when it comes to building, the devil's in the details. The key thing is to ensure that the wall studs are securely fastened, the wall is straight and plumb and there's no wobble in it.
Use drywall screws to attach the drywall instead of nails. The head of the screws needs to be just below the surface of the drywall, but not so deep as to tear the facing paper.
Note: My New Door Video Series is also available on DVD. With the DVD, you can watch the videos offline.
Column 979
Tim built custom homes and did ultra-custom remodeling for 20+ years before launching his Ask the Builder media presence. He was selected as one of the Big 50 by Remodeling magazine in 1993. This award gave birth to Ask the Builder in October 1993. Tim also operates https://DrawPlumbingPlans.com. His @askthebuilder YouTube channel was the first home improvement channel on YouTube.