Install Ceramic Tile
Install Ceramic Tile
DEAR TIM: I would like to install 12 inch by 12 inch ceramic tile over my existing sheet vinyl floor. The cushioned vinyl would provide a wonderful flexible membrane that would absorb impact. What kind of glue should I use? What else should I do to make sure my tile floor will look like it was installed by a professional? David R., London, KY
DEAR DAVID: Stop! Installing rigid ceramic tile over something that might move is a huge mistake. The resilient vinyl flooring you now have must be removed before you install your ceramic tile. If you don't I guarantee you that numerous floor tiles will crack over time.
I discovered this the hard way years ago. One of my jobs required ceramic tile floors to be installed in a restaurant kitchen. The tile was installed over a concrete slab. But instead of using cement based thinset that dries hard, I used the trowel-on organic mastic that resembles cake icing. Organic mastic retains a slight amount of flexibility once it dries. When the kitchen equipment was placed on the floor, the tiles beneath the equipment legs cracked in short order.
Ceramic tile is very strong if you try to compress it. But if you bend it, it is very weak and will readily crack. The sheet vinyl floor will allow the tile to bend ever so slightly just as the organic mastic gave way beneath the heavy kitchen equipment. Do whatever it takes to remove the sheet vinyl and any glue that is holding it down. Adhesive removers can commonly be purchased at paint stores. These chemicals work just like traditional paint strippers to soften old glue.
If you're putting ceramic tile in your home, check out my Ceramic Tile Installation Checklist to learn exactly what you should know about the process. Avoid making costly mistakes with the help of this document. I offer a 100% Money Back Guarantee.
The large tiles you are working with are very susceptible to cracking. They are highly sensitive to imperfections in the subfloor beneath the tile. Installation instructions often tell you to make sure the floor is level. What this really means is make sure that the floor is in the same plane - as if the floor was perfectly smooth like a new piece of plate glass. Humps or dips in the floor can create small void spaces under each tile. Walking across these spots or concentrating loads at these points will cause future cracks in the tile.
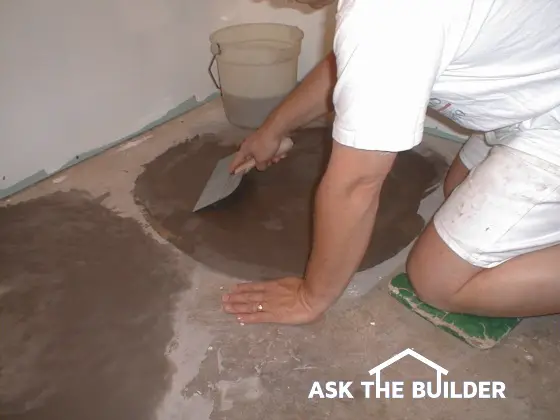
You can eliminate the humps and dips by using a straightedge and floor leveling compounds. I prefer to use the cement based products that mix with water. Most of them will readily adhere to concrete floors or wood subfloors. If you intend to apply your tile on a cement board product that will be nailed to the wood subfloor, you should remove the humps and dips before you nail the cement board in place.
I use three different straightedges and my drywall finishing tools to apply the floor leveling compound. My six foot and four foot long aluminum levels make a wonderful straight edge. I also use my aluminum framing square. Place the tools at various spots on the floor to determine where the humps and dips are. These same tools can be used as large spreading tools that act like bulldozers to evenly apply the leveling compound.
Mix approximately one half gallon of the floor leveling compound with cold water. Many of them are rapid set and you must spread and tool the material within three to five minutes of mixing it. If it starts to get hard in the bucket do not add more water to try to liquify it. This will make the final product weak. Be sure the floor is dust free and slightly damp to achieve the best bonding.
If your getting ready to install tile in a shower, especially the floor of the shower, you must read my Shower Pan eBook. Failure to do so will result in possible water leaks and mold growth at your home. Who wants that?
Using regular drywall tools and a little bit of water you can achieve a smooth glass like surface as the compound hardens. Gently float the wide drywall tools over the hardening compound and it will get smoother and smoother with each stroke. Sprinkle a few drops of water on the compound to make this task easier. Practice on a small spot first until you feel like a pro. Use the straightedges to check for humps and dips in the flooring as you proceed.
Author's Note: We've received other questions with similar problems or questions. Here's one from Krystina G. of San Sebastian, PR, dealing with floor levelness.
"My husband and I have a home made completely out of cement and we want to put ceramic tiles throughout our home. The floor is not level and we wanted to know the best way to go on with leveling floors."
Column 365
Tim built custom homes and did ultra-custom remodeling for 20+ years before launching his Ask the Builder media presence. He was selected as one of the Big 50 by Remodeling magazine in 1993. This award gave birth to Ask the Builder in October 1993. Tim also operates https://DrawPlumbingPlans.com. His @askthebuilder YouTube channel was the first home improvement channel on YouTube.