Magic Wand Stucco Crack Repairs
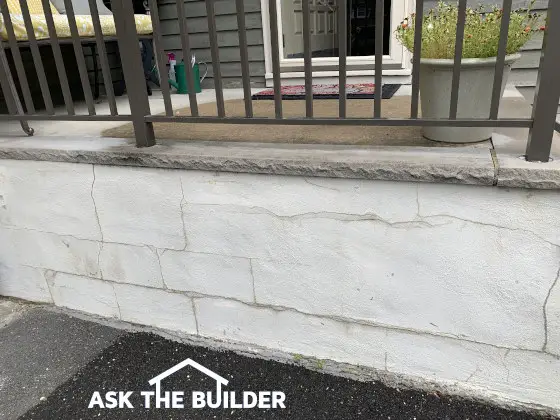
Magic Wand Stucco Crack Repairs | This cracked stucco can be repaired with a moderate amount of effort. (C) Copyright 2019 Tim Carter
DEAR TIM: I’ve got a mess at my home that’s driving me crazy. My 3-foot tall concrete block foundation was coated years ago with a thin coat of cement stucco. There are countless cracks in the stucco coating that outline many of the blocks. I’ve tried caulking the cracks before painting but they always seem to return. Is there a DIY solution I can attempt to solve the cracked stucco once and for all? I’m pretty handy and not afraid of a challenge. Just keep your mansplaining to a minimum if you can. Just kidding! I’ll take any and all advice you can offer! Vicki LaP., Toms River, NJ
Stucco cracks can be quite common. Cement stucco is normally just a mix of sand and Portland cement. This rock-hard building material is unforgiving to any sort of stretching or tension movement. On the other hand, if you try to squeeze stucco or concrete it’s normally ten times stronger than if you try to pull it apart.
Let’s assume you’re as industrious as Vicki. The good news is you might be able to recoat the concrete block with new stucco and be quite pleased with the results. Your chances of getting professional results improve dramatically if you can recruit some help from your husband, wife, or friends. While no one aspect of the repair job is hard, an extra set of hands and back muscles will come in handy.
How to Work with Stucco
I’m going to assume you’re a stucco rookie and have never worked with the material. Fortunately, it’s quite forgiving as you can do all sorts of texturing to mask your inexperience. While texturing is in itself an art form, you can achieve an interesting look with rough brush strokes, a sponge and even round brushes.
The first thing I’d do is build a small test wall using some 2x4 studs and one sheet of 4x8 oriented strand board (OSB). Stand this up on its side so it’s only 4-feet tall and put some diagonal supports so the low wall doesn’t blow or fall over. You’re going to stucco this test wall to gain some experience.
In my opinion, you need to be sure when you do the real repair on your existing stucco you make sure the new stucco doesn’t bond with the old stucco. A simple sheet of 15-pound tar paper put on top of the old stucco will act as a crack isolation membrane. We want the new stucco to be a pseudo rock cloud that will float on top of the old stucco as crazy as that sounds.
How to Install Tar Paper
On your test wall, use a few roofing nails to install tar paper on the OSB. You don’t need too many nails, just be sure the paper is laying flat with no bubbles. The first piece starts at the bottom and each higher piece overlaps the sheet below by three inches.
You’ll now cover the tar paper with a galvanized expanded wire lath.
You can buy this in rolls and be sure to wear heavy gloves working with it to avoid cuts to your hands. There’s a distinct way it’s installed so that the slanted parts of the mesh as you look at them from above slant back in towards the wall. The design is a miniature french cleat where the fresh stucco is locked into the mesh and can’t slide off down the wall to the ground. Believe me, it will make sense when you see the mesh.
Attach the mesh to your wood test wall using galvanized roofing nails. Be sure you nail into the wood studs behind the OSB. When you apply this mesh to your existing stucco, you’ll be drilling 1/4-inch holes with a hammer drill and using anchors, screws, and washers to ensure the mesh will never come off the concrete block. Put the fasteners every 16 inches on center horizontally and every 24 inches vertically. Stagger the fasteners each row.
Now comes the fun part - applying the stucco! You can discover all sorts of recipes for this material, but I’ve had the best success with this one I developed:
- 1.5 parts Portland cement
- 0.5 parts of hydrated lime
- 4 parts medium or fine sand depending on the final texture
Blend these materials together dry at first. Then add clean cold water until you get the mix the consistency of stiff applesauce. You then trowel in onto the wire mesh so it fills the mesh and covers it by no more than 1/4 inch.
How to do a Stucco Test
Do your test in the shade so the stucco doesn’t set too fast. Don’t add more water to the mix if it starts to harden. Mix only as much stucco as you can apply and finish in about 30 minutes. Practice swirling the stucco with a wood float and experiment with textures.
You’re going to discover that it can be boatloads of fun to tackle this project. Guess what? You can colorize the stucco too! You can add dry-shake pigments to the mix to create just about any color. This means you never have to paint the new stucco. I’d love to see your photos. Send them to me via the Ask Tim page at my AsktheBuilder.com website!
Column 1317
Tim built custom homes and did ultra-custom remodeling for 20+ years before launching his Ask the Builder media presence. He was selected as one of the Big 50 by Remodeling magazine in 1993. This award gave birth to Ask the Builder in October 1993. Tim also operates https://DrawPlumbingPlans.com. His @askthebuilder YouTube channel was the first home improvement channel on YouTube.