How to Plan an Outdoor Firepit

firepit created using granite blocks

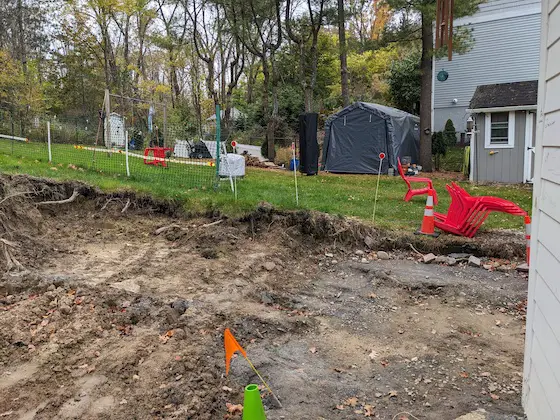
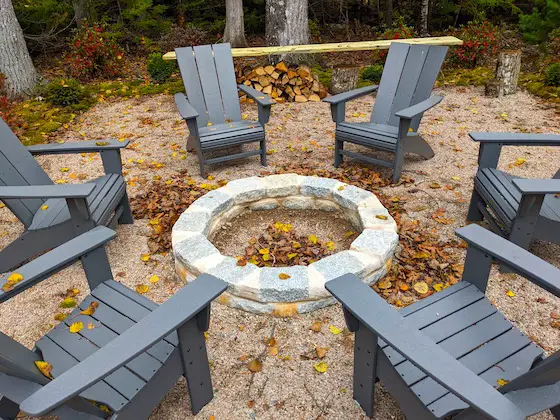
This is my daughter’s brand new never-used firepit. She didn’t ask for my advice and I think her plastic chairs might melt if the fire gets too big. Copyright 2023 Tim Carter

Outdoor Firepit Planning Tips - Don't Get Too Close!

Autumn is my favorite time of year. I love the eye candy Mother Nature hands out here in the great Northeast USA. Add the fragrant aroma of a crackling outdoor fire feeding on seasoned oak and you have, in my opinion, the perfect outdoor setting. Breathing in a light wisp of this aromatic elixir takes me on a time-travel trip to my Boy Scout campouts, cooking on an open fire, and roasting marshmallows.

Two Kids Only One Asks For Advice

This past year two of my children built new firepits. My son’s was part of a new clay paving brick patio project. My oldest daughter was finally able to get her entire yard landscaped. She incorporated a stunning granite firepit on one of the uppermost tiers of the backyard. I know this is hard to believe, but I’ve yet to sit around either one to enjoy a late-afternoon fire.

You may not think you have to do much planning for a firepit. If so, you might make the mistake my daughter made. While the firepit is the correct diameter, 4 feet, the outer circle of gravel where you sit is too small. There’s less than 2 feet between her composite plastic chairs and the edge of the granite stones that surround the pit. She didn’t ask for my input in the planning phase.

My son did ask for my advice. Having built quite a few firepits for clients and having three firepits of my own, I know a thing or two about how hot fires can get and how close you should be so that your clothes don’t ignite or the soles of your shoes become softened globs of rubber!

One day while we were finished laying patio brick, my son asked, “Dad, can you give me a few ideas about my firepit? How big does the gravel pad need to be so the chairs don’t end up in the grass?”

I took a pencil and a piece of cardboard and started to make a quick sketch. The first thing we decided on was the diameter of the firepit. It’s my opinion that a 4-foot-diameter one is ideal. This measurement should be the outside of the fire-containment border no matter what material you use.

Beware of Thermal Shock

There are quite a few ways to create a fireproof ring. You can use a steel collar, simple small boulders, or precast concrete brick you might get at a home center. Be aware that real rocks and precast concrete will almost always crack over time. They don’t do well with the rapid and repeated thermal shock should you build a roaring fire on a cool or cold afternoon. For this reason, if you use those materials and cement them together, there’s a very good chance you’ll be tearing your firepit apart and starting over in a few years.

How To Size the Firepit Area

While my son and I were enjoying a lemonade, I completed my sketch. I started with a 4-foot circle then created a concentric ring around the firepit with a 30-inch space. Next, I drew a 4-foot-wide concentric circle that would be the area where chairs would be placed. I finished with a smaller 18-inch-wide circle of space behind the chairs.

When you add up all those numbers, you discover you need a circle that has a 10-foot radius. While you may scoff at this, I urge you to take one of your lawn chairs out onto your lawn and re-create the above dimensions I shared with my son.

You may not need 4 feet for your chairs because you’ll use a different style than the Adirondack chairs my son intends to use. But trust me on the 30-inch space between the chair and the outer edge of the firepit. Get too close to a roaring fire and you’ll soon be backing up.

Smoke, Embers, and Permits

Put some thought into the location of your firepit. Think about the wind. Do you have a prevailing wind direction in your yard? If so, embers and smoke can bother you or your guests that are downwind of the firepit.

Think about nearby combustibles. The last thing you want is to start a neighborhood grass or wildfire. Trust me, the Internet is littered with stories about fires caused by popping embers that ignite dry grass, low bushes, dry leaves, and mulch on fire.

Use common sense, lots of it, when you do have a fire. Have a pre-charged garden hose just feet away from the firepit. If something goes wrong, all you have to do is squeeze the handle and put out the spreading fire. If a hose is not practical, then have several 5-gallon buckets of water nearby. Be responsible and enjoy the warmth and aroma of a magical outdoor fire.

Finally, check with your local government. You may have to get a fire permit each year. I have to do this here in New Hampshire. In some locations, you’re not able to have a fire in the middle of the day. Volunteer fire department resources can be stretched very thin during the primary daylight hours.

Column 1533

How to Lose Money With a Builder

excavated earth in back yard tree stump removal

This mess was created months after signing the contract. A lack of communication and poor plans led to a huge expensive change order. Copyright 2023 Tim Carter

How to Lose Money With a Builder - It's so Easy!

What you’re about to read might be life-changing for you. It doesn’t matter if you’re building a new home, adding a room addition, remodeling a kitchen or bath, or even building a deck. I shared the following with my 25,000 free newsletters subscribers a day ago and many responded saying I need to share it in my national column that you read. My subscribers told me that it might collectively save tens of millions of dollars. Let me know if you feel the same.

Two weeks ago a husband and wife who live in Saratoga Springs, NY hired me to come to their home. Weeks before that I had done a video conference call with them to help them light a fire under their contractor. Six months ago they had signed a contract with him to build a retaining wall and an exterior detached garage. New house siding and windows were also part of the project.

Months went by with no work happening even though they had given the contractor a huge five-figure deposit. Had I been involved back in April, I would have made sure that there would not be a deposit since no special-ordered materials were required for this job. Instead, the contract would have had a bi-weekly or monthly payment schedule tied to an itemized bid. The homeowners would pay for completed satisfactory work as it progressed.

When I arrived at the house, I discovered the homeowners weren’t sure about a number of things. They didn’t know exactly what type of pavement was going to be put down between the house and the retaining wall. They weren’t sure about stairs from the pavement up to the lawn above the retaining wall. They weren’t sure about positive drainage in the rear of the house but were very concerned about it.

The wife showed me some video of water flowing down the hill behind the house causing a waterfall over a small wall in their front yard. My college degree is in geology with a focus on hydrogeology. Hydrogeology is all about surface and subsurface water. Believe me, I know how to ensure a house or basement stays as dry as an old bone.

After a brief meeting with the homeowner, I set up my optical transit. This tool allows me to shoot extremely accurate grade marks. I transferred these marks to the house siding as a roadmap for the workers to follow. An hour later the builder, his project manager, and the excavator showed up.

We had a productive meeting of the minds and the project manager told me I was the first person to come up with a great plan on how to handle all the water coming off the hillside. Other experts before me wanted to install all sorts of field drains and complex underground piping. Field drains tend to clog in a storm when you most need them.

My plan was to install a large linear French drain behind the new retaining wall. This hidden gutter in the ground would capture all subsurface and overland water flow that was aimed directly at the house. Piping would route this water to the edge of the property and then send it into Lake Saratoga just across the roadway.

I also drew up a plan while there to show how the paving behind the house had to be slanted with enough slope so all overland water flowed by gravity to the walkway between the house and the new detached garage.

It’s important to realize all of this should have been done back in April by the contractor. It would have taken but an hour or two of his time. This planning should have been crystal clear to the homeowners. But alas, it wasn’t.

Days after I left, the contractor dropped a $30,000 change order on the homeowners to do all that I said above. They were astonished and stunned because all of this work should have been included in the original six-figure contract sum.

They negotiated with the contractor and reduced the change order to just under $20,000.00. I feel there should have been no change order. All that I saw there was plain to see back in the early spring. There were no latent defects hiding behind the grass on the hillside.

What is the teaching moment here? Each week I do autopsies on failed projects like this. It’s disheartening to me. There are several common causes of financial and emotional disasters like this.

For starters, you may be one that places too much trust in contractors. STOP DOING THIS. You need to make sure early in the planning process that you understand everything that’s going to happen. Stop hoping things will happen. Make sure the plans show every item that’s going to happen.

If you don’t understand the plans, many homeowners don’t - ask for clarification. There is no shame in admitting you don’t understand. If you advance into the contract phase with a foggy vision of what you think might happen, you could lose tens of thousands of dollars.

Column 1532

Plumbing Drains and Vents Tutorial

pvc drain pipes double vanity rough in

These are the drain pipes for two side-by-side sinks in a bathroom. The vertical pipe centered above the two horizontal pipes is a mysterious vent pipe. Copyright 2023 Tim Carter

Plumbing Drains and Vents Tutorial

Yesterday we had a plumbing emergency in my own home. The main drain pipe under the basement floor got clogged with toilet paper. The culprit is a newer low-flush toilet in a basement bathroom. I’ve been a master plumber since 1981 and I used my flexible drain-cleaning snake to clear the clog. While I shoved the snake into the cleanout, I chastised myself for not buying fifty or one hundred old-fashioned toilets made before the 1.6-gallon toilets became the new nasty normal.

Let’s talk about water before we go any further. In particular, let’s talk about Mother Nature’s plumbing system. It just so happens my college degree is in geology with a focus on both geomorphology and hydrogeology.

Cities are Near Rivers For a Reason

Study a map and you’ll discover that most big cities are located on major rivers. You’ll almost always discover that most small towns are on smaller tributaries. Water is the most basic need for life after all.

You may live in a city where you get your water from a public water system. That water almost always comes from a nearby river, large lake, or deep wells that tap into the massive hidden underground rivers that flow slowly through thick beds of sand and gravel.

If you’re a city dweller, your drain pipes connect to the city sewage system. Have you ever thought about what happens when you flush a toilet in your home? The instant the water starts to swirl in the toilet bowl, an equal amount of water enters the toilet tank. I call it the circle of water.

No Water Shortage - Don't Live in Deserts!

On a large scale, for every gallon of water taken from the river, lake, or aquifer in your city, a gallon of water almost always is put back into the body of water where your huge sewage treatment plant disgorges treated sewage back into the river. If this didn’t happen, the sewage treatment plant would flood from having too much sewage and no place to put it.

The same thing happens at my house in rural New Hampshire. Each time I flush my toilet, I get 1.6 gallons of water from my well and an equal 1.6 gallons of water flows back into the ground via my septic system. This is why we should still have 3.5-gallon flush toilets. There is no water shortage. Water is constantly put back into the system. But I digress.

Pipes Get Bigger Like Rivers

The drain pipes in your home should mimic what Mother Nature does. Lazy rivers have a current as the water travels towards the sea or ocean. While it might not seem like the water can move objects at this speed, it can with great efficiency. The drain pipes in your home should slope at least 1/8th inch per foot of run. For even better flow, shoot for 3/16ths of an inch.

But beware, don’t put too much slope on a pipe. If a drain pipe or sewer has too much slope, the liquids in the pipe can outrun the solids.

The plumbing drain pipes in your home mimic Mother Nature with respect to sizing. Think of how smaller streams connect to larger ones. This happens because the accumulating water needs a channel with more capacity. Sinks in your home use a small 1-5-inch-diameter pipe, while toilets require a 3-inch pipe. All of the fixtures in your home typically connect to a large 4-inch pipe under your basement floor, house slab, or in your crawlspace. This large pipe runs to your septic tank or connects to an even larger 6-inch pipe that runs under your property to a city sewer.

Vent Pipes Let Air In

What about that pipe that pops out through your roof? That’s a vital part of your plumbing system. It’s a vent pipe. You may have more than one that protrudes up through your roof.

Many homeowners think plumbing vent pipes are like smokestacks in factories. They think the purpose of the vent pipe is to expel sewer gas outside. While that does happen each time the wind blows across the top of the vent pipes, the real purpose is to provide replacement air back into the plumbing system each time you send water to the septic tank or sewer system.

When no water is running in your home, the plumbing drain pipes are just filled with air. As soon as you flush a toilet, you introduce 1.6 gallons of water into the pipes. This water displaces the air and often pushes it ahead of the rushing water just like an elevator pushes air in an elevator shaft. Surely you’ve felt this air pouring through the closed doors standing down in the lobby of a high-rise building.

If you don’t have air enter the system via the vent pipes, your plumbing system goes hunting for the air. The weight of the water from a flushed toilet is so powerful it can suction the water from a nearby shower, tub, or sink trap to get the needed air. Perhaps you’ve heard this slurping sound before and not connected the dots. If you hear that sound, it means your vent pipes are clogged or your plumbing pipes were not installed correctly.

While I can’t come to your home to unclog your pipes, I can offer you help with your plumbing dilemmas. Just schedule a consult call with me. link opens in a new tab I can be your virtual plumber.

Column 1531

How to Avoid Construction Delays and Arguments

stone retaining wall

Showing a contractor a photo like this allows you to communicate exactly how you want your retaining wall to be. Think of all the photos you could put in a PDF document that would prevent arguments! Copyright 2023 Tim Carter

How to Avoid Construction Delays and Arguments - It's So Easy

Just before writing this column, I did a phone coaching call with a man who lives in northwest Ohio. He wanted me to tell him if it was possible to build a room addition to his son’s home. The dealbreaker was the addition had to match the existing house so it would appear as if the addition was part of the original house.

My answer was, “Yes, it’s possible to achieve this goal, at least when one looks at the house from the street. You may have trouble sourcing the exact brick and the siding on the second story.”

As the call progressed, I shared the things he had to do before he even thought of signing a contract with a remodeling contractor. The biggest obstacle was to discover if any local zoning laws would prohibit the addition. The man was unaware this could be an issue.

I explained to him what setback lines are. These invisible lines on most parcels of ground create a border around your house. Think of this part of your lot as green space or a moat around a medieval castle. I informed him he must go to the local zoning office to determine if there was enough space between his son’s house and the side yard setback line to build the addition.

Dick Bruder - Mr. Organized

Next up I shared the story about Dick Bruder. Years ago I picked up my phone and Dick was on the other end. “Tim, it’s Dick Bruder. I want you to build my pool house. Can you come over for a pre-build meeting this weekend?”

I thanked Dick for his trust and of course agreed to stop by his home. I had attended countless meetings like this in the past and I felt this one would be much of the same. Dick would have lots of questions and I’d have lots of answers. It turns out Dick had but one question.

Dick met me at the door and showed me into his dining room. There on the table were two large binders. I didn’t think much of it at the time. He sat down and said, “Tim, I’m excited to work with you and can’t wait to get this project started. I asked you to come to the meeting so we could get on the same page.”

He then added, “I work at a large company and do lots of international travel. If you have any questions about this project, I’m not going to be able to take your calls during the day. That’s why I created these binders. Please open yours and look at it.”

I did as Dick instructed and lo and behold I was dumbstruck. As I turned each page, I discovered everything that was missing from the architect’s drawings was in the binder. Every single product that was to be used in the project was already selected. Every paint color was specified. The actual paint chips were glued into the binder.

It was the most amazing thing I had ever seen. My first thought was, “Holy tomato, this is going to be the most profitable job I’ve ever done.” Why? I’d not have to waste any time waiting for a homeowner to make a decision and there were going to be no change orders! What’s more, I knew exactly what the customer wanted down to the exact hardware to use and even the color of the tile grout!

Dick finally asked me after a pregnant pause, “Tim, what do you think? Do you have any questions?” I think I said something about how he was the first customer to ever have thought everything out. He loved that answer, and it was true.

“Well, Tim, then all I need to know is how you get paid.” I told him my policy was to just give him a bill at the end of each month for the work completed and for all material that was on site. I just asked that he pay the bill within five days. “That’s not an issue. You’ll always have your money on the fifth day.”

The job took about three months from start to finish. I only talked to Dick one time and he called me. The topic of the discussion was about parking arrangements at the top of his driveway. His wife was upset that she had to sometimes wait for us to move our trucks if she was in a hurry to leave.

It turns out the job was my most profitable one ever and Dick and his wife were very happy with the finished product. There was no drama, and happiness ruled the day.

You don’t have to create an old-fashioned binder with today’s technology. You can create a stunning PDF file using a word-processing program. Create a page for each room. On that page drop in screenshots of the exact look you want. You can get these photos from manufacturer’s websites, Pinterest, or search engine image searches.

You can put links in the document to the specification pages of all the products. This way all the rough-in dimensions will be known. You can put in close-up photographs to show the level of craftsmanship you expect. This PDF file should be created at the same time you draw plans. Each bidding contractor should get a copy of both. Both of these should also be an addendum to your contract with the remodeler/builder you choose to work with.

Column 1530

Homeowner Insurance Nightmare

hardwood flooring ruined by water being removed

A silly little mouse caused this damage. You'll be suprised when you file a claim if you have similar damage. (C) 2023 Tim Carter

Homeowner Insurance Nightmare Catch 22

Do you have homeowners insurance? How much do you know about your policy, or should I say contract? When was the last time you read your policy cover-to-cover? If you’re like me, you purchased a policy sight unseen assuming that you and your possessions are protected in case of a fire, flood, storm, water leak, etc.

If you have a loss, there’s a very good chance you’ll suffer a secondary shock when you discover your policy has more holes in it than the colander in your kitchen cabinet. I know because it just happened to me.

Seven months ago a mouse caused an overnight water leak in my home. The hardwood floor in our bedroom buckled and a floor beneath it was also damaged. Some drywall had to be repaired and replaced. All the flooring in the first floor of my home had to be refinished to match the replacement hardwood installed in the bedroom. The total loss was just under $30,000.00.

I soon discovered several things. First and foremost my insurance agent was worthless. She told me on the phone she couldn’t do anything about the claim and that I had to deal with the insurance company. My insurance company then offloaded me to a third-party adjuster. If I had questions, the adjuster was to answer them even though my contract was with the insurance company.

The damage occurred on March 23, 2023. I didn’t get a written estimate from the adjuster until May 18, 2023. The adjuster encouraged me to get bids when he visited my home days after the leak.

It’s a good thing I didn’t sign any contracts because his stern authoritative letter that came with his estimate informed me that if the repair cost was higher than his estimate, the insurance company would not pay for the overage unless it was pre-approved.

Three weeks before the adjuster’s estimate arrived, I did get a check from the insurance company for a little over $14,000.00. That was $1,000 lower than just the cost to do all of the floor restoration work.

Before I go on, let me ask you something. Do you happen to have $10,000, $15,000, or $30,000 in a checking or savings account you can tap into without causing you financial stress? I’m talking about money you could use to pay contractors to do work on your home. My insurance company expected me to have this and if I didn’t they told me to take out a loan or pay the contractors with my credit card.

After the restoration work was complete, I submitted all the invoices to the adjuster. His company came back and said, if you want all the money due to you, you need to provide us with the canceled checks you wrote to the contractors. I said, “I can’t pay the contractors until you give me the money you owe me.” It was a stalemate. Catch-22

A month of back-and-forth communications got me nowhere. Out of frustration, I filed a complaint with the New Hampshire (NH) Insurance Department. Within 48 business hours of their intervention, a FedEx driver handed me an envelope with the money I had deserved to get months before.

The bitter experience with my insurance company lit a fire inside me. I reached out to my state representative. She was keenly interested and three weeks later I was sitting in a chair next to the NH Insurance Commissioner and his top staff members. The commissioner wanted to know exactly what happened with my claim and he was most interested in the reforms I proposed.

My first suggestion was to require insurance agents to do what real estate agents are required to do in most states. An insurance agent should be forced to produce a one-page agency document that informs you their fealty is to the insurance company, not you. It should clearly state what the agent’s responsibilities are and where they end.

My second idea is that insurance companies should be forced to produce a simple bullet-point list of all the things that are and are NOT covered in the policy you’re about to purchase. In your lifetime have you ever received this list before purchasing a policy? Can you see how invaluable this would be allowing you to compare one policy against another?

I then recommended that the insurance companies should release money much faster. It should be just like in the home-building industry. When I delivered notarized affidavits to a bank or savings & loan, they issued a check to that contractor or supplier. My insurance company, once the heat was turned up by my state insurance department, cut a check in 30 minutes and I had it the next day!

Lastly, insurance agents and companies should be forced to give you, the day you file a claim, a roadmap of what to do, what not to do, and how long the process will take under normal circumstances. I had no guidance whatsoever.

Column 1529

Deposit Money to Contractors

new house being built roof framing rough carpentry

The bank financing this project would ROFLOL if the builder asked for money upfront to build this house. Copyright 2023 Tim Carter

Stop Giving Contractors Money Upfront

I’ve set an ambitious goal for this column. It’s my hope it will save collectively at least 100 million dollars. If you and every other reader follow the advice I’m about to share, we can make sure your money will not disappear through the hands of a dishonest contractor like sand in an hourglass.

I do quite a few short 15-minute consult phone calls each week with homeowners. This past week I talked with a man who wanted to know how he could motivate his contractor to start work on a small room addition. The contract sum for the job was just a bit over $100,000.00.

This homeowner and contractor had worked on plans early this past spring and finally signed a contract five months ago in May of 2023. Five months later the only thing accomplished was a heat pump has been disconnected. It was in the way of the room addition. An excavator also ripped out two large tree stumps in the back yard.

excavated earth in back yard tree stump removal

The backyard has looked like this for months. Sad. (C) 2023 Tim Carter

About five minutes into the call I asked the man, “How much money did you give the contractor when you signed the contract?” There was a pregnant pause. He then said, “I wrote a check for $77,000.00. The contractor said he needed to purchase supplies.”

In all my years of building and doing autopsies on failed jobs, I had never heard of someone that gave so much money to a contractor. I was in a state of shock and it took me a moment to process this. Sadly just three weeks before I had a very similar call where a husband and wife had advanced $71,000.00 to a contractor for a job costing several hundred thousand dollars. Months had transpired and all that happened was a hole in their backyard.

There are countless reasons why you should never give any contractor money upfront. There are a few situations where it is warranted. You should adopt the same time-tested practice that banks, savings and loans, and credit unions employ. I’ll share that at the end of this column.

First and foremost, contractors don’t pay their employees, subcontractors, or material supply houses in advance. If a contractor does have to pay for materials at the time he purchases them, that tells you the supply house doesn’t trust him to pay a month from now. That should be a huge flashing danger light to you.

When a contractor asks you for a deposit, he’s basically telling you that he doesn’t trust you to pay him. Trust is a two-way street in any situation. You can make the same argument should it come up that you don’t trust the contractor will do the work and do it well!

Pros Don't Need Deposits Normally

Great contractors don’t ask for money up front for a host of reasons. They have tens of thousands of dollars in their business accounts. They can easily pay for things for weeks or a month or two without needing your money. They know they’ll show up and satisfy you so that you’ll gladly pay them.

Fantastic and honorable contractors will negotiate a very fair payment schedule. They might ask that you pay for completed work at the end of each week, every other week, or at the end of a month. These same contractors will produce, if you ask, signed and notarized affidavits in exchange for your check or checks. These affidavits are valuable legal receipts that protect you from mechanic liens.

Don't Advance Job Profit

It’s insanity for you to give a contractor his profit before a job starts. When you do this in the form of a deposit, you remove his incentive, other than his honor, to finish your job on time and with excellent workmanship. Money is the only leverage you have and never forget that.

Any banker or home-loan officer reading this column knows that what I say above is true. A bank would NEVER give money up front to a contractor. Banks and financial institutions require the work to be done and done correctly before they release money. They send out inspectors to jobs before they release construction loan proceeds.

The contractors and suppliers have to provide the affidavits I mentioned before. As soon as those documents are produced, the inspector comes back with a satisfactory report on the completed work, the banks then quickly release the money to pay the contractors and suppliers. You should consider yourself a tiny bank and do the same.

If a contractor asks you for a deposit, you need to stand firm and reply, “Why do you need a deposit? Why should I give you your profit before you start the job?” In rare instances he may give you an honest answer. Your job may require some custom-made item that’s non-returnable. In these cases, the supplier often asks for a 50 percent down payment.

If nothing on your job is custom-ordered, then you’d be foolish to advance money to a contractor. Simply negotiate a fair payment schedule where you pay for work that’s complete and satisfactory.

To protect yourself, you need an itemized quote from the builder or contractor showing what each aspect of the job costs. I happen to sell this list. I developed it using the same percentages banks apply to each part of your new home. This document is invaluable when it comes to you protecting yourself.

Column 1528

Algae, Mold, and Mildew Removal and Prevention

algae growing on house siding

The green stain on the yellow siding is algae here at my own home. Copyright 2023 Tim Carter

Algae, Mold, and Mildew Removal and Prevention - Remove Water & Food

Days ago Jerry stopped by my www.AsktheBuilder.com website. He reads my column each week in his local paper and was perplexed by algae growth on the exterior of his home. Jerry hales from Chesterton, Indiana, the gateway to the massive sand dunes at the south end of Lake Michigan.

Here’s what he said, “My vinyl-sided home has a northern exposure that gets an algae-like film on it. It gets dark enough that I have to power wash it every year. What's really confusing is that the south side of the house, the sunny side, doesn’t have this problem. With one-foot eaves, the north side never gets any sun. The south side gets diffused sun shade by honey locust trees. Do you have any idea what causes this?”

It just so happens that I know exactly what’s going on. In fact, I have this exact same problem at my home in central New Hampshire. You may have the problem too unless you live in a very dry and arid location.

Algae, mold, and mildew are quite similar to fire. You may think that’s an odd analogy. To create a fire, you only need three things: fuel, oxygen, and heat. That’s it, nothing more.

Water and Food

To grow algae, mold, and mildew you just need three things and sometimes just two! Typically for some algae, mold, and mildew you need: the spores, food, and water. There are some algae that create their own food and only need carbon dioxide and water to create their own food.

It’s far easier to control the growth of the three organisms inside than outside. I say this because inside your home you often can minimize the presence of water. You have mold and mildew spores everywhere in your home and food sources are abundant. Add water and in a short amount of time, you’ll have mold and mildew proliferating.

You may struggle with mold and mildew in your tub and shower area. You can prevent it from growing with some effort. All you have to do is to dry the tub and shower walls and floor each time you get them wet. I know that’s a huge ask. Most people will never do it. At the very least, squeegee as much water to the drain, shake off the shower curtain, and leave the shower door and shower curtain open as well as the bathroom door to get everything to dry out as fast as possible.

Controlling algae, mildew, and mold growth outdoors is very hard. You can’t control the water part of the equation. Rainfall, dew, and water vapor coming up out of the soil provide a nearly constant supply of water.

As Jerry observed, he has no algae on the south side of his house. He recognized the sun hits that wall. The small amount of sunlight in the morning and early part of the day is enough to evaporate any dew or fine dew haze that’s on the siding.

All you or Jerry has to do to prevent the growth of algae, mold, and mildew is to take the food away from the growth triangle. Your body is no different. If you don’t want to have offensive body odor and filth on your skin, you typically have to take a shower each day. You rub your skin with soap and water to remove the bacteria that create body odor. That same soap and mechanical agitation of your skin with your hand gets rid of dirt.

Jerry just needs to increase his cleaning schedule from once a year to possibly three or four times a year. Here’s what not to do. Avoid using chlorine bleach outdoors in an effort to clean or kill the organisms. Chlorine bleach will poison any valuable landscaping or prize trees in your yard.

No Chlorine Bleach!

Years ago I advised a neighbor of mine against the use of bleach. Each spring she’d pour three gallons of chlorine bleach on her concrete patio to remove the algae. She had a magnificent maple tree overhanging the patio that provided much-needed shade. I said, “Barbara, the chlorine bleach will kill the tree.” She thought I was dumber than a box of rocks. After all, I was just a blue-collar builder.

Each year the tree got sicker and sicker. She spent thousands of dollars with an arborist trying to feed and care for the tree. I often wondered if Barb told the professional about her chlorine treatments. My guess is the arborist never thought to ask.

After about ten years, the arborist came out with his chainsaws and crew and cut the tree down. Barb was about fifteen years older than I was and I think she thought her age automatically made her wiser. It may have in other areas, but not when it comes to chlorine bleach.

When you go to clean the outside of your home, just use regular liquid dish soap and water. Rub the siding with a sponge just as you’d wash your car. Avoid pressure washers because they can damage your home and they don’t always remove all the dirt and food that feed the organisms.

Column 1527

Repair Front Porch

mosaic tile front porch repair

This porch was constructed in 1949. Its best days are undoubtedly behind it. Copyright 2023 Tim Carter

Repair Front Porch - Mosaic Tile and Concrete Base

In the past week, Don asked me for advice. He lives in the extreme northeast corner of North Carolina just 15 miles from the Atlantic Ocean. His front porch stoop is in very bad shape. Back in 1949 when the house was built, the tile setter used quarry tile to create a mosaic look on the flat surface. He then mortared full tiles to the sides and front of the poured concrete stoop.

Don shared that the repairmen he’s talked with are very nervous as to how to proceed. Some of the mosaic tiles are cracked and when you tap on some tiles it produces a hollow sound. Many of the full edge tiles are falling off. In other words, the 74-year-old porch is in poor condition.

Don mentioned that he and his wife want to keep the original look and he wondered what might be the best plan of attack. Based on the photographs he sent, my opinion is it’s time to get rid of all the old tile and rotten concrete base beneath the tile.

If Don hired me to do this job, the first thing I’d do is take photographs of the mosaic tile layout that forms the flat surface of the porch. If there was enough money in the budget, I’d create a map of the mosaic tiles. I’d take the time to trace the pattern of the tiles onto construction paper. These templates of each of the pieces of the random-shaped tile would be numbered and put on the map.

I know this is obsessive-compulsive, but if Don and his wife wanted the exact same look and money was not an object, then this is exactly what should be done. I’ve worked for customers in the past that had these financial resources. While it’s rare to have a budget that will allow this, I have to tell you it’s intensely rewarding work.

There are many possible reasons why Don’s porch fell apart. The truth be told, there’s no reason why it shouldn’t have lasted 150 years or more. For starters, Don lives in a very mild climate. While it does get cold and the temperature drops below freezing in winter months, it’s not the extreme cold I suffer from where I live in New Hampshire. It could even be worse had Don’s house been in International Falls, Minnesota!

I’m quite sure if I visited Don’s city I could locate several railroad bridges that were constructed in the early 1900s. The concrete abutments supporting the bridge beams are probably in good or very good condition. I can take you today to similar ones in Cincinnati, Ohio that suffer from much worse weather than what Don experiences. These railroad structures are in great condition.

The reason the railroad bridges are in such great shape is because the bridge engineers and designers specified that lots of Portland cement be used in the mix. Today the minimum specification for most exposed concrete is 4,000 pounds per square inch (PSI) or a six-bag mix. This means six 94-pound bags of cement are in each cubic yard of concrete. You can always add more cement. The cement is the glue that holds together the sand and stone in the concrete.

I would order an 8-bag mix for Don’s new concrete stoop. This might elevate the strength up and over 6,000 PSI. I’d also be tempted to add a bit more pure Portland cement to the thinset mix used to bond the new quarry tile to the concrete.

There are a few other things I’d do if Don hired me. For starters, I’d tell Don that the best weather to install the concrete and tile would be in the fall or spring. I’d want daytime temperatures to be around 60 F with no threat of rain. I’d want the nighttime temperature to not drop below 45 F.

I’d precut all the new mosaic tile and lay it out on a flat surface that matched the size of the new porch. I’d want to make sure all the tile were the correct size. This would be done before the new concrete porch stoop was poured.

I’d pour the new concrete porch late in the day on a Monday or Tuesday. I’d plan on installing new tile on the concrete the next morning at 7:30 AM. Cement paint would be used as a bonding agent between the fresh concrete and the thinset mortar. You add clear cold water to Portland cement mixing it to the consistency of gravy to create cement paint. I was taught to do this by wise concrete masons who applied cement stucco to exterior steps in Cincinnati many years ago.

Once the tiles were all set, I’d cover the tile with plastic to help retain the moisture in the fresh thinset and concrete base. I’d wait at least 48 hours before I’d think about grouting the tile. Once grouted, I’d cover the porch and edges again with plastic to hold in the moisture. I’d not take the plastic up for at least three days.

The concrete stoop, the thinset, and the cement-based grout all need water to cure properly. If water leaves these things too rapidly, they never attain their desired strength.

A month or two after the porch was finished, I’d apply a clear silane-siloxane sealer to the new porch. This would minimize water infiltration into the grout. Water that seeped into the grout and original concrete is what destroyed Don’s porch. Don’t let it happen to you.

Column 1526

Elliot Moore Smart House Colony

Elliot Moore Smart House Colony Scam

On September 16, 2023 at 1:18 AM in the morning, I received an email from Elliot Moore.

Elliot claims he is a writer/photographer for a website called SmartHouseColony. He put forth an allegation that I had stolen one of his photographs which you see on this page of my AsktheBuilder website.

elliot moore email

Here's the text of his email if you can't read what you see in the above screenshot:

My name is Elliot, and I am the photographer & writer for the website SmartHouseColony. Once in a while, I do routine checks on my images to try and check for people using them without permission.

While doing my checks, I saw my image of the bricks on https://www.askthebuilder.com/brick-water-repellents/. I'm happy for it to stay up, as long as I get credit!

Please add somewhere on the page, "Image By SmartHouseColony" and then link to the page: https://smarthousecolony.com/ so people know where to find my writing work!

Thanks so much,

Elliot Moore
Photographer & Writer | SmartHouseColony
Charlotte, North Carolina

I immediately responded to Elliot. Here's my reply:

Good Morning, Elliot.

TNX for reaching out. I'm flummoxed. I just went to that page of my website. I shot each of the photos on that page. Can you please give me a screenshot of what photo you think is yours and tell me where it was taken?

Looking forward to your response.

Tim Carter - CEO Ask the Builder

All My Photos

All of the photos on my page are mine. I shot each one. They were taken at the home of one of my newsletter subscribers. I was at the home applying the water repellent to the brick with the help of an employee of the company that made the water repellent.

Did Elliot Respond?

Elliot never responded to my email reply. IN MY OPINION, I believe he's trying to run a clever SCAM with website owners. He's trying to get website owners to LINK to his website. These links would help his website appear higher in Google's organic search rankings.

In my opinion, I feel that Elliot is counting on any number of website owners to not bother checking WHERE they got a certain photo and just insert his requested link. It takes seconds to create the link he asks for.

If my suspicions are true, then Elliot is not only a clever guy, but he's also, IN MY OPINION, a very unethical person. Let me know what you think in the comments below.

If Elliot is as smart as I think he might be, he's probably got a Google Alert set to his name and he'll see this page I created in his honor in less than 48 hours.

Elliot, if you read this, chime in and let all know WHY you never responded to me.

Three Season Room Problems

three season room door and windows

Does your three-season room look similar to this? These rooms, if not built correctly, can create a plethora of problems you’d never imagine. Copyright 2023 Tim Carter

Three Season Room Problems - There Can Be Many

Not too long ago Philip reached out to me. I’ve mentioned in past columns that each week I solve countless problems for homeowners just like you. For me, it’s similar to putting together a jigsaw puzzle or playing the board game of Clue. You present me with all sorts of jumbled data points that make no sense to you and it becomes my challenge to solve the problem. Believe me, it keeps my tiny gray cells limber!

In Philip’s case, he had a three-season room constructed up off the ground about 30 inches. It had composite decking for the floor with the requisite 1/4-inch gaps between the decking boards. Philip and his wife wanted to install solid luxury vinyl plank (LVP) flooring. As you may or may not imagine, this presents all sorts of problems.

In a normal three-season room, if it rains through open windows and gets on the decking, it’s normally no big deal. The water can drain through the gaps in the decking to the ground below. No harm, no foul.

LVP flooring interlocks. There are no gaps. Add to this, most manufacturers require a solid underlayment of some type under the LVP. I just installed some LVP at my own home and used a thin foam one that had a waterproof coating. Can you see where this is headed?

Water is your biggest enemy when it comes to a three-season room. The best ones are constructed like a four-season home. If your home is constructed properly and you have generous roof overhangs and closed windows, rainwater rolls off the windows, doors, and siding to the ground just like water off a duck’s back.

Water Can Get Into a Three-Season Room

The issue is some three-season rooms are not built like your home. The exterior walls of your three-season room may rest on top of the finished flooring and pass under the wall to the outside. Your three-season room may be on a slab and the slab is wider/longer than the exterior walls. This is very common in warmer climates. I’ve seen countless photos of situations like this.

You never want water to get on the flooring in your home for all the obvious reasons. Imagine in Phil’s case if water or snow enters his room and gets under the LVP flooring. While most, if not all, LVP is waterproof as well as the underlayment, where will the water drain to? Will it get trapped under the LVP and start to create mold issues?

Fortunately, Phil’s room is built like his home and the only danger of water getting on the new LVP flooring is from a window left open by mistake during a rainstorm. That can happen to anyone at any time even in a regular home.

Water Seeping Under Doors

One of the biggest conundrums you’ll face is with your exterior door or even sliding doors that allow you access to the great outdoors. In Phil’s case, his existing composite decking runs under the exterior door to a landing outside the room. This is a huge problem.

Water can work its way under the door threshold via capillary attraction, wind, or even negative slope on the exterior landing causing water to run towards the room! These same water infiltration issues are common on many condominiums that have exterior concrete patios poured at the same level as the concrete floor inside. Cantilevered decks using wood floor joists have a history of creating interior wood rot for the exact same reason.

Decks & Landings Must Be Lower

If you’re building a new three-season room that might become a four-season space, be sure exterior decks, landings, etc. are always 2 or 3 inches lower than the interior finished floor to prevent water from getting inside.

Make sure your contractor building the room constructs it just as you would a normal home so it’s impossible for water to enter inside a wall or flow under a wall. If you think this might happen, perhaps you should frame your walls with treated lumber to prevent future rot. You can also purchase treated plywood to sheath the exterior walls.

Don’t forget to raise the pre-hung exterior door so the bottom of the metal threshold is at the same level as the top of the finished floor. This allows you to install a proper flashing under the door and gives you plenty of room for a thick throw rug or mat on the interior floor next to the door.

Give serious consideration to a hip roof if possible. You’ll enjoy the spaciousness of a vaulted ceiling in the room with a slow rotating paddle fan on those warmer days. Plan for how you’ll heat the room should you transform it into a year-round room. I’m happy to help you should you get flummoxed!

Column 1525