Oxalic Acid Cleaner

rust in acrylic tub shower

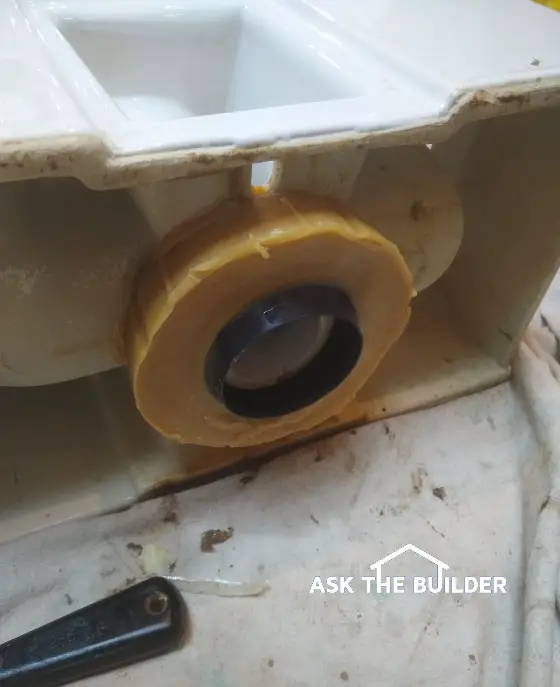
This is deep rust staining on an expensive acrylic bathtub/shower unit. Can the rust be safely removed for less than $1? Yes it can! Copyright 2022 Tim Carter

Oxalic Acid Cleaner - It's a Great Rust Remover

Not a week goes by that you, or another reader or two or three or twenty, might reach out to me with a fantastic question about the column of mine you’re reading. Often you might ask why I failed to dive deeper into the topic. You may not realize this, but your newspaper that publishes my column often has a limited amount of space where my words and photos must fit. I need to adhere to that word-limit restriction.

About a month ago this column was devoted to removing rust from my own toilet. I received an avalanche of great questions that were not covered in the column. So many that I felt a follow-up column on rust removal would help you save thousands and thousands of dollars. Let’s get started.

Will Oxalic Acid Hurt Drain Pipes?

The most frequent question of all revolved around two related topics: will the oxalic acid harm the plumbing pipes in my home and how does one neutralize the acid? Weak oxalic acid will not harm PVC or ABS piping. Plastic drain pipes are generally immune from any and all weak acids. Cast iron drain pipes and acids don’t play well together with acid so it’s important to neutralize the acid before you allow it to flow through the pipes on its way to the city sewer or septic tank.

How Do You Neutralize Oxalic Acid?

You neutralize an oxalic acid solution adding ordinary baking soda. Start to pour in some into the solution. It should bubble. Stir carefully and continue to add more soda powder until the bubbling stops. The best way to check to see if the solution is neutralized is to use litmus paper making sure the solution has a pH of 7.0. Adding lots of water to the solution will also dilute the acid.

Will Oxalic Acid Hurt a Septic Tank?

You may have wanted to know if the oxalic acid would hurt your septic tank and the biologic activity inside the tank. Well, we know for a fact it won’t help it! The safest thing to do when cleaning anything using an oxalic acid solution would be to prevent the solution from going down the drain. Capture the acid solution and take it outdoors to pour onto the ground once you’ve neutralized it.

Can you Use Oxalic Acid on an Acrylic Tub or Shower?

Next up I received quite a few questions about how safe it is to clean acrylic tubs and showers, chrome faucet parts, ceramic tile and all sorts of surfaces in a normal bathroom that might have rust stains. I’ve got great news for you. In my experimentation at my own home, I’ve discovered the oxalic acid solution doesn’t harm anything other than polished marble. Keep any and all acids away from marble.

Do a Test First

Here’s the best advice I can offer before you start to apply an oxalic acid solution on anything. Mix up a small amount of the solution and use a cotton swab to apply a drop of the acid solution to the object. Let the acid sit for about an hour. It’s vital that before you apply the drop that the area is clean and dry. It helps that it’s also in an out-of-the-way spot so if the acid does damage the sheen, you don’t notice it that much.

Will Oxalic Acid Clean Vinyl Siding and Concrete?

You may have reached out to me about using oxalic acid outdoors to clean rust from vinyl siding, brick, mortar, concrete, etc. You get rapid results when cleaning vinyl siding but you’ll discover it takes quite a bit of time to get great results on rock, concrete, brick, mortar, etc. This is because the rust can soak into these surfaces. You just have to be very patient and try to work in the shade so the oxalic acid solution doesn’t evaporate.

Oxalic Acid and Redwood

Oxalic acid solutions are the go-to cleaner for exterior redwood. If you recall your high school chemistry, you’ll remember that acidic solutions have a pH lower than 7. Caustic chemicals like many oxidizers have a pH higher than 7. Redwood can turn black or darken if you use anything with a pH higher than 7.

This is why you never want to use chlorine bleach or any other oxidizer to clean redwood. All that said, always TEST using an oxalic acid solution solution to clean your redwood or any other surface. I can’t stress that enough. You can’t hope everything is going to work out fine. It only takes an hour at most to run a test.

Where Can I Buy Oxalic Acid?

Just about everyone who reached out to me asked where’s the best place to purchase oxalic acid. Fortunately it’s a very affordable product and I bought mine online from Amazon. I got a sizable pouch of the white powder for less than $15.00. You may discover a local national-chain hardware store stocks these pouches.

oxalic acid 2 pound bag

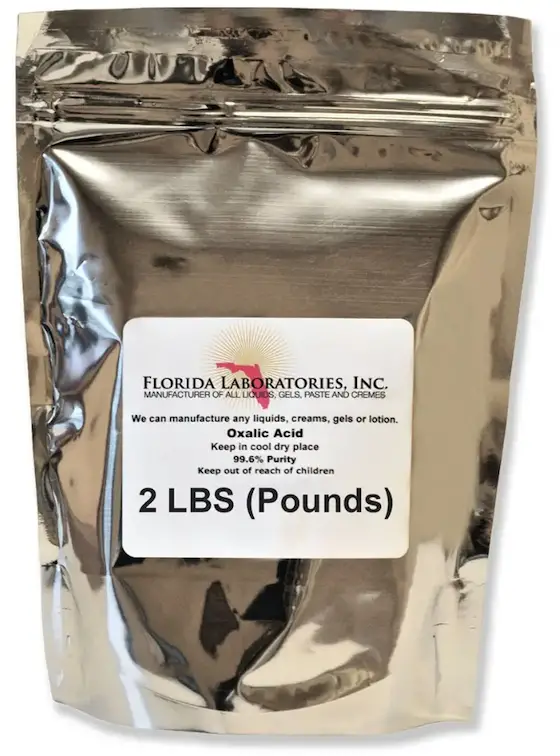
This is a re-sealable bag of oxalic acid crystals. Go HERE to get it delivered to your home NOW.

Always read the instructions about how to mix, use and store the unused acid. My pouch is sitting on the bottom shelf of my refrigerator right now next to cartons of milk. Oxalic acid powder likes to be stored cold if at all possible. If you’ve got kids in the house, be very careful where you store it. You never want the possibility of a child thinking the acid is powdered sugar. It looks just like it.

What can I help you with? What issues around your home worry you? What do you want me to discuss in my upcoming columns? Go here and tell me.

Column 1479

Help Me Tim

Help Me Tim - You're My Only Hope

Fill out the form below. Share with me in as few words as possible what you need help with.

GO TO THIS PAGE AND USE A DIFFERENT FORM if you have HELPFUL PHOTOS to upload that will help me understand your situation.

If you want FREE weekly tips you should sign up for my free-for-life newsletter. I share many things each week not found in my syndicated newspaper column.

Parts in a Toilet Tank

toilet wax gasket parts in a toilet tank too

Parts in a Toilet Tank | Here’s a rare photo of a toilet that you’ve undoubtedly never seen. It’s the underside of the commode with a new wax gasket applied to the outlet hole. Copyright 2022 Tim Carter

Parts in a Toilet Tank - Just Two and Easy to Replace

I’ve been a master plumber since 1981 and I want to share as much of my accumulated knowledge with you as possible in these turbulent financial times. As we move down the timeline, I’m going to try to save you money each and every week. You need to know about the parts in a toilet tank AND you need to know about the toilet bowl beneath it as well.

Let's get started.

Toilets are much-needed fixtures in the average home. While they appear complex, they’re not. Once you understand the simplicity and elegant way the average toilet incorporates the physics you discovered in high school, you’ll soon be able to tackle any and all repairs yourself. What’s more, with my help you can even remove and install a new toilet by yourself in less than an hour if that’s what you want to do! I’ve got step-by-step instructions how to do this on my AsktheBuiler.com website.

Toilet Bowl Basics

Let’s start with the toilet bowl. When you flip up the toilet seat cover you should see a standing pool of water. That water is sitting in a u-shaped trap no different than the u-shaped pipe under your sinks, tubs, and showers. You only see half of the water. The other half is in the bowl colon. This colon passageway curls up and then down again creating the pathway to the drain pipe.

What Does the Water in the Bowl Do?

This water in the bowl serves two purposes. First and foremost it provides a barrier for sewer gas and vermin from entering your home. Without this water, foul-smelling invisible sewer gas would waft into your home much like smoke rises off a burning stick of incense. Vermin need to be excellent deep-dive swimmers to make if from the hidden side of the trap to the room side that you see when you peer down into the bowl.

The water spot is supposed to make it easier for the toilet bowl to stay clean when solid waste is deposited into the bowl. Back years ago when the generation-one 1.6-gallon-per-flush toilets were introduced, many had a smaller water spot. Customer complaints got rid of this design faster than a short-order cook flips burgers during the lunch rush.

Are Wax Gaskets the Best Seal?

The toilet bowl must connect to the drainage pipe under the floor so gas and water don’t leak into your home. For many decades this was done using a wax gasket. For the gasket to produce a seal there needs to be about a 3/8-inch gap between the top of the toilet flange and the underside of the toilet china. The flange is a special fitting that is attached to the top of the drain pipe. The toilet bolts to this flange.

Too small of a gap between the toilet and the flange can squeeze too much wax out and too much of a gap means the wax doesn’t make a perfect seal between the toilet and the flange. Wax gaskets, in my opinion, are the best seal you can get. Newer gaskets made of rubber can fail over time if they dry out. Wax composition never changes.

How Can I Get a Strong Flush?

Your toilet flushes away waste using simple physics. Remember that easy formula in high school? Force equals mass times acceleration. The force of the flush is created by the mass of water that accelerates as it travels from the tank down into the bowl. Gravity helps do this in your home. In most commercial toilets, this force is created by the water pressure in the water supply line. My guess is you’ve never really thought much about the absence of a toilet tank in most commercial restrooms.

More Water Means Better Pipe Cleansing

Older toilets did a better job of flushing and carrying the waste to the city sewer or septic tank because they had more mass. Old toilets typically had twice the amount of water flow into the bowl than modern toilets. Very old toilets had the tanks up about six feet in the air. Those really flushed well because the water had more hydrostatic head.

The two moving parts inside your toilet tank are the things that flummox most homeowners. You just have a fill valve and a flapper valve. The fill valve allows fresh water to fill the tank after you flush. The flapper valve stops the tank water from flowing into the bowl after the tank fills with new water.

How Do I Adjust the Fill Valve?

You can adjust the fill valve so that you get the maximum amount of water flowing into the toilet bowl with each flush. To do this, you adjust the float on the fill valve to stop the flow of water just as the level in the tank rises to the top of the overflow tube. This tube is a drain pipe that prevents water from overflowing the toilet tank should the fill valve malfunction and not shut off. Can you imagine the flood in your home if you walked out of the bathroom and water started to overflow the tank? Oh my!

Flapper Valve Leak Detection

Worn-out flapper valves create phantom flushers. Have you ever heard your toilet tank start to briefly refill when no one has used the toilet? You might think a ghost flushed the toilet! The cause is simple. A small amount of water seeping past the flapper valve causes the level of the water to drop in the tank over a period of a few minutes. As the fill valve float drops, it eventually triggers fresh water to enter the tank.

You can test for these small leaks by using food coloring. Clean your toilet bowl well and then flush the toilet. Once the fill valve stops the water from entering the tank, wait about 30 seconds. Squirt a generous amount of green food coloring into the tank water. Come back into the bathroom an hour later to see if the color of the water in the bowl is a light shade of green. If so, it’s time to replace the flapper valve.

The internet is overflowing with helpful videos showing you how to install new fill valves and flapper valves. It’s extremely easy and so long as you can turn off the shut-off valve that supplies water to your toilet tank, you can do these repairs with minimum tools.

Column 1476

DeWALT D55154 Air Compressor

DeWALT D55154 Air Compressor

This is the business end of the DeWALT D55154 Air Compressor. It's caveman simple to operate. Check the oil level in the back, plug it in and get to work!

DeWALT D55154 Air Compressor - It's a Dandy

I've had quite a few portable air compressors in my time. My first one was a wretched sound machine gasoline-powered one. It was heavy and its engine drove you crazy after a few hours.

Ever since then I've always had an electric compressor as even on job sites, you almost always have power available without having to use a generator.

This DeWALT D55154 Air Compressor can easily power two large pneumatic air tools and not strain. I loved how compact it was and it's really not that heavy. I could lift it up into my truck with very little strain.

DeWALT D55154 Air Compressor gauges

These are the two gauges. The one monitors the pressure in the tanks. The other one tells you how much pressure is going out to your tools.

DeWALT D55154 Air Compressor quick connects

You can connect two air hoses to the compressor. You just push the end of the hose into the brass fitting to make an air-tight connection.

DeWALT D55154 Air Compressor left side

You can see the sturdy pipe frame.


DeWALT D55154 Air Compressor cylinder

This is the cylinder that compresses the air. The aluminum casing contains the lubricating oil. Always check the oil level before operating. The dipstick that was shipped attached to the power cord goes into the top where you see the flat red cap that is holding in the oil that was put in at the factory. Note that it tells you the oil type to use and how much to add once you drain the oil out. It's wise to change the oil once it appears the slightest bit dirty. READ the manual about the time of the first oil change!!!

DeWALT D55154 Air Compressor with handle

This handy handle comes with the compressor. It's well balanced and you'll feel like you could wheel this through an airport concourse with ease.

DeWALT D55154 Air Compressor drain plug

This is the all-important drain plug. You MUST drain the water from the tanks after each use to prevent internal rust.

DeWALT D55154 Air Compressor power cord

This is where the power cord stows.

DeWALT D55154 Air Compressor label

Here's the specs. You'll not regret putting in a 20-amp circuit in your garage as this draws 14 amps!

DeWALT D55154 Air Compressor tire

I don't think you need to keep a spare tire around. But you can see the tire size. They inflate with ease.


Oceans – Where Feet May Fail

Oceans - Where Feet May Fail - It's All About Trust

Are you facing a tough challenge and going backwards each day?

Is each day Groundhog Day for you with no change in your situation?

Are you swirling down the dark drain of depression?

Does your trust have borders?

Maybe it's time for you to change up your routine.

Maybe it's time for you to stop trusting those who have been leading you into the drain and start listening to other voices.

Maybe it's time to get inspired by this beautiful song. The lyrics might hit home with you.

Ford Lightning EV Towing Test

Ford Lightning EV Towing Test - Disaster Beyond Belief

Electric Vehicles (EVs) don't seem to be ready for prime time when it comes to heavy loads or towing. Watch the video just below.

Are you attracted to EVs thinking you're helping the Earth Ball?

You do realize there's no such thing as Zero Emissions unless your source of charging electricity has nothing whatsoever to do with fossil fuels.

This means you must have your own solar panels or your own micro-hydroelectric power plant. I doubt you do.

Your public utility that your home is connected to either uses fossil fuels or it buys electric from other systems when they can't produce enough.

Don't be bamboozled by all the hype and Social Proof that's in play trying to get you to buy one of these EVs.

Avoid High-Pressure Sales Tactics

colonial saltbox house reroof job

Do you need a new roof? How will you know if you’re getting the best job and best price? I can help you.  Locate the BEST ROOFER in your city or town using this checklist. Copyright 2022 Tim Carter

Avoid High-Pressure Sales Tactics - It's All Psychology

Published September 26, 2022

It’s possible this is the most unique column I’ve written in the thirty years since Ask the Builder came to be. I think it’s important for you to know why I switched careers from being a full-time builder, remodeler, and master plumber to a syndicated newspaper columnist and then video personality.

It was always about money. I started Ask the Builder to save you tens of thousands of dollars. Right now you need this help more than ever because black financial storm clouds are racing towards you and everyone here in the USA. It’s time for you to preserve every penny you have. It’s time for you to avoid all those who would prey on you using deep psychology to pry your money from your banking accounts.

I’m sure you realize inflation is raging in the USA. It’s doing the same on a world-wide basis. Layered on top of that, in my opinion, is an impending deep recession. It’s a perfect storm that can put you and millions of other homeowners under severe stress. I’m going to try to relieve some of that stress now.

It was my wife’s idea to create Ask the Builder. She said one day after I was selected as one of the top 50 remodelers in the USA, “Tim, why don’t you take your book idea and write a syndicated newspaper column?” You see, I had always wanted to write a book about how you were played and taken advantage of by many contractors.

Not only did many do sub-standard work, but some others also used psychological tricks on you to persuade you to sign a contract. It infuriated me when I discovered one of these cunning contractors beat me out of a job. In some cases, I was called in a year or two later by the homeowner to fix all the mistakes that could have been avoided had they realized they were being manipulated.

You're Being Manipulated Everyday

This psychology is used by businesses and people in power on you and me each day. The one that seems the most innocuous, yet is quite powerful, is the psychological trick of reciprocity. You might have fallen victim to this easy one in the grocery store. Have you ever put one of those small sample pieces of cheese or summer sausages on the end of a toothpick into your mouth? If you did, and walked away without buying the cheese or sausage you probably felt guilty. If you did buy the product, they got you.

Reciprocity

How do home improvement sales people use reciprocity? Simple. They tell you that if you agree to their offer they’re going to throw in for FREE this or that. The free item or service they say might be worth hundreds of dollars. How many times have you whipped out your credit card for a BOGO offer?

Social Proof

Another very powerful psychological trick that’s pulled on you is called social proof. You see this one all the time on TV commercials where four or five paid actors in most instances tell you how the product took away their pain, fixed this or that problem, or made them lose weight.

After you see about four of these people praising the product, your brain screams at you, “Hey, they know something we don’t! Look it must be true. If it worked for them surely it’s going to work for us!!!” That roofing contractor sitting in your living room invokes social proof by showing you photos of all the recent jobs he’s done in your neighborhood. Social proof is extremely powerful and you need to be darned careful. Get the names and phone numbers of the people who own the homes in the photos. Call them to get the facts. See if they’d hire the roofer again.

Scarcity - The Most Powerful One of All

All that said, the most powerful of all psychological tricks being played on you is scarcity. When a person makes something scarce, you might sing like a canary telling all you know or sign a contract faster than you’d race your pregnant wife to the hospital like I did just before the birth of our first child. I must have been doing 85 mph down the expressway that night!

How is scarcity used on you by the roofer, the remodeling contractor, the vinyl siding salesman, or the gutter guard company? It’s so easy. How many times have you heard one say, “This offer is only good tonight. Once I leave the house, the offer expires.” You see they’re making the special lower price SCARCE.

Scarcity is also invoked if you hear a salesman say that this or that damage will happen to your home if you don’t sign the contract. For example, overflowing gutters may cause massive foundation failure, you may get deathly ill from mold, you might die from a virus no more harmful than the common flu, or a myriad of other scary things.

To behold the power of scarcity, look at this photo.

mass grave

Mass grave outside of NYC. Fair Use Doctrine usage. (C)2020 New York Times

Would this scare you? It's a mass grave. You might expect this in a war zone, right?

Mass grave are repulsive. Mass graves immediately create an image in your mind of a gristly death.

But what would you think if the photo was taken in the USA just a little over two years ago within miles of Manhattan?

Are you telling me we don't have enough ground available to bury a person in their own MARKED grave in the USA?

You know, a dignified burial in a Potters Field 30 miles west of NYC with a humble headstone?

SHAME on the NYC leaders for burying those people in a mass grave.

That mass grave was created to SCARE YOU into thinking you were going to DIE from a virus no more lethal than the common flu. You were being played when you saw this photo.

Death is the ultimate scarcity play.

STOP BEING PLAYED!

You're being played like a cheap fiddle by contractors, your leaders, and people you should NOT be listening to.

If you really want to prevent being taken to the cleaners by sly salespeople or other people in power who want to control you, I urge you to read this fascinating book. Influence - The Psychology of Persuasion. I discovered it about twenty years ago and it was life changing for me. Go here to get a copy.

influence psychology book

Column 1475

Best Home Builder

How to Find the Best Home Builder

Over the past five months I’ve watched the dream of a neighbor I’ve yet to meet start to come true on my own street. It started just after the snow melted when two men arrived with a giant machine that wrestles logs and chain saws. Their job was to cut down and haul away no less than fifty trees on the stubborn hilly building lot.

You can see my entire video series right here. Click the horizontal bars in the upper right corner to get a menu:

I remember starting jobs and feeling that excitement. Those same endorphins rushed through my body when I broke ground on the stunning Queen Anne Victorian home I built back thirty-six years ago for my family.

However, as the weeks have progressed my new neighbor’s dream is slowly transforming into a ghoulish nightmare. Sadly they may not be aware of this. I’ve been chronicling the progress with lots of videos explaining what’s going on. The sad thing is the mistakes I’m seeing are all based in misplaced trust. I get at least fifty emails a week from homeowners just like you who have made the same mistake.

Just days ago carpenters showed up to put the first layers of wood on top of the poured concrete foundation. Weeks ago I witnessed the foundation being installed and based on my past experience I sensed there would be mistakes made. My instincts were not to be denied.

Watch this video to see exactly what I saw. It's deplorable.

The lead carpenter should be congratulated because I know for a fact he checked the foundation for level. He might have used a high-quality optical builder’s level or he could have used a laser level. Within a short time, he discovered a long side wall and a short return wall were out of level by 1 and I/4 inches. That’s a huge variation and unacceptable.

It’s important to realize that everything that follows is speculation because I was not privy to any conversations. It’s entirely possible the carpenter called the builder making him aware of the problem. This, by the way, is one of the other mistakes I’ll expound on shortly.

The carpenter should have told the builder that he wasn’t going to install the two sill plates until such time as the out-of-level foundation was corrected using a time-tested thin concrete overlay using coarse sand and Portland cement. This repair could have been done in less than four hours by two men. The materials for the repair would have cost less than $25.00.

This repair didn’t happen. Instead, the carpenter proceeded to bolt the treated-lumber sill plate to the concrete and then install the untreated plate next. He leveled this second plate using cedar shims that are water-resistant, but not waterproof. That was another mistake.

We already know the foundation contractor made the error. It happened, in my opinion, because he failed to snap level lines on the inside of both sides of the forms. Once the chalk lines were snapped, a worker would install 4 or 6-penny finish nails spaced about six or nine inches along both chalk lines.

The magnesium float used by the foundation contractor to smooth out the wet concrete would glide the tool along these nails ensuring the top of the foundation was level. It would have taken about an hour for one man to install these nails. Such a sad mistake to skip this simple step.

The builder, whom I’ve yet to see in five months, made no less than two mistakes in my opinion. Once the foundation forms were placed, he should have stopped by the job site to check to see how the foundation contractor was going to ensure it would be level.

After the forms were stripped, the builder could have set up a laser level by himself and determined the foundation was out of level. This could have been done in less than 15 minutes. There are all kinds of possibilities at this point. He could have seen the error and ignored it or selected the wrong solution to the problem.

Now it’s time to lay part of the blame at the feet of my new neighbor. You see, I’ve done thousands of autopsies on similar situations in the three decades of wearing the Ask the Builder hat. The biggest mistake the homeowner made was hoping everything was going to go well. He didn’t do a great job of vetting the builder with his $1,000,000-plus investment.

The homeowner probably didn’t have in-depth meetings with all the bidders on the job to go over the plans and specifications. My guess is the homeowner didn’t make it crystal clear what his expectations were. He just hoped those expectations would be met. I doubt the homeowner had an hours-long meeting with the builder to go over his bid to ensure the builder calculated all the right amounts to meet the homeowner’s expectations. You have to do this before you sign a contract.

Here’s the flip side to this. My son just purchased a new home in the spring just 60 miles south of me in southern New Hampshire. It’s the best built home I’ve seen in the fourteen years I’ve lived here. My son discovered from a neighbor that the builder spent many days at the job site to ensure everything was done correctly. He did this quality control each and every day. Is your contractor going to do this, even for a small two-week job? How do you know? Stop hoping. Stop trusting.

Column 1474

New House Build Video Playlist

New House Build Meredith NH Video Playlist

You should be able to see all the videos below from the new house being built just down the street from my house. Look in the UPPER RIGHT corner of the video. see the three horizontal lines? CLICK those and you should get a menu that appears showing you all the videos in the playlist.

Just below is one video but after it plays the next one in the playlist will appear. As of September 22, 2022 there were 25 videos in the series. Some are very informative, especially the Concrete Foundation Leveling MISTAKE one. Holy tomato!

I'm not the builder on the job, I'm just an observer.