DEAR TIM: I read your column each week. Your last one talked about deck screws vs. nails, but I need to know about the different choices I have when it comes to deck flashing materials. What are my choices and can you discuss the pros and cons of each and any new and exciting materials? Also, what would you use on your own home if given the choice? I’ve seen on other websites that some of the modern caulks with lifetime warranties are just fine. Debb D., Santa Rosa, CA
DEAR DEBB: Let’s crush the caulk myth right away. I’m a big fan of caulk for many jobs around a house, but relying on them to flash a deck to a house is the last thing I’d choose. I’m beginning to wonder if some of the caulk manufacturers who offer lifetime warranties are using the warranty more as a marketing gimmick rather than a statement about the product’s ability to perform for decades without failure.
Based on what I’ve seen in my short time on this planet and what the sun’s powerful and unrelenting ultraviolet (UV) light can do to metal, I’d say that no caulk is going to last and last. UV light is so powerful it causes durable materials to fall apart and disintegrate. This is why paint chalks, deck coatings fail, zinc coatings disappear from metal roofs and wood fibers fall apart when exposed to sunlight. Imagine what UV rays can do to soft and pliable caulk over time.
Before I discuss the different materials you can use for deck flashing, I feel you need to understand the importance of flashing and how it works. Flashings are transitional materials. They connect one thing to something else always with the sole purpose of preventing water infiltration. The flashing itself needs to be waterproof and permanent. They should last as long or longer than the adjacent materials.
In the case of decks, a flashing is often required where deck lumber contacts the side of a house. The flashing’s job is to prevent water from entering behind the exterior cladding material of the home. If water gets behind brick or stone veneer, wood or vinyl siding or any other exterior surface, it can leak into your home causing wood rot and mold and mildew nightmares.
There are many materials available to you for flashing a deck to a home, but always keep in mind the power of the UV rays in case any of the flashing material is exposed to direct sunlight. Choose wisely.
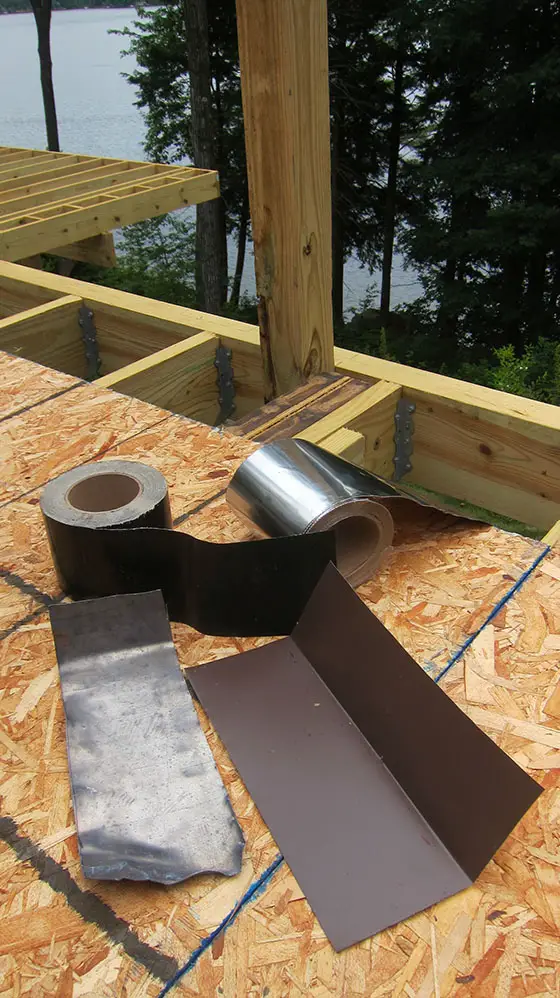
These are a few choices when it comes to deck flashing materials. Technology is improving all the time. Photo Credit: Tim Carter
Aluminum coil stock is a readily available flashing material, it’s affordable and somewhat easy to work with. It’s biggest drawback is that it is not too easy to make waterproof lap joints. Without a permanent sealant or watertight mechanical connection, capillary attraction can easily draw water behind the flashing causing a leak. You can’t solder or weld aluminum with ease. I’m not confident about using any sealant to bond two pieces of aluminum together for decades.
Thin sheet lead is a viable and affordable option. You can purchase it online with no issues in all types of sizes and thicknesses. I prefer to use lead that’s 1/32nd of an inch thick. Lead is waterproof and can last hundreds of years exposed to sunlight. Because lead is malleable, it’s easy to bend. This means you can make just about any shape flashing often using your bare hands and no equipment. Iou can solder it together if necessary or you can bend and hammer it to make interlocking flat seams that are highly resistant to water intrusion.
The market is flooded with all sorts of flashing membrane tapes not much different than a large roll of duct tape. My issue with these adhesive membrane tapes is their long-term durability. Some of them are not very resistant to puncturing. If the flashing, or part of it, is exposed to the UV rays of the sun, how long will it take before the flashing fails?
Perhaps the most exciting product I’ve seen lately is ultra-thin 304 stainless steel flashing that’s about as thin as a piece of paper. You can purchase this with a butyl adhesive already applied. It comes in rolls of various widths and you can bend the flashing to fit any shape. Stainless steel is extremely durable and highly resistant to tearing or puncturing. It’s a perfect material for a flashing because it will never rust. It’s the only metal flashing to use along the ocean where saltwater spray and mist causes rapid corrosion of other metals.
The butyl adhesive holds tenaciously to just about any clean and dry surface. If you want to slide the flashing up behind a piece of siding, you just leave the paper backing on that portion of the flashing so the adhesive doesn’t cause installation frustration. This newer thin stainless steel on a roll a remarkable material.
Keep in mind that you can purchase the best flashing and still have problems with leaks. It’s important for you to understand how flashings work and how they need to be fabricated and layered into and over the things they’re in contact with to make for a waterproof detail.
The best way to think about flashings is to study how simple wood siding or asphalt shingles work to keep water out of houses. They work in conjunction with gravity and each successive row overlaps the row below. It’s much like how the feathers on a bird work to keep them dry.
Column 1152