Terri Williams has a perplexing dilemma with dirty kitchen floor tiles in her Baton Rouge, LA home.
Allow her to give you the story.
Tell me in the comment section below if you picked up on the most important clue she shared in her description.
I believe I know exactly what's going on. Let's see if you do too.
"I just moved into a house that has a slate tile floor and the tiles are on the counter top in the kitchen.
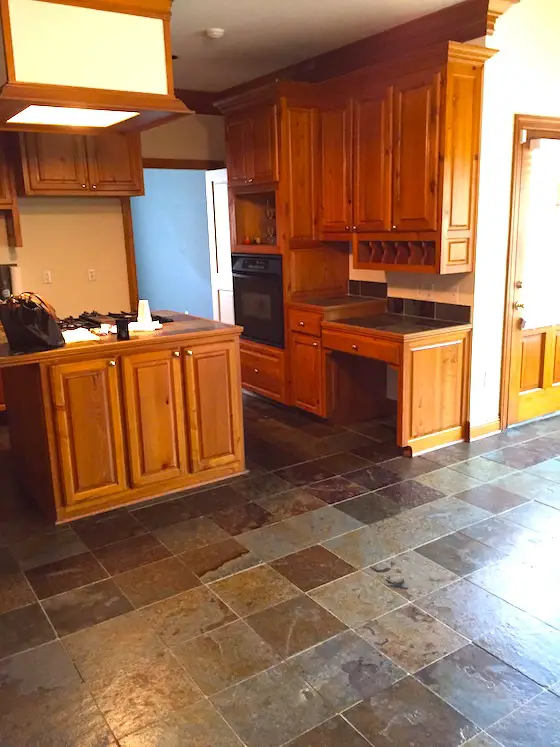
Here's Terri's kitchen. There's a clue in this photo too. Let's see if your Columbo trench coat has strong mystic powers. Photo credit: Terri Williams
I also have white carpet (not my choice) in my bedrooms and they show black where the wear pattern is.
I have a cleaning lady that comes once a week. Every time she comes she says when she wipes the counters her rags collect black and rust (reddish color).
The floors always feel gritty to me.
Do you think this tile "sheds" and is causing this grit and grime and if so, do you think sealing them would stop this "shedding" and help keep the carpets cleaner?
It is more than just dirty floors because right after she mops the floors I get dirt on my bare feet. Help!"
Here's my cunning Sherlock Holmes response:
Terri, based on what you reported to me, and that's all I have to go on along with your great photo, I believe you're using two invalid data points to arrive at your conclusion.
I've got lots of experience with slate flooring. I had it in the entrance hall, powder room and connecting hall in my Queen Victorian house I built for my family. Slate is extremely durable and I've never heard of it "shedding" gritty particles. In the twenty years I lived in that home, it never produced grit.
Let me share a story from decades ago. When I was a freshman in high school, I used to sneak out of my house with a friend at 4:30 am and walk a mile to mop the floor of the Skyline Chili parlor in the Clifton suburb of Cincinnati, OH.
I was fortunate one of the owners really showed me how to mop a floor. Most people I see mop floors use the wrong tools and techniques.
The best way to mop, in my opinion, is to use a traditional string floor mop. You need to dunk it in the soapy mop water bucket and squeeze out the excess water. Then comes the most important step.
As you take the mop from the bucket, you must spin it so the strings extend outwards and look like the blades on a flying helicopter.
The strings land on the floor in a crude circle. You then slide the mop sideways creating an overlapping pattern of S's.
After cleaning about twelve square feet, you then lift the mop up, put it back in the bucket and pump it up and down in the bucket getting all the dirt, grit, etc off the mop.
I'm willing to bet your cleaning lady is not doing a great job of cleaning the floors and the countertops.
There is a true art to cleaning.
Many cleaning people just push the dirt around on surfaces.
As to why the floor feels gritty to you, the evidence of the most likely cause is in your photograph.
Slate is not naturally shiny. There is some sort of polish or coating on the slate.
Is the cleaning lady applying that? Did she apply it to a DIRTY FLOOR covered in grit locking the grit into the floor finish?
Here's how you can test to see if the cleaning lady is doing a good job and trapping grit in the clear finish.
Next time she cleans the kitchen floor, you hopefully can be sure no one walks on it after it dries. Ask the cleaning lady to clean it the LAST THING before she goes home. Tell your family members to not walk on the floor.
When the cleaning lady leaves, get a few white paper towels damp and rub a few of the slate tiles. My guess is the paper towels will pick up all sorts of dirt. The same thing will happen on the counter top.
You should then clean the floor with my Stain Solver Certified organic oxygen bleach. Watch this video to see how to do it the right way.
After cleaning it well with a scrub brush, be sure to rinse it well with CLEAR water. Change the water FREQUENTLY if it clouds up.
The floor is only clean once the rinse water STAYS CLEAR.
After the floor dries, then do the paper towel test again. If you did everything right, the towel should stay white.
Once the floor dries, if you still feel grit, you know the grit was locked into the clear finish.
You can clean your carpets with the Stain Solver too. They should come out looking BRAND NEW.
CLICK HERE to see amazing Before and After photos taken by a professional carpet cleaner who uses my Stain Solver.