Green Energy - It Will Take Many Decades to Become Mainstream
Watch this video and become informed about the facts about where the energy you use each day comes from.
Watch this video and become informed about the facts about where the energy you use each day comes from.
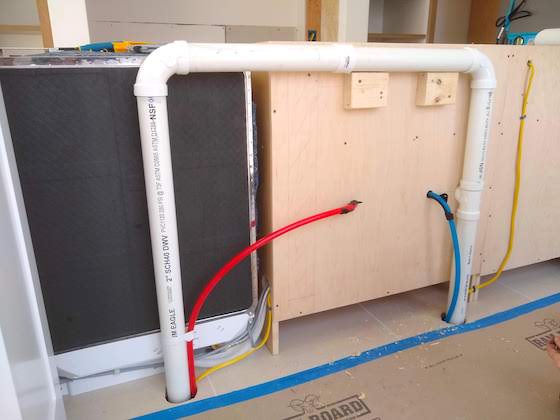
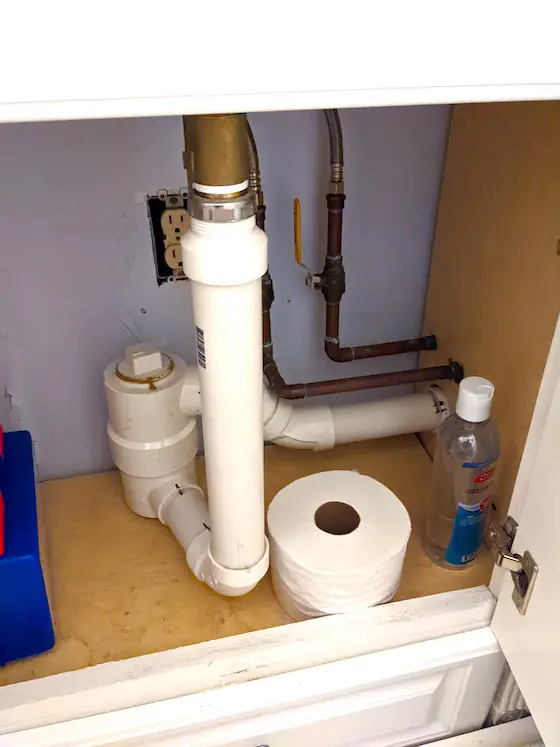
How Loop Vents Work | This is the magic of a time-tested plumbing loop vent for island sinks. Don’t take the shortcut using an AAV. Copyright 2022 Tim Carter
Have you heard the old saying, “You don’t know what you don’t know.” I think it’s an overarching axiom with just about everything there is to know about building homes. Stop and think for a moment about all you don’t know about all of the things hidden behind your plaster or drywall walls and ceilings not the least of which is your entire plumbing drain and vent system.
I’ve been a master plumber since 1981 and it’s one of the trades I love the most. I find it attractive because when installing plumbing drain and vent pipes in a new home it’s a true three-dimensional puzzle. If you have a young family member looking for a rewarding career where she/he will always be in demand, suggest plumbing. It’s a marvelous way to meet homeowners who will thank you for fixing their pipes.
My guess is the first thing you don’t know is the true purpose of the plumbing vent pipe that pokes up through your roof. Most homeowners I talk with compare it to their chimney. A chimney is designed to expel smoke or combustion gas out of a house. Thus, you might think the plumbing vent pipe’s job is to spew stinky sewer gas outdoors.
The exact opposite is true. The purpose of the vent pipe is to let air into the plumbing system just like that tiny pinprick hole you put into a large jug of drinking water that has a spigot in it. If you’ve ever tried to use one of those jugs without poking the hole in it, you discover rapidly the water in the jug has a very hard time getting out.
Before I share with you the way kitchen island sinks have been vented for decades, allow me to indulge you with the movement of water and air in the pipes hidden behind your walls and ceilings.
Imagine no one’s home or you’re sleeping. Let’s also imagine you don’t have any dripping faucets that waste vast amounts of water. When no water is running the only water in the plumbing pipes is that you have in the traps under fixtures and perhaps some condensate water in the vent pipes. The rest of the volume of all the pipes is filled with air and sewer gas.
When you flush a toilet, 1.6 gallons of water rushes through the toilet bowl into the pipes below the toilet. As the water cascades down the vertical pipes it pushes the air in the pipes ahead of it. This air must be replaced and it comes into the system via that stubby pipe sticking up through your roof. This same scenario happens when you put water down any other drain pipe in your home. It’s precisely why each plumbing fixture in your home needs to have a vent pipe as part of the drain.
If you go to my www.AsktheBuilder.com website you can watch my How to Vent Plumbing video. What you’ll see are all sorts of vent pipes that go up walls behind your bathroom vanities, your kitchen sink that’s on a wall, and all your other fixtures.
But how can you do this if you have a sink in the middle of a kitchen? Who wants some ugly plastic pipe going up through the countertop up to the ceiling? No one! Wait, I know what you’re about to say, “Tim, isn’t that what air admittance valves (AAVs) are for?” Yes, these devices that have moving parts were invented to try to solve the problem. The issue is I constantly have people pay me to tell them why they have sewer gas smell in their kitchens. It happens when the moving parts in the AAVs fail.
For all the decades before AAVs, plumbers like me installed a humble loop vent inside the island sink cabinet. It’s an ingenious, elegant, and simple solution that has no moving parts and is guaranteed to work for the life of your home. The best part is it takes maybe just an extra 30 minutes to install a loop vent.
First and foremost, the entire loop vent system including the drain pipe must be constructed using 2-inch pipe. This is paramount because it’s vital the horizontal portion of the drain pipe never fill completely with water. There has to be a layer of air above the water that’s traveling down the pipe on its way to the sewer or septic tank. The short horizontal pipe draining your kitchen sink needs to be a smaller 1.5 inch pipe to restrict the amount of water entering the loop vent.
The loop vent system looks like the giant letter P resting on its side. To top part of the P is where the kitchen sink pipe connects. The lower leg of the P is the vent part of the system. Here’s the magic of how it works.
I show you how to create a perfect loop vent in this wonderful product.
Imagine you fill your kitchen sink to the brim with water. You then pull out the stopper and the water begins to rush into the short 1.5-inch pipe. This pipe fills completely with water until the sink drains. As the water drops down into the vertical 2-inch pipe it’s swirling and there’s more than enough volume to allow air into the pipe as well as the water. Remember, before the stopper was pulled there was nothing but air in the plumbing system including the entire length of drain pipe from your sink to the sewer or septic tank.
When the water hits the horizontal part of the loop vent heading towards the sewer, it starts to level out with perhaps a 1/2-inch air space on top of the rushing water. As the water heads towards the sewer, the air on top of the water is rushing over it the other direction going up the other vertical pipe that’s part of the loop vent. It’s replacing the air that used to be in the pipe. It’s that simple and the best part is it will be trouble-free for the life of your home!
Column 1468
Watch this video and tell me if you'd get one of these.
Think about this: How LONG will it take rescuers to get to you? Don't be naive' for goodness sake.
And then, what about fire? What happens if a fire rages out of control in your damaged building?
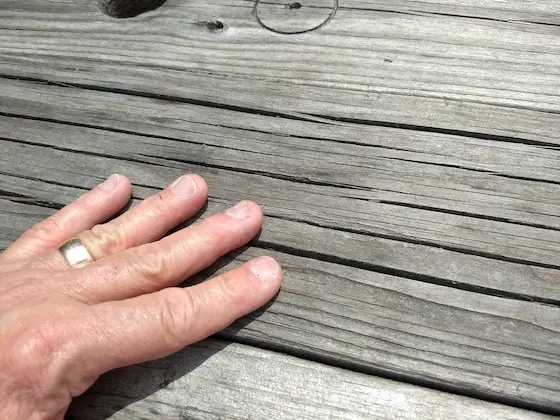
These pieces of outdoor wood decking show serious signs of neglect. The large cracks allow water to soak deep into the wood. Copyright 2022 Tim Carter
Do you own anything made from wood that lives its life outdoors? It could be a stunning deck, perhaps a decorative privacy fence, maybe a pergola, or even a teak table and chair set. I’ve owned all of the above and more over quite a few trips around the sun.
When I was younger, I didn’t think much of the work, time, and expense it required to keep the wood looking like new. But every year as I cleaned and re-sealed one of my outdoor wood things, the work grew more and more tiresome. In many ways all of my outdoor wood possessions were like my three kids when they were young. They also required constant care.
Over the past ten years I finally surrendered to the unrelenting power of the sun and rain. My dock panels and steps leading down to the lake are the only things left I have made from wood. Fortunately I finally discovered a wood sealer that appears to last for four years instead of the normal two I got from every other product. Every other outdoor wood object I owned has been replaced with something that isn’t made from wood.
Allow me to share with you why you’ll probably wave the white flag and concede to the forces of Mother Nature at some point in time. It’s important to realize that wood is hygroscopic. This simply means that its size changes in response to the moisture content of the wood. Wood expands when it gets wet and then it shrinks as it dries. This movement, over time, starts to rip the wood apart.
If you look closely at a new piece of milled wood, it’s usually smooth and free from any surface defects. However this appearance is transitory. As soon as you subject untreated wood to frequent wet/dry cycles, you’ll start to see very tiny checking cracks develop. These are tiny hairline cracks in the top surface of the wood.
The next time it rains, these cracks allow the water to penetrate deeper and faster into the wood. This causes even greater expansion pressure between the wood fibers and soon the lignin in the wood fails. Small cracks get bigger and eventually a piece of wood will split in two. Think of how a steel wedge is used to split a piece of firewood. Water does the same exact thing to your wood deck, fence, or teak furniture.
This is why it’s paramount to keep outdoor wood sealed so water doesn’t soak into the wood to make tiny cracks huge cracks as you might see on a neglected fishing pier boardwalk that extends out into the ocean.
If you think water is bad for wood, wait until you layer on top of it the punishing ultraviolet (UV) rays of the sun. A small percentage of the sun’s UV rays contain active photons. When photons hit an object traveling 186,000 miles per second, imagine a microscopic nuclear explosion.
Photons are so powerful they can break atomic bond of metals. Have you ever wondered why the corrugated metal roofs you see on barns and other agricultural buildings are rusty? Do you know what the roof looked like when new? They were shiny silver like a new galvanized garbage can. The fresh zinc coating can be blinding in the sun.
But each day when photons hit the zinc, they break bonds and then the next rain washes the zinc from the roof. Eventually there’s no zinc protective coating left and the exposed steel begins to rust. The same thing happens with copper flashings on roofs. Have you ever noticed how the roof surface below a copper flashing looks new and is mold-free? It’s because copper is a natural biocide and each rainfall transfers copper from the flashing to the roof surface.
Knowing this, imagine how destructive UV light is to your wood! Wood is so much more fragile than zinc or copper. The UV rays blast apart the lignin that holds the wood fibers together. This is why after you wash your deck, fence, pergola, or furniture it’s fuzzy. The fuzz is wood fibers that are just barely hanging on like your child’s tooth that’s about to fall out. You have to allow the wood to dry, then go through the painstaking process of sanding it to get the wood smooth again.
You can minimize UV damage to wood by using outdoor wood sealers that have a fair amount of pigment in them. The pigment acts like sunscreen or a sacrificial anode in a water heater. The pigment is a shield and gives up its life so the UV rays, photons, don’t make it to the wood. But you know how this ends. Your deck color starts to fade just as zinc washes off the galvanized roof panels. Soon there’s not enough pigment left and the UV rays can get to the wood.
Paint is the ultimate protector for wood, but the issue is it will eventually fail. Because your wood is hygroscopic and expands and contracts at a greater rate than the paint, the paint eventually cracks and peels. Then you have an even bigger mess on your hands. Now you know why I eat lunch each summer day with my feet resting on my composite deck while enjoying my food that’s on a wonderful aluminum table and my posterior is parked in a matching aluminum chair!
Column 1467
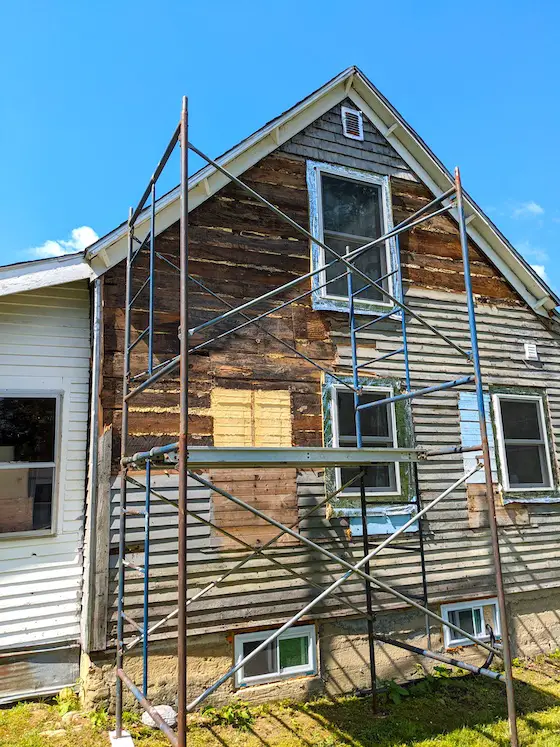
DIY Home Projects - You can rent pipe scaffolding like this with the aluminum platforms. It's safe and easy to erect. Copyright (C) 2022 Tim Carter
The volume of incoming DIY help requests via the Ask Tim page of my www.AsktheBuilder.com website is rising faster than the Fed can hike interest rates to tame the raging inflation. With the prices of bare necessities such as fuel and food taking larger bites out of your budget, there’s scant money leftover to hire contractors to do work for you, even if you can get them to return phone calls. You may be one that needs my help.
Because you can’t afford to hire a contractor, you may be one of the millions that’s made the decision to tackle a larger project yourself. I know it can be intimidating, but believe it or not it’s never been easier to do some larger projects than it is now. Years ago you couldn’t watch videos about how to do something. Now many manufacturers have excellent instructional videos that can give you the confidence you’ll be able to do the job just as good, or better, than some subcontractor sent to work on your most valuable asset - your home!
Add to this the vast selection of tools you can rent to help you accomplish tasks that require you to be up in the air. Years ago man lifts didn’t even exist. Now you can get motorized lifts with giant articulating arms that allow you to safely paint that tall gable end on your home, or reach a difficult sidewall above a steep roof. Never before has it been easier and safer for you to do exterior work on your home.
For example, imagine you wanted to install gutter guards. I’ve tested many and discovered the best ones out there. You should go to my website and read my Gutter Guard Test Results column. Some companies charge astronomical prices to install these simple products. If a man lift can drive around your home, you might complete the job in less than a day. It’s possible to save well over $1,000, or more.
Two months ago a friend of mine rented one of these man lifts to do exterior painting. He’s okay with using ladders for work up about 15 feet in the air, but terrified to go up further. In just two weekends he not only got all the high painting work done, but he also used the lift to install a heavy light bar over his bocce ball court.
An often overlooked tool you may not be aware of is simple pipe scaffolding. I have four sets of my own I’ve owned for forty years. Masons traditionally use this scaffolding and it’s strong, safe, and stable. Once you stack the pieces together, install the cross braces, set the aluminum platforms, and then the guard rails, it’s as if you’re standing on the ground. The scaffolding allows you to kick anxiety and fear to the curb while you diligently work 20 or 25 feet up in the air.
Here where I live in central New Hampshire, I can rent six sets of this scaffolding, including the aluminum work platforms, for just $300 per month. This would allow you to build one tower that would get the bottom of your feet 30 feet up in the air. It’s plenty of scaffolding to set around a ranch home so you can walk across the top of all six sets placed next to one another and travel almost 50 feet down one side of your home. Don’t underestimate what you can do with this strong steel pipe scaffolding.
Angel, a young woman who lives in upstate New York, is using this scaffolding to help her build a dormer on her home. I’ve been coaching her over the phone as she marches through this daunting project. She attempted to get contractors to bid the job, but none called her back. She’s got the three Ds: diligence, determination, and discipline and she’ll not only get the dormer done, she’ll save tens of thousands of dollars in the process.
Let’s say you want to install new vinyl siding on your home but you’ve never done the job before. What would you say if I told you it’s extremely easy to do it and modern trim pieces have made it even easier. Add to this the extensive amount of how-to videos you can watch for free online, many produced by the actual vinyl siding manufacturers.
There are some aspects of installing vinyl siding that do require some expertise, but the odds are your home might not have these challenges. I visited the Vinyl Siding Institute website and they have a huge section that shows you how to install vinyl siding including a marvelous free interactive installation manual. There are wonderful videos there too.
When you see how easy it is to install vinyl siding, I’m guessing you’ll get motivated just like Angel. Her dormer job is much much harder than just installing vinyl siding and she should be an inspiration for you.
I’ll leave you with this. My father-in-law had a great saying that you should consider, “Success breeds success.” It simply means that your confidence builds as you tackle tougher and tougher projects achieving great results each time. If you have a garden shed, cover it with vinyl siding first. Once you complete that, you’ll say, “Heck, that wasn’t so bad. I’m sure I can do the house now with some of that pipe scaffolding!”
Please send me before and after photos of the tough project you completed.
Column 1466
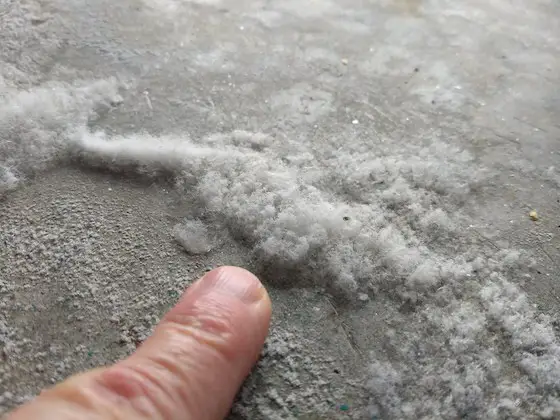
You're looking at salt, not mold. My finger is pointing to efflorescence on a concrete garage floor. These are harmless rock salt crystals not mold as many believe it to be. Copyright 2022 Tim Carter
Not too many years ago I recorded a video in my garage as spring debuted. You can watch this video for free on right here on my website.
This video gets comments each and every week from folks like you. Most of the comments surprise me because the viewer is relieved to discover the fluffy white deposits on their concrete floors, brick walls, or basement walls is harmless salt, not deadly mold.
I routinely fall into the trap thinking that you might know all about efflorescence and the truth is many don’t understand it at all. I remember doing an experiment in high school chemistry class that demonstrated the mechanics of what causes this white powder to appear and how to get rid of it.
In my case, rock salt is used on the roads in central New Hampshire during ice and snow storms. The rock salt, once it comes into contact with the ice or snow, dissolves and turns the frozen precipitation into a salty liquid brine. This salt-water brine then drips off my car when I park it in my garage.
The brine soaks into the concrete floor. With the garage temperature close to freezing and there’s no wind in the garage, the evaporation of the water in the concrete happens very slowly. And each time I drive back into the garage, I add more liquid brine into the concrete.
When spring arrives with warmer temperatures, the brine starts to come to the surface of the concrete like the hosta shoots that peak up from the soil next to our front sidewalk. The first place the efflorescence appears is along the tiny hairline cracks where the salt brine entered the concrete with ease. Soon patches of fluffy white crystals surround the parking area of the car.
I can see why you might think these harmless salt deposits are some sort of scary mold. They do look strange and they can appear in a short amount of time. But you might make a big mistake trying to get rid of them.
You get out your hose and try to wash the deposits away. This just dissolves the salt again and allows it to soak back into the concrete to only appear again in a few days when the brine comes back to the surface of the concrete.
The best way to get rid of efflorescence is to just brush the salt off the concrete or brick and blow it away. You may need to use a stiff scrub brush in some instances. Never use a steel wire brush as that will harm any masonry surface, including concrete.
The salt deposits can and do happen in places that don’t get snow and ice. Many soils and sand deposits contain the invisible salts that can create efflorescence. The salt can be an ingredient in concrete paving brick you may use for a patio. The salt can be part of the sand used to make brick mortar.
The salt can be in soil behind a retaining wall. In all these cases, when water enters the masonry surface, it dissolves the salt just like you might have done that day in your high school chemistry lab. Now you have the brine in the masonry. Wind and warmth pull this liquid to the surface where the water in the brine evaporates leaving the salt behind.
This is the exact same process with normal hard-water deposits you might see in your kitchen or bathroom. The salts are already dissolved in your drinking water. When this water gets on a dark countertop, or the bright metal finish of a faucet, you can see the white salts in a few hours after the water droplets evaporate.
You can often buff the surface with an old towel and remove them. If allowed to accumulate on a shower door, faucet, or counter, you can remove them with ease using a paper towel saturated with white vinegar. Vinegar is a mild acid and it can dissolve light amounts of hard-water deposits with ease if you’re patient.
Go here to see dramatic before and after photos of how vinegar removed thick hard-water deposits. SCROLL to the bottom of the page to see the photos of the tile around the fountain.
Don’t rub the deposits with the paper towel. Just drape the saturated towel over the area that has the deposits and walk away. Let the vinegar work on its own for a few hours. In almost all cases when you come back and rub the surface with the paper towel, rinse with clear water, and dry with a clean rag, the deposits will be gone.
Don’t use the vinegar on polished or burnished marble surfaces. Or, if you do, test it with a small drop applied with a cotton swab. Put one single drop of vinegar on the marble and come back in a few hours.
You want to see if the vinegar alters the polish of the marble. You may not realize it, but the marble has a very similar chemical makeup as the salt, Strong acids will etch marble. It’s just a matter if the low-grade vinegar acid will harm your marble.
Column 1465
Sewer Gas Detector | This is a p-trap although it’s a different design. This device, so long as it’s filled with water, stops sewer gas and vermin from entering your home. Copyright 2022 Tim Carter
Do you have the same problem I have with the passage of time? It’s hard to believe, but I’ve been a master plumber since 1981. I’ve always loved doing plumbing work because it’s a true three-dimensional puzzle.
You may not realize it but just after the US Civil War smart people finally connected disease and sickness to bacteria. All of a sudden it became quite apparent that it was a great idea to pipe body waste to remote parts of cities instead of throwing pans of it out second-story windows to splash on the street.
Plumbers all of a sudden became as respected as physicians because their skills working with pipes allowed people to stay healthy. This was true of both drain lines and the installation of potable water lines that provided fresh, clean, and sanitary water to millions of people.
To this day these facts are a primary driver why plumbers are well-paid. If you have a daughter, son, or grandchild that wants to have a rewarding career that provides significant income, point them to a trade school that teaches this craft.
It’s vital that plumbing drain pipes, as well as the vents that connect to them, be installed correctly so sewer gas never enters your home. Each week I solve sewer gas problems over the phone with homeowners just like you. In fact, yesterday I solved a vexing problem for a New Mexico homeowner just hours before he was expecting house guests.
Sewer gas can be found in septic tanks, city sewers, and the drain pipes in your home. It smells horrible. It’s caused by the decomposition of bodily waste and rotting food that you send down your drain pipes. It’s toxic and can cause severe illness if you’re exposed to enough of it for long periods of time.
Just two years ago a man hired me to come to his home to solve a sewer gas issue. His wife was seriously ill and no doctor could figure out the cause. Within minutes I connected her suffering to the leaking sewer gas. I found out that they had installed a new tile floor on top of an existing one in a powder room immediately adjacent to where his wife sat and watched TV.
After the new floor was installed, the tile setter or plumber didn’t put in an extra wax ring to account for the fact that the toilet now sat 1/2-inch higher than it did before the new floor was installed. Invisible sewer gas was leaking from the base of the toilet like smoke issuing from a raging wood-burning fireplace. As soon as two wax rings were installed on top of each other on the toilet flange and the toilet reset, the sewer gas stopped entering the home.
A year ago I decided to help homeowners like you solve sewer gas problems on your own. I decided to write a simple short book about sewer gas. It explains how your plumbing system works. I then ask you a series of questions that helps you narrow down why you’re having sewer gas issues. Within a few minutes you can normally figure it out on your own. If not, I can call you on the phone as I do with many many people each year.
Here are the basic things you need to know about your plumbing system and sewer gas. First, it’s vital the plumbing pipes in your home work like the blood vessels in your body. When all is well in your body, your blood stays inside the blood vessels. If you cut yourself or a vessel breaks under pressure, blood leaks out. The same is true for the pipes in your home. When all is well, the liquids, solids and sewer gas stay in the pipes.
But if a pipe cracks, has a hole drilled in it, or a trap under a fixture dries out, then sewer gas and vermin can enter your home. Dried-out p-traps under sinks, showers, and floor drains are the most common source of sewer gas.
Two years ago I did a phone consult with a man that owned a condo in a high-rise building in Monaco. He had a horrible sewer gas problem. It turns out the source of the leaking gas was in multiple other condo units above and below his unit!
Many of the condo owners only stay in their units for a few months out of a year and while they’re gone water evaporates from the traps under all the fixtures and from the toilet bowls. Once the water seal in the traps is broken, the sewer gas wafts into the unit and then enters the tall plumbing shaft where all the pipes go down to the street. The sewer gas in the tall shaft was getting into the man’s condo.
I had him contact the condo maintenance manager. He used his master key and went into each vacant condo. He then ran water in all the fixtures and flushed all the toilets. Within hours the sewer gas problem in the entire high-rise building stopped.
Wind can also cause a problem. That plumbing pipe up on your roof works the exact opposite of chimneys at factories. Chimneys are designed to get rid of smoke from a fire or furnace. Plumbing vent pipes do the opposite. They supply fresh air down into the pipes in your home each time you run water in a sink, shower, or flush a toilet.
If you want to read the first chapters of my short sewer gas book for FREE, go here.
Column 1464
Lou Gramm does a great job on this song along with his wonderful live backup singers.
Check out the woman at 4:19. She's absolutely stunning.
Lyrics:
"I Want To Know What Love Is"
I gotta take a little time
A little time to think things over
I better read between the lines
In case I need it when I'm older
Now this mountain I must climb
Feels like a world upon my shoulders
Through the clouds I see love shine
It keeps me warm as life grows colder
In my life there's been heartache and pain
I don't know if I can face it again
Can't stop now, I've traveled so far
To change this lonely life
I wanna know what love is
I want you to show me
I wanna feel what love is
I know you can show me
I'm gonna take a little time
A little time to look around me
I've got nowhere left to hide
It looks like love has finally found me
In my life there's been heartache and pain
I don't know if I can face it again
I can't stop now, I've traveled so far
To change this lonely life
I wanna know what love is
I want you to show me
I wanna feel what love is
I know you can show me
I wanna know what love is
I want you to show me
And I wanna feel, I want to feel what love is
And I know, I know you can show me
Let's talk about love
I wanna know what love is, the love that you feel inside
I want you to show me, and I'm feeling so much love
I wanna feel what love is, no, you just cannot hide
I know you can show me, yeah
I wanna know what love is, let's talk about love
I want you to show me, I wanna feel it too
I wanna feel what love is, I want to feel it too
And I know and I know, I know you can show me
Show me love is real, yeah
I wanna know what love is...
This is an iconic song that rings true about our media that's lost its way.
The media used to be the Fourth Estate. Now only a few publications bear this sacred responsibility that's a byproduct of the First Amendment here in the USA.
But your local papers, TV stations, and radio news outlets still practice shoveling dirty laundry into your senses. There's an old saying in news, "If it BLEEDS it leads."
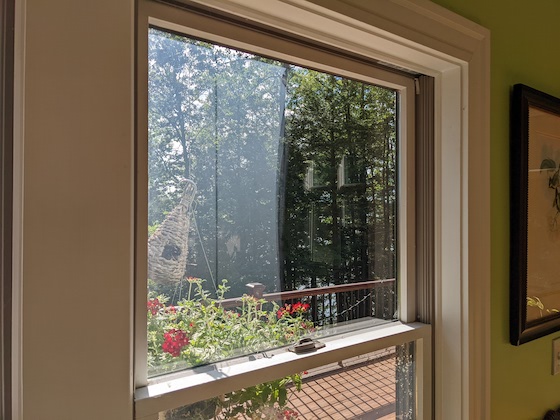
Window Washing Near Me | Look at the before and after. You can get professional results in SECONDS yourself. Pro tips below.
See that window above? See that fog on the left half of the sash? Unless you're paralyzed, you can get professional results in seconds.
I cleaned that right half of the window glass using exactly what pros use to clean skyscraper glass. What magic window washing solution do they use? You're going to be BLOWN AWAY because you have it at your kitchen sink.
Watch this short video to see what it is:
Subscribe to the FREE Ask the Builder newsletter to receive professional advice for your home. Complete the form below and each week you'll get:
Unsubscribe at any time. We respect your email privacy.