February 13, 2013 AsktheBuilder Newsletter & Tips

A few days ago, I was blowing and shoveling snow for three hours. On Monday, we received another 3 inches on top of the 18 inches Nemo dumped here in central New Hampshire this past weekend.

I have to rake off my roof to prevent ice dams from forming in the valleys that pass over the entrance hall. The idiot builder who built my house didn't properly protect the roof from ice dams. Grrrrrrrrrrrrrrrrr!

When you rake the snow from the one part of the roof, it comes crashing down on the front porch creating a pile about 3 feet high. This snow compacts as it smashes onto the decking and has to be removed one heavy shovelful after another.

The architect who designed this house should have his license revoked. Why one would create three roof slopes all converging above a front porch here in snow country is beyond mental comprehension.

What I need is a snowblower like my ham radio buddy Lee Hillsgrove Jr. owns. It attaches to the front of his garden tractor.

Watch this video of him blowing Nemo's snow from his driveway. You'll not believe how far it throws the snow. I have a standard walk behind model that shoots snow about one-third the distance you'll see in the video.

Editor's Note: CLICK HERE to read a follow-up story on this House Design!

TIP OF THE WEEK - NO PLUMBING REPAIRS ON SUNDAY

This past Sunday, my very good friend Russ and I walked around his house just before he drove me to the Burbank, CA airport to fly back to New Hampshire.

He was asking for tips on how to fix things. One stop was a bathroom vanity sink where the faucet handle was hard to pull out and rotate.

It was a common single-handle faucet. I told him, "Oh, all it needs is a new cartridge. It's an easy fix."

What I forgot to add were two words: " ... for me."

Russ, and his DIY talented wife Ann, were getting ready to leave for a business trip to Arizona the next day, but for some reason he decided to jump into the project.

Important Factoid: There are two other bathrooms in the house. This faucet did NOT have to be repaired at that time - not by a longshot.

Russ soon discovered that the shutoff valves under the sink didn't shut off the water. In fact, one sprung a leak while he was trying to rotate it. Then he discovered he couldn't remove the faucet cartridge. All of a sudden he was in over his head.

After multiple trips to the hardware store, Russ was able to supply his wife Ann with all the parts she needed to install an entirely new faucet.

I called him in the few minutes I had as I raced around the Chicago Midway airport to make my connecting flight to discover the can of worms he had opened up.

Bottom Line: Don't jump into a plumbing project on a Sunday before you're going out of town. Don't start a plumbing project unless you have ALL the parts and tools on hand. Don't start a plumbing project unless you have the number of a plumber that will drag you out of the Plumbing Hole of Death you'll probably slip into - assuming that you don't have a talented wife like Ann!

Russ knows I'm a master plumber, but he's not. His wife Ann is a pretty accomplished plumber, so it's a good thing she was around to save the day! I can hear him now calling, "(Ann's maiden name), come quick! A pipe is leaking!"


NEW STAIN SOLVER SIZE!

Kathy and I, and the rest of the Stain Solver team, are happy to announce a new arrival! Not a living breathing baby, but a new small Stain Solver size!

Stain Solver Sample Size

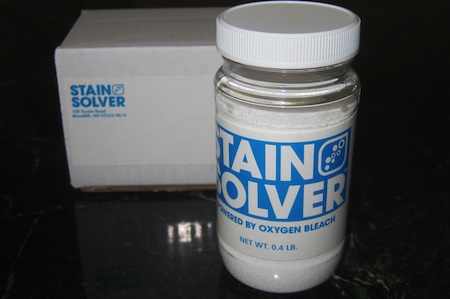
This little guy weighs in at 0.4 pounds, and is perfect to sample Stain Solver. It's in a nice clear bottle perfect to fit in a purse, an office drawer, a suitcase, etc.

In the past, the 2-pound size has been our smallest size and it can be a leap of faith for some to buy that size.

But this NEW size costs just $9.97 with FREE SHIPPING to anywhere in the lower 48 states. I'm working feverishly to get it to ship easily to Alaska, Hawaii and Canada. Please be patient.

You've heard me talk about Stain Solver and all the great things it can do. Now we've made it affordable for you to purchase some.

Once you discover how well it does, you want to buy Stain Solver in a bigger size to save lots of money.

We're also offering this new size in a case of 12 in case you want to sell it at your store or give to friends or neighbors as a gift.
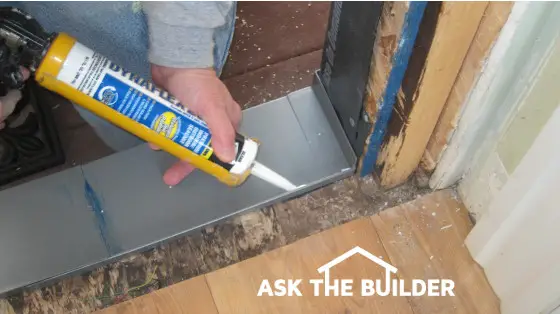
 

WOOD ROT REPAIRS

I was in Los Angeles last week taping the Wood Rot Repair video series. The weather just barely cooperated. About an hour after mixing and applying the amazing special epoxy, it started to rain and hail. It was a cold, rainy Friday in LA!

If you want to see exactly how to repair wood rot without having to be a master carpenter, you should invest in this video series. The project closes out in just five days and then the price for all the videos I taped showing you secret ninja tricks will go up.

Wait until you see the fantastic products in this video series. They were a dream to work with.

Do it now, just go back my Wood Rot Kickstarter project. I'll be editing the videos soon!


HELP GROW ASKTHEBUILDER

You could really help make this newsletter better by using my affiliate link when shopping at Amazon. When you do this, it does NOT affect the price you pay for an item.

Amazon simply pays me a small commission on what you buy. I have no idea who is buying what, so it doesn't invade your privacy.

Just CLICK the banner just below and shop away!

Help AsktheBuilder on Amazon


BLACK AND DECKER SCREWDRIVER - ANOTHER POSSIBLE USE

I have really come to like using my powered screwdrivers and impact drivers around the house. There are countless uses for them.

But something tells me you never thought that you could use a battery-powered screwdriver to ...... You'll have to watch the video.


BOOKS I'M READING

A little over a year ago, I purchased my Kindle Fire tablet. It's fantastic. Granted, it's not large like an iPad, but it's a delightful reader. You can surf the web and do lots on it like you'd do with any tablet.

Last week, I finished reading Murder on the Mind by L.L. Bartlett. It kept my attention all the way to the end. That's a good thing.

I'm now reading Back on Murder by J. Mark Bertrand. It's got more twists and turns than Lombard Street it San Francisco! I'm anxious to see how this book ends.

Currently, as you can see, I'm in a rut about murders. What are you reading?


CAPITAL HOME AND GARDEN SHOW APPEARANCE

Do you live in the Washington DC metro area? Would you like to hang out for a couple of hours with me? Do you have some problems at your house you want me to consult on?

I suggest you come and see me at the Capital Home and Garden Show on Sunday, February 24, 2013. If you go to their website and purchase advance tickets, you can get a substantial discount using this promo code: BUILDER

I'll be on stage at 2 and 4 p.m.. I plan to host two meetups before each appearance on the show floor.

Be sure to bring any photos of the problems at your home.

If you want to meet up with me at the show, you MUST respond to this email. Change the Subject Line to: Home Show Meet Up


LIVE ASKTHEBUILDER.COM TV SHOW!

Guess what? I'm starting a LIVE TV show on YouTube!

Are you up off the floor yet? Are you filled with questions about what the show's going to be like?

Well, you're going to help me design the show.

Please take this SHORT three-question survey to HELP me create the best home improvement show in history!

I'll share more about the show and what I have in store next week. But for now, PLEASE help me. Take the survey!!

Exterior Door Flashing Ninja Tricks

DEAR TIM: When it rains, water leaks into our basement just under our front door. The previous owner installed the door, and much of the work around the house he did we’ve discovered is substandard. What do you think is the cause of the water leak under the front door? How can it be fixed? What should have been done in the first place? If we do nothing, what will happen over time? Sharon P., Nashville, TN

DEAR SHARON: I realize it’s of little consolation, but you’re in a large group of homeowners that suffer from poor workmanship. Some is perpetrated by do-it-yourselfers that don’t have the proper training or attitude, but a frightening amount of poor work is being done by paid individuals trying to pass themselves off as pros.

Sadly, I see an erosion of the quality standard each year. Just last month, I saw an article in one of the top building magazines where the author was telling other builders and roofers that it was perfectly fine to use caulk as a sealant while building a copper chimney flashing. I was aghast at such workmanship and advice. You don't caulk copper flashing joints, you solder them for a permanent leak-free joint.

The door flashing is in place and a bead of caulk is being laid down to prevent air infiltration. Photo Credit: Tim Carter

With respect to your front door, I'm afraid the leak could be traced to any number of potential defects. The first thing I suspect is the installer didn't include a weather membrane under the door threshold. That's the bare minimum that should be done.

It's also possible the leak could be coming from a lack of a sill flashing pan, poor caulking on the sides of the door, a lack of a water membrane on the sides of the door frame, a lack of a flashing above the door, etc. There are several other possible causes of the leak.

The best way, in my opinion, to understand why doors and windows tend to leak at houses is to think about how the exterior wall system works when there is no door or window in the opening.

If your house has wood, metal or vinyl siding, these materials shed water much like shingles on a roof. One piece of siding overlaps the next one such that water running down the wall can't get behind the siding. The overlapping materials shed water very well.

When you install a door or window in an exterior wall, you must do it in such a way that you maintain this overlapping layering of materials. Think of the door as a giant piece of siding.

This means that under the door there needs to be a water membrane that protects the subfloor from water and overlaps the last piece of siding or exterior material that tucks up under the door threshold.

Better yet, you should install a preformed flashing pan under the door or window. I've installed many in my career, even making my own from soldered copper or tin. The front of the flashing pan overlaps the piece of siding that tucks up under the door threshold so that any water that gets under the door is channeled back outdoors.

These flashing pans are sized for just about any width door or window and for the most common wall thicknesses. They're the absolute best defense when it comes to preventing leaks. After the flashing pan is in place, you continue up the sides of the opening with a water membrane that overlaps the sides of the flashing pan. This method channels water back outdoors.

To fix your leaking door, I'm afraid to say it may require removing the door to inspect to see how it was installed. You can get clues as to the leak cause by just removing the exterior wood trim that surrounds the outside of the door. Removing this trim is not hard, and it will readily show you if the required water membranes are installed as well as the mission-critical flashing pan.

Ignoring water leaks under doors and windows is a mistake, especially if your home is constructed with wood framing.

Water can and will promote wood rot. Water leaks can cause vast amounts of damage. Water will fuel hidden mold growth.

If enough wood rot is allowed to occur, you'll suffer from structural damage at some point. It may take years, but floors can sag, beams can fail and roofs can collapse.

You can see why it's so important to hire a true professional that understands how to keep houses dry. It's your job to understand this as well so you can ask the correct questions as you interview contractors that will work on your most valuable asset - your home!

Column 974

Wood Rot Repair Tips and Tricks

wood rot

Wood rot like this can be minor or serious. It can be repaired without removing the wood in some cases. Copyright 2018 Tim Carter

"Wood rot is caused by different fungi that are consuming the wood. The fungi need water to live."

Wood Rot Repair Checklist

  • Determine if repair or replacement is the best solution
  • Replace with rot-resistant wood like redwood or cedar
  • Treat wood with copper naphthenate or borates
  • Repair with easy-to-use wood petrifier and epoxy

DEAR TIM: It seems like we’re constantly doing wood rot repair at my home. The latest project involves numerous places on the inside and outside of our home where wood is rotting.

My carpentry skills are better than my husband’s but that’s not saying much. Is there a way to repair wood rot without having to be a master carpenter? What are my options? What can I do to prevent wood rot in the first place? Amy S., Buffalo, NY

Related Links

DIY Wood Rot Treatment Magic Liquid

DANGER! Treated Lumber Can Rot!

DEAR AMY: Wood rot seems to be a growing epidemic in homes. The complaints I’m receiving are growing by the month. Some of the rot can be traced to poor maintenance habits by homeowners, some to poor building practices by the trades, and believe it or not some traced to the lumber companies.

Free & Fast Bids

CLICK HERE to get FREE & FAST BIDS from local carpenters to repair wood rot.

How Do You Prevent Wood Rot?

You prevent wood rot by keeping the wood dry. Look around your home at the wood that's always dry. You never see this wood rotting.

Wood rot is like the fire triangle. You need fuel, heat and oxygen to create fire.

You need fungi, wood and water to create wood rot. Remove water from the equation and there's no rot.

What Causes Wood Rot?

Wood rot is caused by different fungi that are consuming the wood. The fungi need water to live.

How Do You Keep Exterior Wood Dry?

You keep wood dry by keeping it painted and sealed. It's also a great idea to keep it above horizontal masonry or concrete surfaces by at least 2 inches.

I prefer to keep wood up off of soil at least one foot and to keep air moving if possible to dry the wood.

A year ago, I had to rebuild my front porch. I didn't build the house I currently live in. The builder installed a composite decking material without the proper spacing between the pieces of wood. The underside of the decking material was covered with fungi that were eating the wood particles in the composite lumber. Even composite lumber can succumb to wood rot!

What Should I Do Before Repairing the Rot?

You need to stop the water problem before you attempt to repair wood rot. It's imperative that you hunt down and eliminate the water source that's causing the rot.

If the wood has been placed too close to the soil, a sidewalk, a patio, a roof, etc., you may have to re-engineer the situation so the wood doesn't get wet, or if it gets wet it dries rapidly.

Should The Wood Dry Out Before Repairing the Rot?

Once you have the water situation solved, then the wood needs to dry completely. This can take days, weeks or months depending on the season. Blowing air across the wood will accelerate the drying time. Be very careful about using a heat gun or other artificial heat source to dry the wood. Wood that's rotted and dry ignites very readily and can burn fiercely.

CLICK HERE to get FREE & FAST BIDS from local carpenters to repair wood rot.

Can You Revitalize Rotted Wood?

Yes, you can revitalize and strengthen rotted wood by using a liquid wood hardener/petrifier. Petrifier is slang for petrified wood.

I've had great luck revitalizing rotted wood using PC Petrifier.  It soaks into the dry wood fibers and makes the rotted wood hard again.

wood rot repair

This is PC Petrifier wood hardener. It comes in different sizes. This is the gallon jug. Get this size if you have to repair lots of wood rot. CLICK THE PHOTO to have this delivered to your home.

These liquids appear to be heavy bodied resins that adhere readily to the rotted wood. Drilling hole into the rotted wood can enhance deep penetration of the liquids.

Does The Wood Hardener Strengthen The Wood Rot?

Yes, these liquids, once dry, add considerable strength to the rotted wood fibers. Using this milky liquid is the first step in wood rot repair. The second step is filling holes and gaps with special wood epoxy.

Is the Wood Epoxy a Special Product?

Yes, the wood epoxy I prefer, PC Woody, is a special filler meant to fill holes, cracks, and gaps in the rotted wood.

wood rot repair

This is a great wood epoxy that will fill larger cracks in wood decking and outdoor wood. If the wood is starting to rot, get the kit that has the PC Petrifier component. CLICK THE IMAGE NOW TO HAVE THIS PRODUCT DELIVERED TO YOUR HOME.

Any gaps, holes, or voids can be filled with paste epoxies that adhere very well to the wood. The dry epoxy can be sanded and painted. You don't have to be a master carpenter to work with these DIY friendly epoxy products.

Should I Read the Epoxy Instructions?

As with any repair products, you have to read all the instructions on the product labels. What you'll discover with most, or all, of the chemical and epoxy repair products is the wood needs to be dry. You want this anyway so the good wood doesn't rot further!

What are Wood Rot Prevention Tips?

Preventing wood rot is not as hard as one might think, but it requires a mixture of common sense and best practices. Purchase lumber that has built-in rot resistance if possible. Redwood and cedar are exterior wood species that have natural chemicals that stave off wood rot except in the worst conditions.

Beware of hybridized lumber that's now grown by lumber companies if possible. This lumber has vast quantities of spring wood in it. Spring wood is the lighter-colored band of wood when you look at the end of a piece of lumber. It's softer and readily absorbs water.

What is the Easiest Way to Prevent Wood Rot?

Keeping wood painted and sealed is the easiest way to prevent wood rot. It's not the silver bullet, but it can help. Caulk cracks that allow water to penetrate into wood crevices.

What DIY Wood Rot Chemicals Can I Use?

If you want to give untreated lumber a chance to fight fungi, you can also treat it with borate powders and copper naphthenate.

copper naphthenate wood rot repair

This is copper naphthenate. It's a magic DIY wood preservative. CLICK THE PHOTO now to have it delivered to your home.

These borate powders readily dissolve in water. If you then soak the dry lumber with the borate solution so it soaks into the wood fibers, the borate chemicals stay behind after the water evaporates.

Fungi dislikes the borate chemicals and will not eat the wood. The only problem is the borates are water soluble. This means you can't leave the wood unprotected from repeated wet / dry episodes. If that happens, eventually the borate chemicals are leached from the wood and the fungi move in and begin to feast!

You can paint, stain or seal borate-treated lumber successfully once the wood dries thoroughly after it's treated.

CLICK HERE to get FREE & FAST BIDS from local carpenters to repair wood rot.

Column 973

Control Joint Tool Video

Hello, I'm Tim Carter and I found a really great tool. It is called a Robo-Joiner. Basically this is a jigsaw on steroids!

This tool is used to cut control joints in concrete. It is an absolutely revolutionary tool. In the old days, you would have a hand tool that you would have to push along and pound to create the joint. This does it automatically.

It has two plates. One that can give you the traditional rolled look and the other that gives you a square saw cut look for the control joint.

This is a really great tool that comes apart easily for cleaning. This Robo-Joiner will revolutionize installing control joints in concrete.

RoboTool-2012[3]

February 5, 2013 AsktheBuilder Newsletter & Tips

While this email is being sent to you, I'll be cruising the floor of the massive Las Vegas Convention Center.

I'm here on February 5 and 6th attending the World of Concrete show. To many that may be slightly less exciting than watching paint dry.

But in all seriousness, concrete is an amazing product, and there are so many allied products and tools there's enough for a massive show. When you think how much concrete is made each year, tens of millions of cubic yards, you can see why there's a need for an exposition.

If you're attending the show, I'd LOVE to meet you. To make it easy, I'm going to be at the BN Products booth on Tuesday morning. Just come to the North Hall and find booth N 2637. I'll stick around there until 11 am.

This company makes all kinds of great tools if you're working in and around concrete. One of them is the Cutting Edge Saw that can flush cut any number of materials.

I leave Las Vegas Wednesday afternoon, February 6th flying to Los Angeles.

Guess what I'm doing there? I'm taping a very cool video series that shows you how to Repair Wood Rot.

I'm going to show you how and you don't have to be a master carpenter! In fact, if you can fog a mirror, you'll be able to get pro results using the secret methods I plan to show in the videos!

Want to get that video series for just $2?

Then you better act really, really FAST because there's a limited number of people that can discover the secrets I'm going to share for that insane low price. When I say FAST, I mean CLICK NOW to get there. Be sure to click the photo at the top of the page to watch the video!!!

Yes, you guessed it, this is my third Kickstarter project! CLICK that link and discover the cool products I'll be using to repair the wood rot. You'll be blown away.

CLUE: I'm not replacing the rotted wood with wood. Can you guess what I'm using?

TIP OF THE WEEK - ELASTOMERIC CAULK

A few days ago, I installed my gorgeous Classic-Craft Therma-Tru Fiberglass Door that looks like it's solid mahogany. As you can see in the photo, I trimmed it with Fypon cellular PVC trim that simply will never rot.

What you can't see under the door is an amazing Jamsill flashing pan that ensures water will NEVER rot out the wood subfloor.

new front door

The white Fypon trim surrounding the door will be painted the dark green once the weather warms up. Yes, I have to paint that new piece of fiber cement siding under the door threshold too.

I cover how to install all of these things in my newest DIY video series - How To Install a New Front Door.

The written installation instructions that came with the Therma-Tru door and the Jamsill flashing say you MUST use an elastomeric caulk as part of the installation. Not too long ago that was a common word written on some caulk tubes.

Elastomeric refers to the long-term elasticity of a caulk. In other words, if a caulk is elastomeric, that means it can expand and contract a certain distance much like you'd pull on a rubber band XXXXX amount of times before it fails.

Caulks that are elastomeric are usually higher in quality and price. The trouble is, many of the caulk manufacturers took this word off the descriptive content on the caulk tubes!

When shopping, it's hard to determine what's elastomeric and what's not.

The best way is to look for writing on the tube that says the caulk meets or exceeds the ASTM C 920 standard.

I made a phone call last week to one of the top caulk manufacturers begging them to put the word elastomeric on the caulk tube again.

They said I was in a handful of people that had brought to their attention that door and window manufacturers were using the word elastomeric in their instructions.

Hopefully, the caulk manufacturers and the door and window manufacturers will start to communicate a little better with one another! That's the root cause of the issue.


MILWAUKEE SAW BLADES

Can you tell me what these saw blades are used to cut? The 6-inch ruler is in the photo for scale. The red and white divisions are centimeters!

MILWAUKEE SAW BLADES

In other words, those are small blades. Go to the Milwaukee Cutting page and see if you can't discover what these specialty blades are meant to cut.

I'll give you a clue: The materials they're designed to cut both begin with the letter D. You might argue with me that the one blade is meant to cut something that begins with the letter M, but I'd argue that it's a certain type of that product.

My best friend Richard sure wishes he had the one blade years ago! It would have saved him hours of time.

I tested both of these blades at the Milwaukee tool conference last year and they both were absolutely unbelievable. Real game changers.


BETHEPRO.COM

Last week, I told you about the BeThePro.com Pro Forums. That's the digital water cooler where the pros hangout chit chatting about topics that are near and dear to them.

One of the current topics that's really getting traction is the lack of young people who are entering the trades as a vocation, not just a job. When you think long term, this is not good as we need a constant flow of young and motivated people to repair, rebuild, remodel and build new things. Members are sharing their insights about this dilemma.

home under construction

Another topic that never seems to quiet down is workshops. I built a dream shed last summer that I may go brag about. There are amazing photos in some of the articles about the latest and greatest workshops.

Tool tips are also popular. Remember that Bosch oscillating multi-tool (OMT) I reviewed last year? I used it again yesterday to cut a piece of fiber cement siding in half so it would fit in my truck. Check out what the pros say to see if you can discover a new use for your OMT!

Stain Solver logo


GROUTING FLOOR TILE SECRETS!

Do you know someone, it could be you, that has cracked and crumbling floor tile grout?

I'll bet you don't know WHY that happened and how to prevent it.

If you want floor tile grout that wears like the granite ledge that's protruding out of the hill next to my driveway, then you MUST watch all the videos in my Grouting Floor Tile series.


ROCKWELL 16-VOLT DRILL AND DRIVER

Last week, I received a new Rockwell 16-volt cordless drill and impact driver. I've not had a chance to test them yet, but I did open them up, charged the batteries and gave each a spin.

Oh my are these some nice tools. If you're a woman, you're going to LOVE them. They're not heavy, the grip is just right for smaller hands, and they're both well balanced.

I intend to test these in the next month. Be sure to open all future newsletters for a full report.


LA MEETUP LAST CALL

Several people have responded and we're planning to do a leisurely meet up on Saturday afternoon February 9th in downtown Montrose, CA, at 2 pm.

I'd love to meet you, so please respond to this email and change the Subject Line to: LA Meet Up. It's important that I have your cell number in case there's a last-minute change of plans.

When I get your reply, I'll tell you exactly where we'll meet. The satellite image below pretty much tells you all you need to know. Can you smell that coffee now? Or are you a hot tea drinker? Either way, you'll be at the right place!

satellite image part of Los Angeles

February 3, 2013 AsktheBuilder Newsletter

If you're a new AsktheBuilder.com subscriber in the past five days, this is NOT a normal newsletter. I send out alerts from time to time about important things.

Tomorrow, February 4, 2013, I fly to Las Vegas to attend the World of Concrete show.

Let's do a Meet Up at the show!!!!

I'll be on the show floor all day Tuesday and Wednesday morning.

If you're attending the show and want to do a meet up, be at the BN Products booth on Tuesday morning between 9-11 am.

The BN Products booth is in the North hall of the Las Vegas Convention Center at N 2637.

Tuesday's Newsletter ANNOUNCEMENT:

I have a monster newsletter for you on Tuesday. Be SURE TO OPEN it right away!!!

I'm launching a new video project series about Wood Rot.

Wood rot is everywhere. Can you name five people that don't have wood rot at their homes? Be honest.

You don't want to miss out on this video series launch. You'll see why on Tuesday.

Tuesday's newsletter also contains:

  • a saw blade challenge for you
  • a new drill for women (men too!)
  • a photo of my new Therma-Tru mahogany door
  • a tip about the best caulk to buy
  • LA Meet Up location revealed!
  • and MORE!

Thanks!

January 29, 2013 AsktheBuilder Newsletter & Tips

Tomorrow (January 30, 2013), the new Therma-Tru mahogany front door goes in here at the Carter Casa. I'll be trimming the outside with Fypon rot-proof cellular PVC trim. The door is going to rest on a wonderful Jamsill door flashing. Wait until you see the video of me installing that all-important flashing!

Mother Nature must be in a great mood, as she has 50 F temperatures in the forecast. Way to go Mom!

Rain's also supposed to be in the area, but that's not an issue as I constructed a temporary shelter to keep me and the door dry. You can see a photo of the shelter in a column I just wrote about working in the weather.

That simple shelter has an OSB roof on it that's not too visible in the photo.


Congratulations to Alvaro!

On Saturday (January 26, 2013), I broadcast live the drawing of the winner of the LE Johnson Pocket Door contest. Hooray to Alvaro Villalon who lives in South America. Alvaro, I'll be shipping all your loot to you later this week.

It really pays to play in the contests here at AsktheBuilder.com!


Tip of the Week - Removing Woodwork

I taped a video several days ago for the Install A New Front Door series. I was demonstrating a great way to remove door trim that you want to salvage.

The mistake many make is they start to pry the woodwork off while they're standing up.You may be one that starts to hammer in the small pry bar about 54 inches off the floor close to eye level.

That's a huge mistake.

You want to start to take the trim off down at the floor. If you slightly damage the trim as you hammer in the pry bar between the trim and the door jamb, it will be much harder to see the defect down at the floor rather than at eye level.

Be sure you use a razor knife to score the edge of the trim where it touches up against the drywall. If that joint has been caulked or has a heavy buildup of paint, when you lift the trim away from the wall, it can peel the drywall facing paper off. Then you have another thing to fix!


BeThePro.com - A Place for Pros

Remember last week when I talked about the BeThePro.com website? If you're a builder or remodeler that's striving to connect with other like-minded individuals, it's a great place to start.

Let's imagine you've got a problem on a job. Drop into the Pro Forum and get help from others.

BeThePro.com has a growing collection of columns written by pros. Have you ever gone out on a call to look at a job and the homeowner tell you they want something you've never seen? It's happened to me. It also happened to Thom Hunt.

Thom's a concrete artist that was asked to build a retaining wall inspired by a mystical theme. The story gets better. He had to build this wall in Costa Rica.

When you visit the BeThePro.com site and read articles written by pros that have been there and done that, you may get some ideas that make you more competitive in your marketplace. There's a good chance you'll discover new tools, new techniques and new friends!


Washington DC - Capital Home and Garden Show Appearance

A few days ago, I was scheduled to talk at the Capital Home and Garden Show on February 24, 2013. If you purchase advance tickets at their website and use the promo code: BUILDER, you can get $4 off each ticket. That's a sweet deal.

The show is held at the Dulles Expo Center. I'll be on stage at 2 and 4 pm.

I'll be doing a meet up at lunch before the show, so be sure you stop by!

Also, it's a great chance for me to help you with any problem you might have. All you need to do is bring some photos, your plans, whatever and I'll answer any and all questions you might have.

The session I run is a simple Q and A. I've discovered over the years that's the most popular format as just about everyone has a problem at their home and they want solid advice from someone who doesn't have a dog in the fight. That would be me!!!


Stay Warm in a Heated Jacket

Yes, I realize you may live where it's warm right now. In fact, you could live in a tropical location where the temperature rarely drops below 70 F!

But for millions of us, we live where the snow blows. I just reviewed a marvelous heated jacket, and urge you to watch the video!

If you can't wait, just go BUY the jacket now.


Repairing Wood Rot

Unless you live in the Atacama Desert, you probably have some wood rot at your house.

How would you like to discover a really simple way of repairing the wood?

I thought so. You don't have to be a master carpenter!

Be SURE you open next week's newsletter right when it shows up!!!!!


Los Angeles Meet Up

Do you live in LA? Do you want to hang out on Saturday, February 9th, for about an hour or so? I'll be hosting a meet up in Montrose which is just northeast of Burbank.

If you want to know where and when the meet up will be, reply to this email but change the Subject Line to: LA Meet Up

Milwaukee Heated Jacket Video

Hi, I'm Tim Carter and it's winter time, but I'm not worried about it. I have on a wonderful heated jacket. It looks like a normal jacket, except a little brighter, but it is powered by a 12-volt lithium-ion battery. The battery fits on the side in a little pocket.

The jacket heats the body core area and has three settings. It has high, medium and low heating levels. In addition, the jacket is also wind and water resistant for a variety of cold jobsite conditions. The jacket also features a zip-in removable hood.

The jacket is also a safety construction jacket as you can see from the reflective strips. The jacket is highly visible at night.

It is available in three other colors - fire-engine red, black, a camouflage design as well as the neon yellow I am wearing. This jacket keeps me nice and warm to I am comfortable when working outside in the winter.

The above is an affiliate link. I get a tiny commission if you purchase this item from Amazon.

Working in the Weather

DEAR TIM: I'm thinking of starting my own remodeling business since I've been laid off work. The weather in my area is four season and I wonder how you can continue to work outdoors in cold, rainy and snowy conditions. I don't want to loose income if the weather is bad. I'm sure I can't always have inside work to do when the weather is not too great. How can you work in and around Mother Nature's fickle moods? Scott J., Littleton, MA

DEAR SCOTT: Congratulations on your new venture! I've been self-employed for over thirty-seven years and love the freedom and challenges. My biggest piece of advice to you is to maintain a great attitude and strive to do excellent work. If you produce fantastic quality, show up on time, return phone calls and treat your customers with respect, you'll soon be flooded with work.

I can tell you that working in the weather hasn't changed much in the decades I've been in the business. What has changed dramatically are clothing and footwear choices that absolutely will allow you to work comfortably outdoors all day long.

Not only can you dress well to shrug off what Mother Nature sends your way, but you can also build quick and easy shelters that allow you to do lots of work that otherwise might have to wait until warmer dry weather. Waiting like that can hurt your bottom line since all you really have to sell is your time. You can't afford to be idle not making money because it might be raining or snowing.

Let's talk about clothes first. There are many synthetic fabrics that are perfect for working outdoors. You can get a wide variety of these t-shirts, long-sleeved t-shirts, fleeces, etc. at stores that cater to hikers and campers. The textile technology dealing with preventing hypothermia has advanced miles in the past few decades. Never wear cotton on cold rainy or snowy days.

Perhaps my favorite newer clothing item is the heated jacket. Imagine wearing a jacket that's powered by a small 12-volt lithium-ion battery. These jackets are rugged and made with outer shells that can take the demanding construction environment. There are three heat settings so you can regulate the temperature depending on the outdoor temperature and your level of exertion.

It's really important that your feet stay dry all day, so invest in boots that are absolutely waterproof, but are made with the special fabric that breathes. You'll want a pair of rubber boots too for those really wet days and muddy job sites.

Wool socks are excellent because wool is a natural fiber that has the ability to insulate even when wet. Always have extra dry socks with you on the jobsite in case your feet do get wet. If you get chilled, your dexterity drops and you start to concentrate on staying warm. If you get distracted by the cold, or lose feeling in your hands and feet, that's the recipe for accidents and injuries.

Even though you may be wearing great clothes to keep you warm and dry, it's best, when you can, to keep water off of you as you work. In certain situations you can do this by building small temporary structures that allow you to work in a dry cocoon.

Just recently, I had to install a new front door at my home in the middle of winter. I was able to erect, in less than an hour, a temporary wall that sported a lean-to roof. All I had to do was attach a piece of heavy plastic to the wall to stop cold wind and any water from bothering me while I removed the old door and prepped the opening to install the new door.

Here’s a simple enclosure that permits you to install a new front door comfortably with temperatures well below freezing. Photo Credit: Tim Carter

Here’s a simple enclosure that permits you to install a new front door comfortably with temperatures well below freezing. Photo Credit: Tim Carter

A few years back, a professional painter I hired for a job had a tight deadline and needed to paint window trim on a rainy day. He was well prepared and created a simple lean-to structure using fiberglass tarps attached to 2x4s that were propped up under the house overhang. He was able to build this in less than 15 minutes!

When dealing with temporary structures outdoors, don't underestimate the wind. A gust of wind can blow over your structure causing major disruptions. If you have to leave the structure up overnight when you're gone, you could have a major problem if your structure blows down. You don't want an angry customer's house exposed to the weather.

You also have to be very careful if you are trying to heat areas with portable heaters that are operating around or in these temporary structures. Not only are there significant fire dangers should your temporary structure catch fire, but you can have a problem with toxic fumes created by heaters that burn fuel.

Column 972

January 25, 2013 AsktheBuilder Newsletter

If you're a new subscriber in the past three days, this is NOT a normal newsletter.

I just wanted to remind you that the drawing for the WINNER of the LE Johnson Pocket door contest is tomorrow, January 26, 2013, at Noon Eastern Time.

It's going to be LIVE on my YouTube channel. Woo Hoo!

I'd love for you to tune in if possible. Why? Soon I'm going to do a LIVE broadcast every week. How would you like me to answer your question LIVE on YouTube?

If you send me a photo today, tell me your issue, I'll pick TWO photos tomorrow to quickly answer. Let's have some fun!

Tim Live Broadcast

When you arrive at my channel tomorrow, the first video at the TOP of the page will be the live broadcast. It should have an indicator that it's Live in RED.

Believe me, you can't miss it. If you get there a little after Noon, when you click it, you'll join the broadcast in progress. YouTube saves the entire broadcast and archives it on the channel if you want to watch it later like you watch shows on your DVR.

If you get there EARLY, before Noon, you may not see the LIVE thumbnail. I'll start the broadcast right at Noon. Be aware you may have to hit Refresh on your browser a few times to see it.

I'll talk for a few minutes before doing the drawing so you don't miss out on me announcing your name to the entire world LIVE.

Please set a reminder now, and let's see how many people can watch it at the same time LIVE.

Please add comments as the Broadcast happens.

We had just under 700 correct entries to the contest. That's pretty good odds!

I wish you the best of luck if you entered the contest.

If you didn't enter the contest, but want to see the gorgeous doors at LE Johnson that everyone else saw, just Click Here!

Let me know how you like tomorrow's broadcast. Send me an email after the drawing and tell me if you'd like to see me on YouTube LIVE each week.

All we have to do next is determine what's the best time to do the live broadcast.

Thanks!