Install a Door in an Open Archway

DEAR TIM: I have a large opening between two rooms. This opening makes it impossible to have privacy in either room. I'd like to close up the opening and install a door. What's involved in this process? Is this a project a single mom can tackle successfully, or should I hire a professional? What are the hardest parts of the job so I can decide if I want to do this? The existing walls are just 2 x 4s covered with regular drywall. Maggie L., Fresno, CA

DEAR MAGGIE: You may be surprised with my answer. I feel it's very possible for you to do this job entirely by yourself. The hardest part of the job, in my opinion, is just the technical aspect of hanging the door. But recently I taped a series of step-by-step videos showing exactly how to do that. Believe me, no one part of the job is that hard, it's just that there are many steps you have to take from the start to the finish.
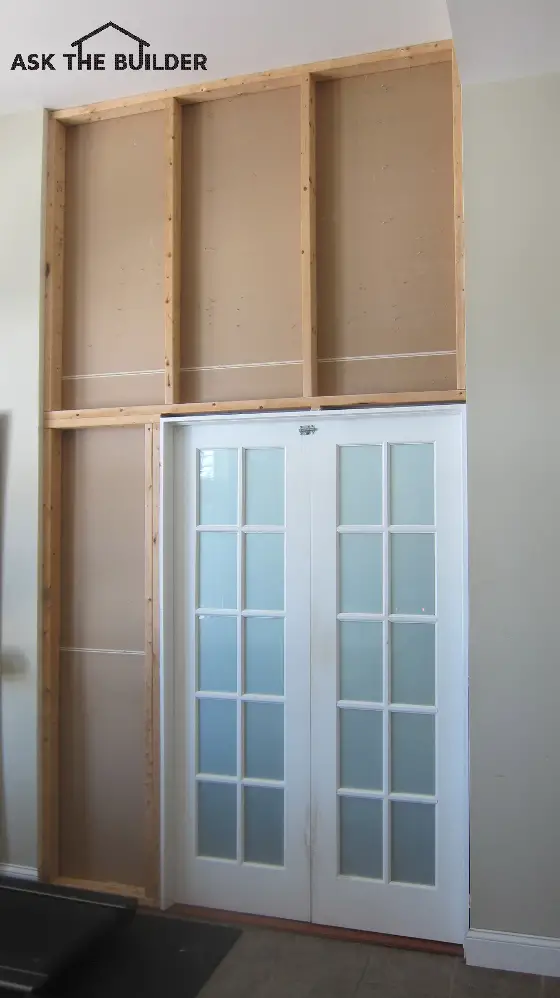
You can see the "bones" of the wall that was created to transform an open archway into a wall with a door. ©2017 Tim Carter

The good news is there's no structural work involved. Any beams that span over the archway between the two rooms have already been installed. All you need to do is fill the opening with wood studs, create the rough opening for your new door, add the drywall to cover the wall studs, install the new door and trim, and then paint.

If your existing opening has been wrapped with drywall, there's probably metal cornerbead at the corners. It's best if you remove this hidden metal from the corners. You do this with a simple metal pry bar. Remove the small piece of drywall that's been nailed to the face of each wall stud on either side of the opening. You're now ready to rough in the wall studs to close up the opening.

You'll build a wall in the opening just like a normal carpenter would. The wall should have a bottom and top plate. These are simply 2x4s that lie flat on the floor and across the top of the opening. The vertical wall studs are nailed to these plates.

When you create the rough opening for the doorway, it's best if you have the actual pre-hung door with you at your house. Make the rough opening 3/4 of an inch higher than the total height of the wood door frame. I recommend that you make the rough opening width 3/4 of an inch wider than the width of the actual door frame.

Take great care to make sure the wall studs you use are as straight as possible. This is very critical at the door opening. Select wall studs here that are perfectly straight. Be sure the rough wall is perfectly plumb.

Temporarily screw or nail the top and bottom plate into position as you check the wall for plumb. Once you feel it's plumb, you then attach strings across the rough door opening going from the four corners of the opening creating the letter X.

If the strings touch one another gently with no gap where they cross, then the rough opening is in the same plane. You need to switch the strings so one is behind the other to ensure that there is no gap at the center of the X. If there is a gap between the strings at the center of the X, that means the opening is in a helix. Correct this by making sure the studs at the door opening are indeed plumb.

Once the drywall is smooth, sanded and primed, it's time to install the door. With the rough opening plumb and in the same plane, this is easy. If you haven't already cut out the bottom plate of the wall as it passes under the rough opening of the door, do it now. You want the bottom plate of the wall to be continuous as you build the wall as it helps keep the door opening in the same plane.

I always attach the hinge jamb first to the rough opening, and then work on the lockset side of the frame. I prefer to use #8 trim screws with a small head that are 2.5 inches long driven at the door hinge locations. Shims are always put above the screws so they don't fall later.

When you ordered the door, you probably got one with a 4 and 9/16-inch-wide jamb. This is normal and allows the frame to project the smallest amount from the surface of the drywall. Be sure the frame is flush or just slightly proud of the drywall on both sides of the wall.

Be sure the gap between the door and the door frame is consistent and you'll be in great shape as you secure the door frame to the rough opening. Trimming the door is just a matter of taking accurate measurements and having a miter saw that cuts the required 45-degree angles. The miters should be this angle because the door you purchase should be perfectly square with 90-degree corners.

No one part of this remodeling project is extraordinarily hard. As with most things when it comes to building, the devil's in the details. The key thing is to ensure that the wall studs are securely fastened, the wall is straight and plumb and there's no wobble in it.

Use drywall screws to attach the drywall instead of nails. The head of the screws needs to be just below the surface of the drywall, but not so deep as to tear the facing paper.

Note: My New Door Video Series is also available on DVD. With the DVD, you can watch the videos offline.

Column 979

March 12, 2013 AsktheBuilder Newsletter & Tips

This past weekend I did something I should have done perhaps fifteen years ago. I worked all day manning a booth at a home and garden show. Oh well, better late than never, right?

I was doing a test.

I was selling oxygen bleach at a neglected small home and garden show just miles from my house. It was a perfect place to work out the bugs and see if it's worth going to other home and garden shows.

It was an enormous success. I nearly sold out of product. A vast majority of people who stopped and helped with the demonstration purchased multiple bottles.

I was selling our newest size, the cute little 0.4-pound bottle. It normally sells for $9.97 delivered to anywhere in the USA (and US Territories). At the show, I was running a special: one bottle for $6 and two for $10. As you might expect, most people purchased two bottles. They fit perfectly in purses and coat pockets.

I'll be ramping up quickly, and soon you may see oxygen bleach exhibited at your home and garden show! I'll be at the Fryeburg Fairgrounds Home Show in Maine in May, and I'm trying to book myself, and some helpers, into other New England shows in the month of April.


TIP OF THE WEEK - BE PREPARED LIKE A GIRL OR BOY SCOUT!

Last night at my ham radio steering committee meeting, a close friend asked me what was the best exterior siding. He and his wife are thinking of getting their house resided after 35 years.

He said, "I went online and filled out a form to get free estimates. I had three contractors rush out to the house, and I have appointments with two others tomorrow. What should I do? What siding should I install?"

"Well, if it were me, I'd get on the phone and CANCEL the two appointments for tomorrow," was my reply.

He looked puzzled.

"How can you get great estimates unless you have a simple set of specifications, with at least the product picked out," I asked him.

If you just call contractors without knowing what you want or how to do the basics of the job, you're going to get back bids that resemble an onion, an apple, a lemon, and a watermelon. In my friend's case, the three told him they'd install three completely different siding products. This made it impossible to compare the quotes.

My advice to you is to take the time to get educated about what you want before you ask one contractor to come out for a bid. You can visit showrooms in your area, look at displays at home and garden shows, do extensive research online - including searching for nightmare stories, and just general due diligence.

At the very least, use my AsktheBuilder.com search engine to see what I feel about a product. I almost always tell you the pros and cons of any given product.

Once you know what you want, then you can get bids and quotes that will make sense. If you want to be an Eagle Scout, then you'll also research, before the contractors arrive, how to install the product. You'll then ask probing questions of each contractor to see if they will be doing the job according to the manufacturer's written installation instructions.

For example, when I installed the Therma-Tru ClassicCraft door here at my house seven weeks ago, I read the written instructions. They clearly stated that you have to do the X-string test across the door opening to ensure the rough frame is not in a helix.

If you asked a contractor, "Are you going to do the X-string test on my door opening before you install the door?", and he looks at you like you're speaking Russian - would you hire that person? I think not.

I show you how to do the X-string test in my Install a New Front Door video series. It should be available for sale next week!


CONTRACTORS NEEDED! - FIBER CEMENT DUST REDUCTION TESTING

Are you a contractor that would be willing to do some testing that will help tens of thousands of workers in the future? This is a RARE opportunity to give back to the construction industry and add to your legacy. Help create SAFER working conditions and save some lives.

Fiber cement contains silica. When you cut this siding with an abrasive blade, it creates silica dust. Inhaling silica dust is not a good idea. You would be testing some revolutionary tools and methods that capture lots of this dust.

If you're a contractor, or KNOW OF ONE, that's getting ready to install some fiber cement siding, that's who I'm looking for. They need to meet these requirements:

  1. Be a contractor that has at least three years field experience working with a circular saw.
  2. Be a contractor that has installed fiber cement siding on at least three large residential jobs.
  3. Have an upcoming job where fiber cement siding will be cut and installed for at least eight hours per day over a course of three days.

Job sites located in Ohio, Kentucky and Indiana are preferred, but not necessary.

If you meet the above criteria and want to HELP future contractors stay healthy, please get in contact with me as soon as possible. Reply to this message and change the Subject Line to: Fiber Cement Dust.


HOW GOOD ARE YOU AT FINDING SOMETHING ONLINE?

I'm stumped. I desperately need a crystal clear waterproof plastic box to build a portable ham radio that I can take into the field. I wrote about this radio on my ham radio blog. I just spent 30 minutes and gave up. Perhaps you're better at searching than I am.

Here's a photo of the box.

The box has two clamps on it to keep its lid closed. It measures approximately 7 inches long, 5 inches deep, and probably 4.5 inches tall.

You can watch a video of a fellow ham radio operator, Jim Cluett, W1PID, using it to send Morse Code in my blog post. He doesn't own the radio that's in the box in his hands. It belongs to Johann Busch, W1JSB, sitting across the table translating the di's and dah's that Jim is sending.

Jim's holding it upside down because the touch-sensitive keys are oriented opposite the way he sends Morse Code with the touch paddle on his radio.

The FIRST person to find this box for me gets a FREE small bottle of oxygen bleach sent to their house or business anywhere in the USA or US territories.

Every other person that finds it for me will be sent a special hidden page where they'll get a healthy discount on this new size of Stain Solver. It's the least I can do for you trying to help me. You need to live in the USA or US territories to get this small jar of oxygen bleach. That's the only hitch.

Happy Hunting and Thank You in advance!


COLUMN OF THE WEEK - CHOOSING A CARPENTER'S LEVEL

I'll bet you'd like to know the latest about carpenter's levels.

I'm currently testing both the 2 and 4-foot bamboo levels I talk about in the column. WOW, are they nice levels. You'll discover a link to them in the column.

More tips next week!

Levels – Types and Use Tips

DEAR TIM: I want to purchase a few surprise gifts for my boyfriend who's a tool freak. I've snooped around his workshop and his levels are in bad shape, some of the vials are broken and fogged. I believe he'll enjoy new levels. What are my options, what levels will last, and what have you had the best luck with? Finally, are there levels you don't like and why? Jeanie F., Portland, ME

DEAR JEANIE: You're a sweetheart for thinking of tools as a gift. Many men truly appreciate them, as well as women! I can tell you that each time I get a new tool, my eyes light up like it's Christmas morning.

Here's a 2-foot level that's made from sustainable bamboo. It's light, durable and can last for generations if cared for. Photo Credit: Tim Carter

Here's a 2-foot level that's made from sustainable bamboo. It's light, durable and can last for generations if cared for. Photo Credit: Tim Carter

Carpenters levels are available in all sizes, types, colors, and materials. I've had just about every type of level you can imagine, and you bet I've got my tried and true favorites.

If you go to brick and mortar stores to see levels, you should get a pretty good cross section of what's available. But to really see what's out there, you need to go online. There you'll discover a few companies as you search online that not only specialize in carpenter levels, they practically own the franchise.

As you go on your treasure hunt, you'll discover carpenter levels are available in three common sizes: 2, 4 and 6-foot lengths. The most common being the 2 and 4-foot lengths. I do have a long 6-foot level, but I primarily use it as a straightedge to level really long countertops. It's my least-used level. By far, I use my 4-foot levels the most.

As you look at all the eye-candy levels, you'll soon discover they're made from plastic, aluminum, wood, and even bamboo. I've got every type of level that you can imagine, and I have to say I'm very partial to my wood levels and the solid aluminum box levels I have. I had an aluminum box level that had lots of cutouts in it to lighten it, but I discovered that when it was dropped a few times the level became unreliable.

My old wood carpenter levels are made from mahogany. It's a fine-grained lumber that is ideal for wood levels. The issue with wood levels is they need to be treated with care. Wood and water don't always play nicely together, so that means if your boyfriend is going to use the level all the time in a wet environment, you may want to consider solid aluminum levels.

The other option is to make sure he follows the directions with wood levels keeping them as dry as possible. It's very important to keep wood levels oiled if the finish wears off. Never store them in a truck cab or cabinet where the sun can heat up the space turning it into a sauna. Extreme heat and wet wood levels are a recipe for disaster.

That being said, many a time I've got my trusty wood level wet and never had a problem. I simply carried an old terry-clothed towel with me to dry it off. I'd then bring it home at the end of the day and allow it to dry inside my house at normal room temperature. Don't lean wood levels against a wall. Always hang them in the shade on a nail using the handy hole you'll discover at each end of the level.

I just started using an attractive bamboo level. I'm tempted to call it a wood level, but bamboo is not wood, it's technically a grass. This level is made from laminated strips of bamboo, and then machined to be perfectly flat. It's extremely handsome. The four long corner edges have inset aluminum so that it's extremely durable.

I love the solid acrylic level vials as it's nearly impossible to break them. The rubber end caps are also very nice in case you do drop the level and it hits either end.

You may want to look for levels that have replaceable level vials. Some great companies offer a lifetime free vial replacement policy. If you break a vial, you can get one for free and snap it in place. Your level works just like new as soon as you install the new vial.

One thing you should keep in mind as you shop is the price. You'll quickly discover there's a wide range of pricing. Believe me, the levels that are low priced are priced that way for a reason. Typically they have cheaper materials, are not as accurate and they'll probably deliver only short-term performance. If you want a great gift for your boyfriend, and one that keeps on giving for generations, please purchase a level that's at the top end of the price structure. You'll never regret it.

Years ago, I purchased a digital level. These are still available. At the time, it was a very savvy tool to have as it had an LCD display that gave you a readout in numbers, not a liquid-filled vial with a bubble. Not only did it tell you when something was level, it could also produce the degrees of tilt in case you wanted to know what the angle of slope was of a pipe, roof or ramp.

However, I soon stopped using the level on my jobs. The reason was that it was TOO accurate. I made the mistake one day of pulling it out in front of a customer that was a perfectionist. When this woman saw that the level read 0.01, she said, "It looks like you need to get it right before I pay you." I got the countertop level, but believe me, 0.01 is far closer to level that you getting a bubble in a vial centered between two lines!

Column 978

March 5, 2013 AsktheBuilder Newsletter & Tips

Just nine days ago, I was at the Capital Home and Garden show. Guess where I'll be this Saturday and Sunday? Come see me at the Central New Hampshire Home and Garden show at the Opechee Inn and Conference Center.

This time I'll be an exhibitor showing the attendees all the magical things oxygen bleach can clean. This is the FIRST home and garden show where my oxygen bleach will be exhibited with live demonstrations.

I'll be selling our newest size - the 0.4-pound jar - on the show floor. If you live near Laconia, NH consider stopping by to visit me at the show.

If the sales of this size continue to grow at their current pace, this small jar will soon be our best seller!


This sample size ships anywhere in the USA, US Territories, Guam, etc. for just $9.97. Ask Sheri. I put her bottle in the mail last Thursday afternoon, and she opened it on Monday in Honolulu, Hawaii! That was speedy service by the US Mail!

Believe me, I'm trying to figure out how to send this size affordably to anyone in the world. I'm working on it.

TIP OF THE WEEK - DRESS UP YOUR STAIRS

Just about one year ago, I got to meet Linda Hayes in person in Savannah, GA. She's a subscriber like you, and Linda was kind enough to knit me three hats! I also got hats from Maggie and a few others. Many thanks for those!

Linda emailed me last week the following note with a photo:

"For a long time I had wanted to put tiles on the back kicks of our staircase. (I had seen it on "Two and a Half Men" - which I had watched when it first came out). I really had my heart set on Mexican tiles and could imagine a little child sitting on the steps pretending different events from looking at the various tiles.

I googled "cheap Mexican tiles" and ordered a box of "seconds". I ordered 4x4 by mistake instead of 6x6, so when they arrived we had to come up with an alternative to make them fit. We went to Lowe's and found the 1" tiles in a sheet for about $2.00+.

They are thinner, but since all the Mexican tiles are irregular sizes, it didn't matter. My husband put them up for me, and I really love the way they turned out. Are they perfect? Not at all, but I'm really happy as to how they turned out."

decorative tiles on steps

Linda, you should be thrilled! They look magnificent! It's a good thing you used the 4x4 tiles. The smaller 1-inch tiles do a great job of setting off the colored tiles.

Thanks for sharing the story and photo and for keeping my head warm!

SPRING = CLOGGED GUTTERS!

For over a decade, I tested countless gutter guards on my own home. I had a personal interest as my house in Cincinnati, OH was surrounded by huge deciduous trees that rained down leaves and debris on my roof like snow in a blizzard!

I've written many columns on gutter guards and published the story about how I discovered the Holy Grail of gutter guards. In fact, the inventor of the gutter guard micromesh technology, Alex Higginbotham, was standing with me on my roof explaining how it works.

Spring is when you NEED gutter guards. That's when all the small tree flower blossoms, and tiny bits of bark, etc wash down your roof. Just about all gutter guards work well in the autumn months to stop huge, dry leaves from entering gutters, but only micromesh will keep everything but water out of your gutters.

gutter guard with pine needles

If you want the Clean Gutter gutter guards I put on my home, you can get the DIY version now.

These gutter guards install EASILY by just sliding them up under your shingles. There's nothing to it. You can easily install these and save HUGE money. Believe me, nothing but water will get into your gutters when you install these.

If you live in the USA and order just three boxes (120 linear feet) or more, you get FREE SHIPPING. Use the promo code: tim to get the FREE SHIPPING.

CLICK HERE to order the gutter guards I use.

This promotion is only available for a short time. You better hurry. What's more, you NEED to get the gutter guards up now, not in May when it's too late.

I do get paid a small affiliate commission if you do order the Clean Gutter guards. But that's okay as I believe in the product and use them. I know you want the products I put on my home.


CHIMNEY CROWN TIPS

Liz, who lives near Bridgeport, CT, contacted me via Facebook. Yes, AsktheBuilder.com is on Facebook and if you are too, I'd sure appreciate it if you would go there and LIKE my page.

Liz asked if it was okay to have her chimney open to the weather. I replied, "Liz, masonry chimneys have been designed for hundreds of years to be totally open to the weather. The rain that comes down the opening collects on a smoke shelf and soaks into the masonry core of the chimney."

But the photo she posted on my page at Facebook was priceless. It's a great teaching moment for you if you have a brick chimney with a mortar crown. Look at the photo.

chimney top

First, I don't see a flashing poking out from under the crown material and overlapping the brick. That's a huge no-no.

See the cracks? They're probably shrinkage cracks from the mortar or concrete being a little too wet when it was poured. It could have dried too quickly too because the mason failed to cover it with plastic or spray it with a curing compound.

My guess is there's no steel mesh in the crown material. That would have made sure the cracks didn't get larger than hairline.

Look at how there is no overhang of the crown at the edge of the brick. That's completely wrong.

See where the crown contacts the clay flue liner? See the crack there? That joint was supposed to have expansion joint material, about 3/8-inch thick, and then be caulked.

In other words, the mason who installed this crown on Liz's house totally messed up.

Read these past columns of mine to discover the CORRECT way to install a chimney crown.

Chimney Cap and Crown

Chimney Crown Construction Tips

Chimney Caps

Chimney Construction Resources

Finally, if you still have questions and need help with your chimney, I can CALL you on the phone.


ARE YOU AN OPTICIAN?

Do you work at or own a business that makes prescription eyeglasses? If so, I've got a question for you. Can you reply to this email?

ARE YOU A FINE JEWELER OR A FINE JEWELRY DESIGNER?

If you are one, married to one or work for one, can you do me a favor and contact me? Simply REPLY to this email.


MOST RECENT COLUMNS

I'm wearing a dunce hat around the office today. Why? Because each week I'm supposed to be sharing with you the latest column I've written. Most should save you time and money!

Well, here's a list of the last five columns and a cool video.

From now on the newest one will be in each future newsletter.

Dealing with Efflorescence

Working With Wood Shims

Exterior Door Flashing Ninja Tricks

Wood Rot Repair Tips and Tricks

Control Joint Tool Video

Working in the Weather

More AsktheBuilder.com news next week!

Tim Carter - Founder

Do It Right, Not Over!

February 27, 2013 AsktheBuilder Newsletter & Tips

This past Saturday and Sunday was a fantastic time for me. I got to meet several new friends and spend some time with a few existing friends. We all came together virtually via this newsletter before meeting in person.

I was in Washington DC giving two talks at the Capital Home and Garden show. It was a great show with lots of fascinating vendors. My absolute favorite booth, for any number of reasons, was the one that was demonstrating UV technology to whiten your teeth.

I left there wondering if anyone got sunburned lips. I'm sure they applied sunscreen or something to all those people sitting in the chairs.

When I appear at a home and garden show, it's for just one reason: to help you.

I've discovered over the years that you have problems and you want someone to help you that doesn't have a dog in the fight. I specialize in telling the truth and try to tell you the best way to do something to save time and money.

Here are just a few of the questions show attendees asked:

  • How do I stop the water from entering my basement?
  • Where can I get this exact shower head?
  • Can I apply ceramic tile on top of existing tile?
  • I have a crack in my drywall that won't go away. How do I fix it?
  • What's better, a wood deck or a paver patio?
  • How do I interpret this drawing about an egress window so I build it right?
  • etc.

It's FUN answering questions like that! I can answer your question by coming to your town or calling you on the phone. If you want the personalized phone option, skip all the way to the end of this newsletter.

Would you like me to come to your Home and Garden show and meet in person instead? That's what Patty and Mike Morris did. It's so very easy.

All you do is contact the show management and tell them you want me there. Greg Crider's a subscriber, he called the DC show, and that's why I was hired to appear. Go ahead, do it now. Some shows are already starting to book slots for the fall.

If you get me to come to your city, we'll have a boatload of fun. We can do a meet up and I may get lucky. You may allow me to kiss you on the cheek. Patty Morris gave me permission on Sunday, and look at her face!

So you know, Patty's husband Mike took the photo. It's a good thing Kathy doesn't subscribe to my newsletter. :->


TIP OF THE WEEK - HASSLE-FREE KITCHEN AND BATH REMODELING

Many of the people attending the Capital Home and Garden show were there to gather ideas and information about remodeling projects. When I asked the crowd if they were going to do kitchen and bath remodeling, many raised their hands.

Both rooms in your home are mission critical. You don't want the rooms torn up and then delays to happen, nasty surprises, or the contractor to disappear. All or some of these things happen if you hire the WRONG contractor.

To avoid nightmares, you just need to hire a pro contractor. They know how to spot problems before they become problems. If a problem does happen, a pro can deal with it quickly and efficiently. Heck, you may not even be aware a problem happened!

While at the show, I taught everyone in the audience how to find a pro contractor in less than five minutes.

Seriously, I did.

Since you weren't at the show, my Kitchen and Bathroom Contractor Hiring Checklists can show you how to easily find the best contractor to remodel your bathroom and kitchen.

Wait till you see the detailed Cost Breakdown spreadsheet that's part of each document! That alone will save you money and time.

Please go watch the video of me at the top of the Kitchen Remodeling Hiring Guide page.

I've put both checklists on sale for you for the next five days. Normally each one costs just $15. But I'm doing a Home Show Special - even though the show is over and I'm back in snowy New Hampshire.

I've dropped the price of each checklist for you to just $7 for the next five days.

The sale ends Sunday, March 3, 2013, midnight Eastern Time. Just purchase them now so you don't miss out.


GREAT HOSE NOZZLE

Before I went on stage at the show, I walked the entire floor looking for great products. I really enjoy doing that, even though each week I get all sorts of news about new tools and products. You never know if something slips under my radar.

I was happy to see at the show a booth where my favorite garden hose nozzle of ALL TIME was on sale!

I've had this nozzle for years and it's really amazing. The only time it delivers sub-par performance is if you live in a house with minimal water pressure. If your water pressure is above 50 psi or even up close to 70 psi, you'll be amazed at this nozzle. Order one or two now for this year's gardening season!


CAN YOU CARVE LIKE THIS?

Marshall, a subscriber who came to the Capital Home and Garden show, sent me a link last week. It contained really unbelievable photos.

Evidently there's a carpenter named Dalton Ghetti that has great skills and magic when it comes to carving the graphite core on pencils of all types.

I'm sharing this link, but with a caveat.

I'll not swear that the photos are real. I say that because I've watched every one of the You Suck at Photoshop videos - there are 30 in the series - at YouTube.

After you watch those videos, you'll NEVER AGAIN trust any photo you see online. Not one.

BEWARE: The videos contain substantial adult humor with some adult language, so be forewarned.

If you decide to watch all those videos, watch them in order to get the full impact of Donnie's humor.

Some of the videos I've watched a number of times, like #5 in the series. Pay attention to the screen shot of Donnie's unopened email Subject Lines.

"But for you, I mean it's going to be stupid hard, advanced."

Bwahahahahahaahahahaaha


BECOME A HANDYMAN - SERIOUSLY!

Back by popular demand!

How would you like to discover how easy it is to start your own profitable Handyman business?

How long have you desired to be your own boss, make your own hours, take as long a lunch break as you want?

Invest just three hours of your time, and I can show you how to achieve all those goals and many more.

This coming Saturday, March 2, 2013, I'm conducting three 1-hour classes on PowHow.com. These are all going to be live.

The classes are at 11 a.m., 1 p.m. and 3 p.m. Eastern Time.

There's VERY LIMITED space in these classes. Aside from all the basics, I'll be teaching how to get paid well for your skills, get paid the day you do the work, how to avoid the nightmare clients and where to find work right out of the chute.

Sign up NOW before the classes fill up.


FEAR OF THE UNKNOWN!

Chris Hughes, a subscriber to this newsletter, emailed me last week. He was commenting on how much he liked the videos in my New Front Door Video Series.

"Do you have any video's on replacing windows? We have MANY lower level windows that are horrible and need to be replaced. They're mounted below the siding in poured concrete. Big deal?"

I responded, "That's what my new 500 Second Consult product is all about!

You take a photo or two of the window(s) - inside and outside - and send it to me.

Then you purchase my 500 Second Consult.

I call you and give you the answers you need. It's fast, it's accurate and we do it in just seconds!"

- - - -

I hope you have a great week! This weekend I'll be working as a CERT and ham radio volunteer at the Laconia Dog Sled Races! Mush On!

Dealing With Efflorescence

DEAR TIM: There are white deposits on my chimney, on the face of a retaining wall and on my paver patio. I sometimes see these white crystals near cracks in my basement walls. I've tried washing them off and it looks good for a few hours. But the next day the deposits start growing again. What are they, are they hurting my home and most importantly, how do I get rid of them permanently? Tom B., Bethel, OH

DEAR TOM: The white deposits are almost certainly efflorescence. They're just salt crystals that are left behind when water evaporates from the masonry surfaces around your house

The problem starts inside your chimney, retaining and foundation walls, and your patio paving stones. The source of the problem can also be what's behind these materials.

These salt crystals appeared when water evaporated from a puddle on my concrete floor. Photo Credit: Tim Carter

These salt crystals appeared when water evaporated from a puddle on my concrete floor. Photo Credit: Tim Carter

Soil, brick, mortar, concrete block, concrete, etc. can all contain water soluble salts. There are many different types of salts with sodium chloride being one of the most common. Most salts readily dissolve in water as is evidenced by ocean water and any other body of water that's salty.

If you take saltwater and allow it to evaporate, the water turns into a gas (water vapor) leaving behind the dissolved salts. You can conduct this simple experiment yourself. Put a teaspoon of table salt into a cup of warm water and stir until it dissolves. Pour this solution into a shallow jelly roll baking pan. Once the water evaporates in a day, you'll see all the salt you dumped into the water.

When rain water enters your chimney, it dissolves the salts that may be in the mortar mix, the brick or even the sand used in the mortar. The same can be said about all the other masonry surfaces where you see the deposits. The salt can be in the soil and ground water is transporting the salt into the masonry surfaces.

The water in all of your masonry wants to evaporate. That's true of all water, unless the relative humidity of the air above the water or masonry surface happens to be 100 percent. But that's very rare.

This means that you have a constant invisible conveyor belt system delivering the unattractive salts to the surface of your masonry all the time.

These salts are not harming your home, but I do agree that they're unsightly. To stop the efflorescence from occurring, you need to do one of several things.

Stop the water from entering the masonry or soil that's dissolving the salts. This is much easier said than done. If you have a proper chimney crown with a great flashing under it that will help. You can also apply clear water repellents to the sides of the chimney to stop water from entering the masonry.

The backside of your retaining wall could have been treated with an asphalt spray to block water from soaking into the masonry. To solve the problem now, you can excavate all the fill material out from behind the wall and install a perforated drain pipe along the base of the wall. Backfill the wall with clean washed gravel so any water flowing through the soil towards the wall falls down through the gravel never making it to the wall.

You can try to do the same thing with your foundation wall, but that could be a massive undertaking.

Trying to clean off the salt deposits with water or any other chemical or liquid is a mistake. The water you're using dissolves the salt and transports it immediately back into the masonry. While you're rolling up your hose and putting away your scrub brush, the invisible conveyor belt system starts up and brings the salt back to the surface as the water evaporates once more.

The best way to deal with efflorescence, if you can't afford to do the waterproofing remedies, is to just brush off the salt from the surface. Depending on the amount of salt, it can sometimes be done with an old paint brush or it may require a stiff scrub brush.

The salts in chimneys will eventually deplete themselves and the problem will go away on it's own. But it can take years depending upon where you live and the amount of salt in the masonry materials.

You can watch an informative video about efflorescence at AsktheBuilder.com. Simply click on "efflorescence video". You'll not believe your eyes.

Column 976

Efflorescence Tips and Tricks Video

Efflorescence Tips and Tricks

Hello, I'm Tim Carter and I want to talk a little about efflorescence. This is a common occurrence in some homes, but some people are confused about it.

Efflorescence are salt deposits that form on brick surfaces, stone walls or concrete. It forms on anything masonry. What happens is there are salts in the mortar, brick or stone. When the salts get wet, they go into solution and dissolve. Similar to sugar dissolving in your morning coffee.

When the water comes to the surface of the masonry object, the water will evaporate, but the salts are left behind. Those are the white deposits you see on my garage floor.

The reason it is happening in my garage is because my truck, in the winter time after running through the snow, the road salt melts off the truck and onto the garage floor. The salt water pond will dry up, leaving the salt behind. Some of the salts gets into the cracks in the concrete floor. When water gets into the cracks, the salts are brought back up and left on the floor.

These deposits are very fluffy and can be easily swept away with a push broom. The worst thing you can to try to get rid of the efflorescence is to use water. This will deposit the salts back into the water, then the water goes back down the concrete floor cracks and will reappear another day.

Just brush the deposits away. Eventually the salts will be depleted from the masonry and the efflorescence will quit. However on retaining walls, the soil behind the wall might be the source of the salt. If it is, the efflorescence will continue to appear. To avoid this, you have to waterproof the back of the retaining wall when building it. Use some type of asphalt solution so water can't get into the wall in the first place.

So that's what efflorescence is and how to deal with it. Just brush it away. It is harmless to the masonry surface.

This White Mystery Powder was shared with my readers of the March 11, 2016 AsktheBuilder Newsletter.

February 19, 2013 AsktheBuilder Newsletter & Tips

This coming weekend I'll be speaking at the dazzling Capital Home and Garden Show at the Dulles Expo Center just west of Washington DC.

I'll be at the show on Sunday, February 24th, speaking at 2 and 4 p.m.

I'd LOVE for you to stop by and be part of the presentation. I'll be talking about some fascinating new products and tools, and, most importantly, answering your questions about the problems at your home.

Do you want to have a private meetup at the show? I can do that!

You have to reply to this email and put in DC MeetUp in the Subject Line. We can meet at Noon right on the show floor and chit chat!

Capital Home + Garden Show logo

You can get a substantial discount on your admission tickets into the show if you use this promo code:

BUILDER

Would you like me to come to your Home and Garden show?

It's EASY!

All you have to do is contact the management company that runs the show in your town and ask that they book me.


TIP OF THE WEEK - DECK SEALERS

Several days ago, I got an email from Michael Malhotra. He lives in some nice, warm local where he can seal his deck. Congrats on that Michael, as the lake outside my house has about one-foot of ice on it!

He wanted to know what was the best "crystal clear wood sealer" that I used in my test last year.

My reply to Michael was, "They all FAILED. In fact, they started to fail within 60 days of application."

deck sealer test planks

The failure was much worse on cedar decking than treated lumber. I suspect the reason for that is the copper leaching from the treated lumber. Copper is a natural biocide, so it does a fantastic job of minimizing mildew and mold buildup.

I'll be publishing some dramatic high-resolution photos of my ongoing test of the fifteen or so deck sealers that co-operated in the test. Look for news about that in late March.


WIN A NEW DODGE TRUCK! SERIOUSLY!

How would you like to win a new Dodge truck? One worth $50,000?

It's possible YOU could be the winner!! How do I know that?

Well, this contest is being run by Bosch Power Tools. They just announced two weeks ago a collaborative marketing effort with Dodge Trucks.

Guess who won the Take-Back-Your-Day Bosch contest back before Christmas????

An AsktheBuilder.com subscriber, that's who!!!!!!

It's possible lightning can strike twice. You may win this contest - but only if you take the 30 seconds and enter it.

I'm telling you right now, GO ENTER THE CONTEST. There's just a few days before time runs out. The contest ends on February 28, 2013

But you know what will happen - you'll forget to do it.

STOP NOW AND ENTER THE CONTEST. Click here to enter or just click the image of the truck.


IMPACT DRIVERS - LIKE-CHANGING TOOLS

You may not be aware of a newer power tool that's revolutionizing how people drive screws and bolts.

It's the impact driver.

When I say that, my guess is the image in your mind is that shiny air-powered tool you see tire jockeys use to put lug nuts on car and truck wheels. You know that high-pitched Zzzzzzittt, Zzzzzzittt noise it makes.

Well, imagine a much smaller tool powered by lithium-ion batteries that can drive just about any screw and most lag bolts you'd use around your home.

The advantages of an impact driver are many. First, it's less wear and tear on your wrist and hand. Second, it's faster. Third, you can easily control the depth of drive. Fourth, you have fewer stripped screw heads.

I can go on and on, but if you've not tried one of these tools, you MUST.

I became a full-blown convert about two years ago. I use my impact driver just about every week.

Want to see a few impact drivers? How about one that I use?

Click Here. Once you do, scroll down the list of tools. You'll see the Bosch Drill / Driver combo kit.

While at the Amazon website, just type in "impact drivers" in the search engine at the top of the page and you'll see an amazing variety.


AN ARCHITECT-TO-BE REQUESTS AN APOLOGY

Last week, I gritched about how I had to shovel literally a TON of snow because of a bad house design. That got James Dambrogio's attention. Read what he sent me:

"Tim,

As a school trained architect (I am an intern at this time so I can't legally call myself an architect) I take offense to your comments.

The final design of your home may have resulted from a multitude of conditions at the time of its construction with one possibility being the negligence of the architect. I can think of several scenarios where the fault is not solely borne by the architect.

Often times the client insists upon a design that is aesthetically displeasing, unpractical, or displays poor construction practices which we take strong objection to but as the employee of the owner we fulfill their desires.

Builders have been known to alter designs after we issue construction documents. Some municipalities do not even require that a residential build be designed by a licensed architect at all. And of course, just as in any profession there are good eggs and bad eggs.

To make a general statement about "an architect" is irresponsible, doesn't paint an accurate picture of the value an architect can and often does provide to a client, and reverses the hard work of the AIA to educate the general public and to forward our profession.

I enjoy the newsletter and am looking forward to the exterior door install video series. Keep up the good work just be a little more mindful us lowly architects.

Best Regards,"

James

James, you're correct. I apologize. There are numerous places to put the blame, and I just picked one place.

Sorry about that. Not only were my back and arm muscles aching, you can see it affected the muscle between my ears too.

I also got a few emails from folks wondering how I could purchase a house with this handicap.

Well, that's easy. I lived for fifty-five years in Cincinnati, OH where the average snowfall event was about 3 inches. A 6-inch snowfall would paralyze the city bringing it to it's knees. Usually the snow would melt from the roofs within a week because the temperatures would moderate.

In other words, rarely did we ever get loads of snow that created ice dams or did vast amounts of snow accumulate that needed to be raked from roofs, etc.

Heck, I never ever recall seeing snow rakes being sold at any hardware stores in Cincinnati.

That's why I just didn't even think about what would happen when I walked up the front walk of this house.

But I've learned my lesson. Never again will I own a house with a design like this.

I may have to rake roofs off, that's easy. However, once the snow falls to the ground, I'll NOT have to shovel it or move it again. It can just stay put until Mother Nature comes in the spring or a dragon happens to fly by for a visit.

Working With Wood Shims

wood shims

These are wood shims that help keep a door in place. They become invisible once the trim is applied around the door. Copyright 2017 Tim Carter

DEAR TIM: I need to install some doors at my house. I've never done it before.

A friend told me to make the rough opening that the door and frame sit in larger than the actual door frame dimensions. This seems odd to me. He also told me I need to use shims to help install the door.

What are shims and how do they help you install a door? Are there any best practices to follow when working with shims? Paula G., Seymour, IN

DEAR PAULA: The good news is your friend is giving you some solid advice.

Smart Friend - Keep Him Close

I would continue to accept advice from this person as he/she seems to be in the know. Installing a door is not as easy as you might think, and it's impossible for me to convey all the necessary steps in this short column.

Free & Fast BIDS

CLICK HERE to get FREE & FAST BIDS from local exterior door installation contractors. They know all about shims!

Let's talk first about rough openings and why they need to be larger for both doors and windows. It's imperative that doors and windows have minimal or no structural stress or pressure applied to them at any point while they exist in your home. If you installed a door or window in a wall and it was tight against the rough framing lumber on all sides, loads could easily be transferred to the door or window causing it to rub, stick, not open or close properly, etc.

The gap between the rough framing and a door or window jamb that's created when you create a larger rough opening allows for the stress and loads to be transferred around the door or window. The gaps also allow you to make the fine adjustments to the window or door so they operate and fit perfectly for years and years. You can also install insulation and flashings in the gaps to make the openings both air and water-tight.

The gaps between the outer edge of the door or window jambs and the rough framing should rarely, if ever, be more than one-half inch. Some door manufacturers want the gap to be no larger than 3/8ths of an inch. Read the written instructions that come with your doors.

Wood shims are used to make the door or window fit tightly in the rough opening so it does not shift around when the door or window is operated. Shims are flat pieces of wood that can be anywhere from 6 to 10 inches long and have a taper to them. One end of a wood shim is normally about 1/16th-inch thick while the other end is about 3/8th-inch thick. A shim is normally about 1 and 1/4-inch wide.

Wood shims can be made from any wood species, but I really prefer to use those made from cedar. They're easier to work with and easier to trim with a razor knife. You'll frequently run across packs of shims made from yellow pine. These are extraordinarily hard to work with and trim. Once in place you generally have to cut yellow pine shims with a sharp wood chisel and hammer.

CLICK HERE to get FREE & FAST BIDS from local exterior door installation contractors. They know all about shims!

When shimming a door in position, it's usually best to start on the hinge side of the door. Most manufacturers want to see shims at the same height as the hinges on the door. Putting the shims at this location is really the right thing to do as the weight of the door is transferred to the door frame at these points. You want the door frame snug and tight against the rough opening at these points so the door doesn't move over time.

Shims are generally installed in pairs one shim coming from each side of the door jamb. You slide each shim towards the other one so the thickness of the two shims increases at the same rate to fill the gap between the door frame and the rough opening. If you just shove one or two shims from the same direction, you'll have a triangle of wood between the door frame and the rough opening.

You want a solid connection between the door frame and the rough opening with no gaps. If the rough opening is twisted because the lumber is warped, you may have to install an extra single shim to completely fill the gap.

I feel it's best to install trim screws immediately below the shims that pass through the door frame and then into the rough framing lumber. You want the fasteners to penetrate into the rough lumber at least 1 and ½ inches. If you drive the screws through the shims, you'll discover it's impossible to move them to make tiny adjustments as you install the door.

By placing the screws immediately below the shims, the shims can't fall to the ground as you work with the door.

Try to keep shims dry at all times. If the shims get wet and you use them while they're wet, they undoubtedly shrink when they do dry. This shrinkage could cause the door or window to not fit properly at a later date.

If the rough opening is too big, meaning it's more than 1 inch wider than the actual overall width of the door frame, you should add solid lumber to the rough opening to reduce the width. It's a good idea to shim this additional lumber in multiple locations so the rough opening is absolutely plumb.

CLICK HERE to get FREE & FAST BIDS from local exterior door installation contractors. They know all about shims!

Column 975

February 17, 2013 AsktheBuilder Alert

If you're a new subscriber in the last 5 days, this is NOT a normal newsletter. You'll get a regular newsletter on Tuesday, February 19, 2013.

I just got back from being on top of Mt. Gunstock here in New Hampshire. I was at the summit at 8:30 a.m. and rode the chair lift back down at 2:30 p.m. I never thought we'd be up there that long. Like an idiot, I didn't pack a lunch. Heck, even if I did, it would have frozen.

The temperature at the summit was about 8 F and the wind was gusting to 35 mph. (That's a wind chill of -16 F.) I was under a building helping to install new ham radio repeaters. Some of the wind was blocked, but not all of it.

It was COOOOOOOLD! Brrrrrrrr!


LAST CHANCE TO GET WOOD ROT VIDEO SERIES FOR $10

Last Sunday, I was flying home from Los Angeles, CA. The three days before that I was there taping the Repair Wood Rot video series.

I wasn't chiseling out wood, making precise cuts, etc. That's what master carpenters do.

Instead, I was using revolutionary liquid and epoxy products to harden the wood and the fill in the gaps and holes with an epoxy that contains wood flour! That way it can be stained and sands easily.

You're not going to believe what you see in the video series. I would have NEVER THOUGHT the products would be so easy to work with.

You'll simply not believe your eyes when you watch the videos.

If you want to get online access to this video series for just $10, you have until TONIGHT (February 17, 2013) at MIDNIGHT.

After that the price will probably double.

You can also get a DVD for a higher price if you want to watch the videos offline.

CLICK HERE NOW to get the videos for $10.

Remember, the sale is now over. It ended at midnight February 17, 2013, Eastern Time.