Hold Down Anchor Tips

DEAR TIM: I'm building two things this summer but can't figure out how to get started. One is a deck that's going to rest on concrete piers that will be buried in the ground. The other project is a screened-in porch that I want to put on an existing large patio. How do I connect these structures to the concrete so the wind doesn't blow them away or the posts don't shift from the concrete piers? What else can you share about this conundrum? Wayne H., Ogunquit, ME

DEAR WAYNE: You've got two aggressive projects ahead of you. I'd love to have a screened-in porch here at my house, but where I want to put it just won't work out. I'm pretty envious of you.

There are all sorts of ingenious metal framing connectors that are available to solve your two problems. They're commonly called hold down anchors. As you might expect, they come in different sizes, models, etc. depending on the structural loads of the structures.

Furthermore, you can purchase anchors that are embedded in wet concrete or are added later after the concrete has hardened. With your deck piers, you can embed strong anchor bolts in precise locations that can then connect to the metal hold down anchors. The challenge is ensuring the anchor bolts are exactly where they need to be.

Hold Down Anchor

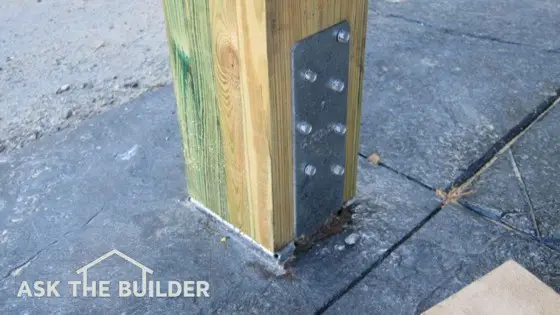
You only see part of the metal hold down anchor that's connected to the wood post. The rest of the metal anchor is deeply buried in the concrete slab. Photo Credit: Tim Carter

Your screened porch on the patio will require you to use a post base anchor that you connect to the slab with a stud anchor that's pounded into a hole you drill in the slab. To achieve maximum strength with such an anchor, you may want to employ some special concrete epoxy that helps hold the anchor in place.

Be sure if you use the epoxy, that the hole is dust free. This is really good advice even if you don't use the epoxy. The stud anchor will hold much better if there's no dust in the hole. Do NOT look at the hole or have your head over the hole when you blow it out with compressed air. You can get abrasive concrete dust in your eyes.

It's better to remove this dust with a wet-dry vacuum using a small stick to stir up the dust in the hole making sure the hole is completely free of debris.

It's very important to use approved fasteners with the metal hold down anchors. You may completely compromise the system using inferior nails or screws. For example, you may use the proper bolt or anchor to connect the anchor to the slab or concrete pier, but then use roofing nails or some other weak screw to connect the anchor to the wood posts that support the deck or the screened porch.

The manufacturers of the hold down anchors sell the correct bolts, screws, fasteners to make up a system that will provide you with all the structural integrity you need for both jobs.

Your biggest challenge, in my opinion, is the layout of the wood posts. You want both the deck and the screened-in porch to be square. If your deck is not too high off the ground, I've used a simple system for years that's helped me get the concrete piers perfectly positioned so the wood posts are centered on the concrete.

I install the outer frame of the deck first getting is perfectly square and level. I just use temporary support posts to hold up this frame. These temporary posts are 2 or 3 feet away from where the real posts will be.

I can then use a plumb bob suspended from where the center point of the support posts will be on the frame above to tell me on the ground where the center of the post will be as it rests on the concrete pier. This allows me to put the required anchor bolt in the perfect spot for the hold down anchor.

The layout for your screened-in porch is much easier. All you have to do is create the square or rectangular outer dimensions of the porch using 2x4s that are nice and straight. Position this box on the concrete slab where you want it.

Be sure the sides of the box are not bowed and that opposite sides of the box or rectangle are the exact same measurements. If the porch is perfectly square, make sure the sides of the box are the exact dimensions. If a rectangle, be sure it's a true rectangle.

Once you know the dimensions are the same, when the diagonal measurement across the square or rectangle are exactly the same, your box is square. Take a pencil and create the outline of each corner of the box while the wood is perfectly positioned. You'll now know where to drill the holes in the slab for your anchors.

You can watch an informative video showing the concrete pier that hold down anchors connect to. Just type "precast concrete deck pier video" into the www.AsktheBuilder.com search engine.

Column 936

May 15, 2012 AsktheBuilder Newsletter & Tips

This past weekend Mother Nature treated the Northeast to some delightful spring weather. Saturday and Sunday were spectacular, with Saturday one of those stunning clear days. We get fall in reverse up here.

Right now all the deciduous trees that are crimson, orange, yellow, etc. in the fall are various shades of green. The picture below does not do it justice. I should have taken the photo on Saturday when there was less haze. It's stunning to see in person.

Spring in the Northeast

Next weekend, I'll be volunteering for another worthy cause - The Seacoast Bike Tour. It's a two-day event put on by the Breathe New Hampshire organization. I'll be one of several ham radio operators providing communications between Portsmouth, NH and Ogunquit, ME.

We're needed all along the course in case bikers get hurt, need repairs or get lost. I'll be staying overnight in Ogunquit, ME, if you want to do a dinner meet up this Saturday. Email me and let me know. 73s to all you hams out there. W3ATB clear on your final.


100+ Step-by-Step Shed Building Videos

Would you like your own DIY dream shed? Of course you do! Would you like:

  • to watch a FUNNY video of me including bloopers?
  • to be part of the process creating 100 or more videos?
  • to get some AsktheBuilder.com swag?
  • to help me help thousands of other homeowners fulfill their shed-building dreams?

I thought so. Please click here, watch the video, read the product description and above all else pledge so we can reach the goal!

Take a SERIOUS LOOK at the $30 pledge. I doubt that you'll ever see me again give you an eBook that has tips, photos and multiple videos for only $1 each. When the finished eBooks are loaded to my shopping cart, they will be priced at $7 each. Only 300 people get the video series at this massive discount price. You'll regret not being one of those 300 people.

^ ^ ^ Go Back Up Now ^ ^ ^ Re-read the above paragraph. I'm not kidding. Read it three times if you have to.

If you have questions about this project, click Reply and ask me.


Quick Deck-Building Tips

Are you going to build a deck soon? Here are some important tips.

If you're going to attach the ledger board to the house, do it with through bolts not lag bolts. Through bolts have a washer and a nut on the one side. Lag bolts can and do fail all the time.

In case you attach the ledger board in direct contact with the house, be sure to install flashing over the top and partially down the face of the ledger so water can't get behind the board. The flashing needs to be behind the siding or trim above it.

Finally, do not install the decking tight to the house. Leave a 2-inch gap so water can flow readily to the ground below past the front of the ledger board. This gap will not be an issue because your feet are never ever that close to the wall. You can close up this gap making it about 1-inch where a doorway opens to the deck.


Your Newsletter Suggestions

You might be one of the subscribers that sends in very helpful suggestions each week. I read each one and appreciate them all. One suggestion that keeps coming up, but I've resisted implementing, is a simple button.

Connie finally convinced me to try it this past week when she emailed,

"Tim, you give us great information each week. I'd love to see special features in your newsletter, and some of your subscribers like me would like to give back since you give to us. I've emailed you several times suggesting you solicit donations, but you keep saying 'No'. Personally, I want more product and tool reviews. If you get enough donations each week, maybe you can use it to hire another writer or tool tester to help you."

DUH!!!! Connie's comment was one of those V-8 forehead slap moments. I strive to create a great newsletter, and I'd like to do more tool and product reviews, but I've just not had the resources. Most of all, I've resisted soliciting donations for all sorts of reasons.

Perhaps it's time to see if Connie is correct. Do you want more tool and product reviews or something else in the newsletter? I've got a young carpenter that's a great writer and wanting to work for me. If you contribute just a small amount of money each week or month, I could use it to give you more of what you want.

Nothing would make me happier growing the AsktheBuilder.com team to give you even BETTER information each week. Plus, I like being a job creator. We need more jobs right now!

If you decide to donate using the safe PayPal button below, be SURE to reply letting me know what you want me to do. I'll do my best to get this in motion.


Tool Reviews in the Queue

Connie's right, I sure want to do more tool reviews. In fact, I have two tools here now waiting for me to start testing. One is the RotoZip 5.5 amp RotoSaw. It's the Original Spiral Saw. Think of it as a hand-held tiny router that has special drill bits that have cutting edges on the SIDES of the bits.

Several days ago, I received two Ryobi ProTip Spray Painting tools. One is an 18-volt cordless tool and the other one is a corded tool. Both have great soft-sided carrying cases and lots of features. I just glanced at the reviews for this sprayer at Amazon.com, and unfortunately most of them are not 5 stars. We'll see what happens in my test.

What other tools do you want me to test? Is it a Milwaukee or Bosch power tool? I've been invited to their annual editors conferences that happen one month from this week. Tell me what you want me to look at.


Tip of the Week - Fast and Easy Flagstone Patio

Do you want to create a patio that's immune to the worst Mother Nature can dish out? Try as she may, she can't wear away flagstone quickly. Flagstone is a dense stone that usually has lots of quartz in it. Quartz is a primary mineral found in granite - need I say more?

Read this past column of mine to see how to create a patio in a day or two with a little help!


Concrete Pier Design

Are you building a deck or any other structure that needs a pier foundation? Would you like your concrete slab that's in a cold climate to be immune from frost heaving? If so, you need to read about how to properly build concrete piers that will not lift up out of the ground.

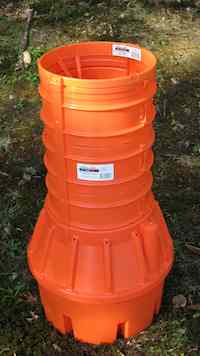
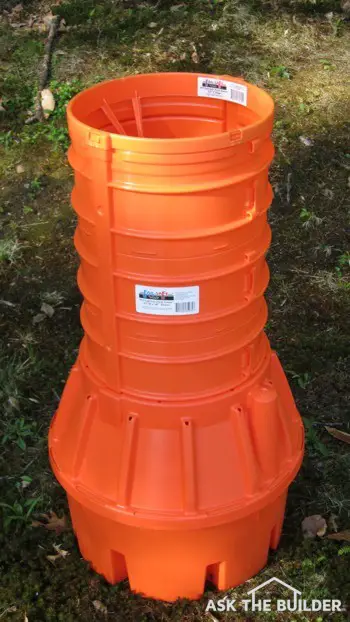
I'm using a plastic form like this for the concrete piers for my shed. You'll discover all about them in the recent column I wrote about this innovative product. This is a real time saver on the jobsite and it's perfect for you if you've never installed a concrete pier before.

If you try to do it the old way, you'll struggle for sure. This form makes it so easy. Read my concrete pier design column for all the sweet tips to help you get it done right!


How to Grout Ceramic Floor Tile

The first week of February, I uploaded How to Grout Ceramic Floor Tile to the Amazon Kindle store. I gave them a 90-day exclusive on it. Now I'm allowed to sell it from my own store as an Instant Download PDF file. It contains tips, photos and four step-by-step videos showing you how to grout ceramic floor tile.

If you're planning on installing ceramic floor tile, you really need this eBook. If you mess up the grout, you'll have a nightmare on your hands.


Cleaning Tip of the Week - Cleaning Patios

You may not own a pressure washer but need to clean a patio. Oxygen bleach does a great job, and it won't harm any plants nearby.

Yes, you want to use Stain Solver! Watch this video to see how it's done.

Sincerely,
Tim Carter

May 8, 2012 AsktheBuilder Newsletter & Tips

I spent the end of last week discovering a way that you and I can start to collaborate on all sorts of exciting building and remodeling projects. I'm blazing a trail into uncharted territory using a new platform called Kickstarter.com.

What does all this mean to you? If everything goes as planned, you're going to be treated to some great video content that I've wanted to create for you for years, but simply didn't have the resources to do it.

The brilliant minds behind Kickstarter.com have solved that problem. As you can imagine, it's pretty exciting for me to be right at the brink of having some of my knowledge-sharing dreams come true.

I love doing videos about building and remodeling, but there's always that troublesome financial aspect. I have to pay the bills to create the content. Ugh. The free model of giving away this content that's been a hallmark of the Internet is simply no longer providing enough revenue to produce the videos. Many video producers like me are having to come up with imaginative ways to create the content you need.

In a few minutes, you're going to discover how we're going to work together to create this unbelievable video content. Thank you, Kickstarter.com!


Tip of the Week - Extra Storage Space

Is your house cluttered? Do you constantly bump into things in your garage when you open the door to get into or out of your car? You probably need a shed.

Most sheds are built with 8-foot-tall walls. You can increase the storage capacity of your new shed by a whopping 25 percent for next to nothing!!! How? Just use 10-foot wall studs instead of the standard 8-foot studs.

The amount of time to install the stud is the same. The cost difference is hardly anything. You just have to spend a little more for exterior siding and sheathing. But in return, you get lots of BONUS storage space for years to come!

Want to know more about building sheds? Wait till you see what I have for you just below.


Screen Printing T-Shirts

Do you know the ink science and fine points of screen-printing T-shirts? I need to know the best process that creates the longest lasting graphics. If you work in the industry or have great info to share, please reply to this email. Change the Subject Line to: T-Shirts Tim


Great Folding Closet Door Hardware

There's a good chance you've had issues with folding closet doors in the past. In almost all cases, the chattering, sticking and failure to stay closed can be traced to inferior hardware.

You can get easy-to-install folding hardware kits from LE Johnson that are perfect for remodeling or new construction. I can't begin to tell you how well LE Johnson door hardware is. I've used it on my jobs for years, and you can find it in all the homes I built for my family!
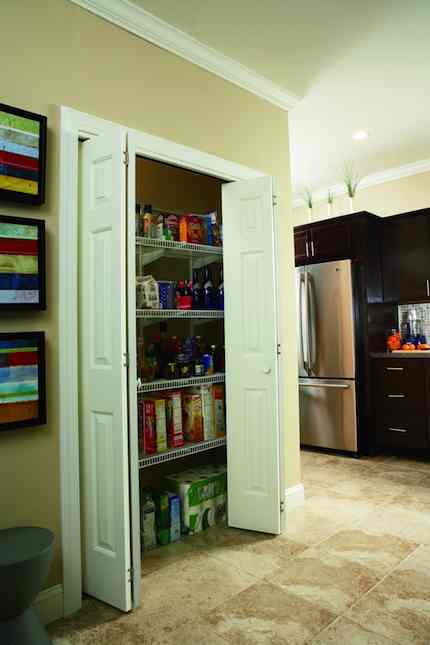
LE Johnson Folding DoorsThe "positive pivot locks" ensure the top pivots stay in the track. The pivots surface mount on top of the doors, so that's a huge time saver. The track the pivots glide in comes with a factory-applied wood finish. You can paint it too.

Everything mounts on the door jambs, nothing on the floor! That's a huge improvement and allows for a gorgeous carpeted look. The brackets allow for easy adjustment of doors that may be warped. LE Johnson's engineers have thought of everything!

You can't beat the lifetime guarantee. What more do you want to know? Oh, where to buy this sweet hardware kit? Easy! Just visit the LE Johnson website to buy the hardware.

LE Johnson paid me to provide this writeup. But understand that I only do this for products I'd use in my own home. I realize you want to know about the things I use too.


The Shed Project

Here's the exciting news. I'm building a wonderful shed starting the end of June, and I really want and *need* you to become part of the process. The Shed category at my website is one of the most popular ones each and every spring and summer. If you're like most, it's no wonder. There are so many things you can do or store in a shed.

The reason I'm building the shed is simple. I want to create for you, my readers and subscribers, the most authoritative and detailed DIY step-by-step videos of the shed building process. Right now I've already identified well over 100 videos that will be put into about 30 separate eBooks explaining each step of the building process.

When each eBook is loaded to my shopping cart, it will be priced at $7 each. You may only need to buy one or two to explain a step about the process. If you need all the eBooks, they will be deeply discounted when purchased as a set.

But I'm not trying to sell you shed eBooks. I'm trying to get your help to create them. However, If you do want to buy some, just wait till you see the enormous discount that 300 people are going to get. Oh my, each eBook in the series for just $1 each!

I've looked and looked online, and I can't find anything that contains the amount of detail I intend to show you in each video. I want to share my knowledge so you can build the shed you've always dreamed would magically appear in your backyard.

I've done hundreds of simple DIY videos over the years, but never have I attempted to tackle such a large video project all at once. The costs to do this from start to finish are staggering. The prices for materials, videographer, editors, etc. all add up quickly.

This is very similar to the process of making a television series or even a motion picture. Hours and hours of video will need to be shot and edited. This is completely different from the three or four 90-second videos like you normally see me do.

Just like a movie producer needs help from the big film studios in Hollywood, I need your help now to make this happen. If you decide to assist to make this video series a success, we'll start doing more of these projects together. Think about all the possibilities: remodel a real bathroom start to finish, remodel a kitchen so you discover all the things you need to know. I think you get the picture.

I already know what you're thinking because my buddy Chuck told me you'd be uttering, "What's in it for ME, Tim?" I get it, that's normal. Well, there's lots in it for you, but we'll get to that in a moment.

In the past few weeks, I've stumbled across a website called Kickstarter that makes it easy for you and I to work together on any number of new projects. I'm serious, if you want to work side-by-side with me for a day or two to discover secret building tips I've marinated for over 40 years, then you'll be able to do it.

If you'd rather just watch the shed project each day from the comfort of your own home while viewing it through a webcam, then you'll be able to do that.

If you want the exact plans, all the 100 or more step-by-step videos of the entire shed-building process as it happens, you'll be able to get that.


Here's how it works

Let's say you decide you want to help me make my dream come true - the creation of all these great videos for you. All you do is pledge, not give, some amount of money. You can pledge as little as $5, and you'll get something in return. The link to the project is just below.

You may be one of the thousands of subscribers over the years that have requested AsktheBuilder.com hats and T-shirts. Well, the day is here! There's going to be all kinds of swag including hats and T-shirts.

Be aware this is not a charity project - I'm NOT asking for a donation. By pledging, you become part of this event. If you help fund this project, I give you something in return.

Here's how it works. I have to set a funding goal for the project, and that goal MUST be met within a certain amount of time - in this case 30 days from the day I make the project live on Kickstarter.com.

The payments for projects on Kickstarter.com are all handled by Amazon.com for safety and security. If you have an Amazon.com account or purchase from there regularly, it's EASY to pledge, cave-man simple in fact. Amazon does NOT charge your credit card when you pledge. They just hold onto the information and wait to hear if the project reaches its goal after 30 days.

If we don't reach the goal in 30 days, your pledge evaporates and you owe NOTHING. The project then doesn't happen, and we just move on.

Let me make that clear. If the project doesn't meet the funding goal, then your credit card does NOT get charged. This is a great built-in safety, as it ensures the project will succeed as it has enough money to pay the bills!

I'm confident you will want to help me to create all the videos so you can use them to build your dream shed.

I'm sure you're curious about how all this works. Please go to the Kickstarter FAQ page and poke around. That way when the project launch happens, you'll be totally up to speed. FEEL FREE TO send me questions. I'll absolutely answer them for you. Are you ready to go see the project? Click here to go to my shed project on Kickstarter.com!


Geothermal Heating and Air Conditioning - Do the MATH First!

I was reading a short article in the April 2012 edition of Remodeling magazine. A remodeler named John Tabor located in Rockville, Maryland, decided to put in geothermal heating and cooling in his house.

So as not to tear up his entire yard to install the piping, he went vertical, drilling three 450-foot-deep wells into solid rock. He should have had a clue living in *Rockville*. He could also have looked at a soil map or geologic map before he decided to do it this way to see what he was up against. But I digress, being a geologist.

Cutting to the chase, he spent $88,000 on the entire system. The article said he got a 30% Federal tax credit and some other county and state rebates. Let's say he was *lucky* and John got 50% of the project paid for by you and me with all the tax credits and rebates. That's what happens when you get tax credits. The rest of us taxpayers foot the bill.

For him to start to SAVE money, he first needs to PAY BACK the $44,000 plus any interest he's paying in financing costs. Once he does this, he FINALLY gets to say he's SAVING money.

Let's say, for sake of discussion, that his total heating and cooling bill in his mild Maryland climate is $2,000 a year. The article says John's heating and cooling bills have dropped 33 percent. That's swell!

You have to be careful in your savings calculations because fuel costs can go up and down and the weather and temperatures are not consistent. Last year was a pretty mild winter. It's very complex trying to calculate the real payback, trust me.

But using our crude math, this means each year John has $660 in savings to use to pay off the $44,000 plus interest. Let's not even take the interest into account.

In 67-years, he's able to pay off the $44,000! Yippeeeeee! Oh, he needs to pay off the interest too. All the math wizards are going to email me about inflation, present value, future value, etc. I get that. Let's just do some rough math here for sake of discussion. Keep in mind that it's entirely possible for fuel costs to drop as we develop more of our natural gas resources.

Suffice it to say, John is not going to be SAVING money for many years. Be sure you do the math to see when you actually will save money before you ever get talked into some fancy energy-saving project.

I've already received some email from subscribers that actually have received a payback, but realize every case is different.


Cleaning Tip of the Week - Dishwasher Detergent ALERT!

A few months back, I talked about how the manufacturers of dishwashing detergent changed their formulations. Well, I'm convinced there are now more problems.

Because the new formulation was not cleaning as well and consumers were complaining, I think the soap manufacturers have decided to solve the problem by adding more pumice or fine silica sand to the liquid and powdered soaps. This added material makes the soap much more abrasive.

Worn glassesAdding abrasive compounds to dishwashing machine detergents is nothing new. You need this grit to get dishes clean as just spraying soapy water on dishes inside your dishwasher will not get them clean.

Here at the Carter house, coffee mugs, measuring cups, etc. are showing accelerated and damaging wear to any printing on the glassware. The measuring cup in the photo used to have bright red markings. The blue mug used to have white and red printing on it.

If you have valuable china, mugs, plates, etc., you better start washing them by hand. I could be totally wrong, but all of this pain is being caused by government regulations. If this is the case and you know about them, share them, and I'll provide an update next week.

You can add my Stain Solver to your dishwasher if you want. It does a great job of not only cleaning and helping to sanitize your dishes, but it also DESTINKIFIES your dishwasher in case it has a moldy odor.

Sincerely,
Tim Carter
Concrete Pier Design

DEAR TIM: I've heard all kinds of things from friends about concrete foundation piers. To say the least, I'm confused. Some say you just dig a hole and fill it with concrete. Others say you need to be sure it's the right size and shape. Still others say you need to include steel in it. Can you tell me why one would use concrete piers and how you would install them? Are there any products that make it easy for a homeowner? Krista B., Wake Forest, NC

DEAR KRISTA: I'm sure you realize that you need to be careful about taking advice from well-intentioned friends. This is true even if one of them is in the construction industry. Each day I run into folks who have been building for decades using a particular method. It turns out, unfortunately, that they've been doing it wrong all those years.

Concrete piers are vertical structural elements that support the weight of a building or structure. I'm sure a structural engineer would give you a more accurate description, but for the layman, think of them as table legs. The legs of a table support all the weight of the table and things on the table. If the table legs are on a solid floor, the table doesn't sag or tilt.

PHOTO CAPTION: This colorful plastic concrete pier form comes complete with reinforcing steel. It's easy to assemble with no tools and put into place. Photo Credit: Tim Carter

The same is true for concrete foundation piers. The concrete piers act as the table legs. If they are designed correctly, and placed on solid ground or to a depth that the friction on the sides of the pier is greater than the load placed on the pier, the piers and the structure will not move. That's a good thing!

Some ground beneath houses or buildings is deep sediment where the bedrock can be hundreds of feet below the surface. In these cases, structural engineers rely on the friction between the poured concrete and the soil or sediment to create stability. For the average homeowner that's using a concrete pier to support a deck, room addition or even a home, this is not a big issue. If in doubt, just hire a structural engineer to assist in the design of the pier.

Most concrete piers used around the average home for a deck or other structure are usually no more than 24 or so inches in diameter at the base of the pier. As the pier rises up and out of the ground, it can reduce in size to as small as 10 inches in diameter. The bottom of the pier should always be below the frost line in the area.

If you're building in the northern hemisphere, piers on the north side of a building that might find themselves in the shade should probably go at least 6 or 8 inches deeper than the frost line. The frost can go deeper into the soil in ground that never receives direct warmth from the sun's rays in the winter months.

It's also very important, in my opinion, that the bottom of the pier be wider than the top. The wider base helps distribute the weight of the structure over more soil. This adds to the stability of the design.

A pier design that's wider at the bottom than the top also helps offset the force of the wind on the structure. The concrete pier acts like an anchor in a wall. It requires enormous upward force to pull a one-piece concrete pier out of the ground that has a wide base. If you use a proper hold-down anchor that's connected to the pier with a long anchor bolt embedded in the concrete, your shed, deck or structure should not blow over.

It used to be hard to create a concrete pier that had this shape. You had to first pour the wide bottom in one concrete pour, carefully place reinforcing steel in the base and wait a day. Then you had to install a heavy-duty cardboard tube that extended up towards the surface. You then filled this with concrete. Believe me, it was not easy.

But now you can purchase a plastic concrete pier form that has the correct shape, it comes with all the needed reinforcing steel pre-cut and pre-bent! The steel fits into slots and holes in the concrete form so the concrete flows around it perfectly. These forms are easy to snap together with no tools, and they're easy to level on compacted soil. You pour all the concrete in minutes saving at least one day in the building process.

You can purchase precast concrete piers for your project, but the trouble is they are heavy - I mean really heavy. You'll need a backhoe or small crane to put them into position. It's possible that you can devise a method to move them by hand or with a group of people, but don't count on it.

Don't underestimate the importance of the reinforcing steel in the concrete piers. It's often overlooked. Steel adds enormous strength to concrete. Be sure the soil under the pier is stable and compacted before you place the concrete pier form and pour the concrete.

You can watch two informative videos that show precast concrete deck piers and the innovative plastic deck pier form at www.AsktheBuilder.com. Just type "building a deck pier video" or "precast concrete deck pier video" into the AsktheBuilder.com search engine.

Column 934

May 6, 2012 AsktheBuilder Newsletter & Tips

Happy Sunday, unless of course you're on the other side of the International Date Line!

If you're a new subscriber in the last five days, this is NOT a normal AsktheBuilder.com newsletter. The real newsletter comes out in two days.

Last Tuesday, I promised that I would let you know about the DIY Shed Building project this weekend.

As you can see in the photo, I made good progress! The shed is almost complete! It just needs the windows and doors installed.

Turn on Images to see AWESOME Shed Model, Seriously!

Yes, I know I missed April Fools Day by six weeks. What you see here is a finished scale model of the shed you and I are going to build together.

The reason I'm building the shed is to create the most detailed set of step-by-step videos that will show you how you can build your own shed.

The video series is going to be the closest you can get to me actually coming to your house to help you. As much as I'd love to come to your house, and Maggie here in New Hampshire, I believe, wants me to help construct her shed, I just can't do that, unless I clone myself.

But the magic of video allows me to get pretty darned close! Tuesday this shed building event is going to launch. I need you to become part of this so we can get started. I've already got the building permit, I just need your help.

On Tuesday, I'll go into great detail as to why you need to be part of this process. It's not hard to understand at all why I need you, and it's going to be a boatload of fun!

In Tuesday's newsletter I'm going to also share some facts from a story I read in one of my trade magazines about geothermal heating and cooling. If you're thinking about doing that to *save money*, you absolutely do not want to miss it.

Sincerely,
Tim Carter

May 1, 2012 AsktheBuilder Newsletter & Tips

This past weekend was windy but wonderful here in New Hampshire. Both days were sunny and chilly because of the wind. I started a fire both days to take the chill out of the air. It's funny as I looked at the weather map, so many places down in the South had their air conditioners on!

This coming week I'm going to be donating a day's work to some friends, Gary and Julie, who suffered from flooding due to Tropical Storm Irene last fall. She blew right over my house, and places north and west of me in central New Hampshire suffered from very severe flooding.

Gary and Julie own Gilcrest Cottages, a nice little retro motel and some cute storybook cabins that make for a perfect vacation getaway because it's so close to the center of the White Mountains here in New Hampshire. If you want to get married on a whim, Julie is a Justice of the Peace and can do it right there on the banks of the Pemigewasset River!

My job is to pressure wash a large blacktop parking area that's still covered with silt from the flooding. I've learned over the years to make this task go faster, you need to scrape up as much of the mud first as you can with a shovel. Otherwise, you're just moving the same mud farther and farther down the drive.


Tip of the Week - Washing Windows

Spring cleaning is in full swing now for many. Washing windows could be on your list. There are quite a few myths out there about cleaning windows. Let's start this tip by going backwards. I'll tell you what professional window washers DON'T do. They do NOT:

  • use old newspaper to clean and polish the glass
  • use blue liquid from spray bottles
  • use rolls and rolls of paper towels
  • use ammonia

Remember, window-cleaning professionals avoid all of the methods above. If you want to see how easy it is to wash windows and get professional results, all you need to do is read this past column of mine:

Be SURE to watch the video that's inside the column at the website.


Technology Alert!

Google announced last week a new service called Google Drive where you can store files from your computer on Google machines.

But the tech world was not happy at all with the Terms of Service that you must agree to. Evidently the wording is sort of fuzzy, and from my nonlegal standpoint you basically are giving Google a license to use your content. No way. No way would I EVER do that!

That's all I'm going to say, since I'm not a lawyer. All I want you to know is that before you use this Google service, you BETTER make sure you understand what you're signing up for.


Recovering Heat from Waste Water

Think about all the hot water you and I send down the drain each day. Arrrrrggggghhhh!

Wouldn't it be nice to recover some or most of that heat before it went down the sewer or into your septic tank? You might be able to do just that with this device.

WARNING! : I have not tested this device, and I can't back any of the claims about saving money or payback periods. But it seems the technology would absolutely work and recover some heat.

In fact, I think it would work far better on a horizontal run of piping rather than a vertical stack. I'd love to see independent test data comparing the two methods. In a vertical stack lots of the hot water may never even touch the drain pipe.


Cleaning Tip of the Week - Algae on a Patio

Yesterday I got an email from a woman who lives down in Florida. Her condo development is amongst some mangrove trees. They need to clean off algae from the patio areas and some walls, but do not want to harm the mangroves. That's smart! She knew that using chlorine bleach would be a mistake as it's highly toxic to all vegetation.

I suggested that all she has to do is mix up some Stain Solver with warm water, stir till dissolved, apply it with a hand-pump garden sprayer, allow to soak for 10 minutes, then lightly scrub and rinse. Ta Da! Victory!

You can have clean concrete and brick with no harm to the mangroves when you use Stain Solver. The same is true with ANY vegetation around your patio, deck or sidewalks. Buy some now to clean up the algae and mildew on your outdoor siding, patios, garden walls, etc.


Smelly Plumbing Vent Pipe

Bryan Miller from Winnipeg, Manitoba, Canada emailed me about offensive odors wafting from his roof plumbing vent pipe. He and his family can't open their windows or sit on their patio it's so bad. This problem started after a new sewer pipe upgrade project was completed in front of his house.

My advice to Bryan was to relocate the plumbing vent stack where it exits the roof. For starters, I'd put it up as high as possible on the roof and make sure that the top of the vent pipe is higher than any other point on the roof. This allows the wind to carry the odor horizontally.

I'd make sure the new location where the pipe pops through the roof is as far downwind on the house as possible. Bryan was aware of the activated charcoal filters you can put on vent pipes. That could be very problematic for him in the wintertime as the filters can choke off with ice in a very short amount of time. He lives in a coooooooold part of Canada!

Be aware that roof shapes, surrounding trees, other nearby buildings can cause downdrafts at your home. By putting the vent stack up as high as possible, you at least can eliminate any invisible air eddies that are happening because of your roof design.


Major Price Reductions For . . .

You're a WINNER! Why? Because the price of Ebooks at Amazon.com and other electronic marketplaces has DROPPED, I've lowered the prices drastically on all my Ebooks and Contractor Hiring Guides at my store. Just $7 each for any one. What a deal! My Contractor Hiring Guides help you find the pro for ANY job around your house. Wait till you see all of them.

P.S. If you, or someone you know is looking to buy a house - not a new house - I have a great checklist they can use. My Whole House Inspection Checklist is for a rookie that doesn't know much about houses. It forces you to look at things to see if there is a glaring defect.

This is NOT meant to replace a professional inspector. It just helps you decide if the house might have too many issues. It's just $7. Here's a link to it.

I'm creating an Apartment Rental Inspection Checklist next week in case you're renting an apartment or you're doing it for a son or daughter going to college. The last thing you want is to be blamed for damage you didn't do!


The Shed Project

Oh my goodness, I sure received lots of replies last week about my upcoming shed project. You may have been one who wants in on this exciting project. There's no doubt about it - sheds are popular. I've known that for a long time.

Maggie, who lives not too far from me in Franklin, NH, wants me to build the shed, hook it to my truck and then tow it over to her house! Maggie, I've got a better idea. You come over here and help me so I can inject you with all my shed-building skills and magic! That way you can go back home and build the shed of your dreams.

Here's the deal. I'm going to put this shed project up on Kickstarter.com. Oh are we going to have some fun there. I hope to launch this on Kickstarter by this weekend. I'm building a scale model of the shed this afternoon so you can see exactly what we're doing.

The way Kickstarter works is that you pledge certain amounts of money, starting at $1, and then you get something in return. If the project does NOT meet its published goal, you pay nothing. So if you want the project to happen, you then try to get others you know to participate so we get to the goal. I know we can do this.

Here's the problem. Once it's live on Kickstarter.com, the entire world can participate in the project. Some aspects of the project have limited availability. For example, I'm doing actual workshops here where you can come and learn how to do one part of the job in person, just like Maggie!

If you want to be part of this, you'll have to act QUICKLY. There's no way for me to just give you access to Kickstarter.com BEFORE the rest of the world sees this.

I'll be sending you a special announcement the moment this project is LIVE on Kickstarter.com. Please watch for this. Pay close attention to your email beginning on Friday. I don't want you to miss out on some parts of this project.

If this is successful, guess what? We're going to start doing a bunch of other projects. Wouldn't you love to be part of a bathroom or kitchen remodeling project? We can do it if we all work together.

Sincerely,
Tim Carter

Bathroom Updated

Beaker from Canada helped remodel a bathroom wall using advise from the AsktheBuilder site. Here is her story.

"Thanks for the advice on tiles. I did an accent wall for my best friend's sister. I hung the Ikea mirror and light fixture. The glass tiles ... came out great. Took your advice on letting the adhesive and grout setup before doing the finishing touches. You're the best. Thanks, Tim."

- Breaker, Toronto, Canada

Beaker's Bathroom Facelift

Beaker remodeled this bathroom wall. PHOTO CREDIT: Beaker


If you want to submit pictures and the story behind your project, CLICK HERE to go to the Before & After Submission Page.

April 25, 2012 AsktheBuilder Newsletter & Tips

I'm pretty excited. Yesterday, I picked up the building permit for a new large shed I'm building here at my house. This is not going to be just any shed. It's going to have special new concrete piers, 10-foot-high walls for lots of storage, an attic, skylights, sun tubes and sun tunnels, a turbine vent, a regular staircase to the attic, a ramp to drive tractors up into the shed, an overhead door, a regular door, interior shelving, etc.

Each and every step of the building process will be documented along the way with who-knows-how-many videos and photos. I estimate there will be no less than 100 videos that come out of this process. If you were to watch every video, you should be able to build a similar shed just like mine knowing what to do each step of the way.

The videos, photos and text will all be put in short documents that you can consume in just minutes. They'll become part of a new category I'm debuting today here in the newsletter: AsktheBuilder Answers. You'll read more about that below.

I'm also turning this shed enterprise into a fun event where you can become part of the project if you want. I intend to even put up a webcam. You'll have the option to gain access to the live camera feed over the Internet. You'll also have an opportunity to become a partial underwriter of the shed project. That will get you all sorts of goodies. I'll be announcing that next week. If the response is positive, then you and I might be doing all sorts of cool projects together as the year progresses!

Tip of the Week - Patching Spalled Concrete

This past winter was really pretty mild for most parts of the USA. You may have some concrete where the top surface has come off revealing the ugly stone core of the concrete.

You can repair this pretty easily with either a patch of cement stucco, or you can do a thin overlay over the entire surface to make it look like you've poured a brand new slab.

There is a secret step you must do to ensure the new stucco or thin concrete bonds to the old concrete. Discover that magic by reading this short past column at the AsktheBuilder website!

Cool Tee Shirts - I Mean Keep-You-Cool Tee Shirts

Last week I began testing some newer technology tee shirts designed for hot weather. We did have a few warm days last week here in New Hampshire, and they were a dream to wear. They are so soft, much softer than cotton.

Last year I switched from wearing 100-percent cotton tee shirts to ones that are 100-percent polyester or a blend of cotton and polyester. I have to tell you that I'm now a huge fan of the polyester or polyester/cotton blends.

This fabric technology does keep me cooler, and when they get wet, they sure seem to dry faster. What's more, the CoolMax tee shirts I tested last week from Duluth Trading Company also have built-in sun-blocking technology with a SPF of 40+.

I love the longer tail as well. If you tuck in your tee shirt, the longer tail keeps you from sharing too much information when you bend over, if you know what I mean.

These shirts come for both women and men. The folks at Duluth Trading Company told me there's a limited supply of these CoolMax tee shirts, so don't put it off if you want to try one.

I don't get a penny from Duluth Trading Company for this write up. I just tested the tee shirts and wanted to let you know what I thought. I'm not a paid shill for them.

Fun Video - Steam Whistle of the Steamboat Natchez

I made a quick trip to New Orleans this past weekend. It's a long story as to why I was there, but I did see lots of the French Quarter, and on Sunday morning I shot this video of the steamboat Natchez paddle-wheeler pulling away from the dock. Each time she does that, she tells everyone at river's edge that she's leaving. Listen for yourself. Turn your speakers UP!

Oh, and I had way too many beignets at the Café Du Monde. One more serving and I'd been in a diabetic coma for sure. If you live in NOLA, I'm sorry but there was absolutely no time for me to schedule a meet up. Next time I'm there, I promise we'll do one.

Another Update on the Washing Machine Valves

Celia S. wrote to me last week after I briefly mentioned the Watts Automatic Shut-Off valve. Please keep in mind I did not test this valve, I just did a quick web search for auto shut-off valves. What I failed to mention was a great point brought up by Celia:

"The Watts valve got bad reviews on Amazon. Even the guy with the good review had a terrible experience with this product, and later updated his review."

Excellent advice Celia! Be sure you take the time to read reviews on Amazon about all products before you buy. Throw out the best and always the worst review and look at the others. Remember, there are always haters and competitors that leave bad reviews. If you see lots and lots of bad reviews, that's a warning flag indeed.

Do You Need a New Roof? Maybe Not!

Do I Need A New Roof?Installing a new asphalt shingle roof on your home can be expensive. But, do you *really* need a new roof, or can it just be repaired buying you time and saving you money right now?
You may be stunned to discover that you can get by with repairs. An unscrupulous roofer may try to take advantage of you telling you that you need a new roof, when a repair could be all that's required to keep you and your possessions dry.

I created a short document titled, Do I Need a New Roof, that has three videos in it that help show you examples of asphalt shingle roofs that may or may not need to be replaced. This document will give you the confidence you need to make an informed decision. At just under $3, you can't go wrong! Please buy a copy now and tell me what you think.

If you want this document on your Kindle Fire or your iPad that has the Kindle software on it, click here.

This document is part of a new series of electronic products that I'm starting to create. It's called the AsktheBuilder Answers series. They're short, they're to the point and they answer very specific questions. My goal is to create hundreds of these answers about different aspects of projects. I know you frequently get to a fork in the road at times on a project and just need to be pointed in the right direction.

Here's a link to the other AsktheBuilder Answers I've completed.

Many, many more documents are being developed. I hope to have one up about How to Prevent Gravel Drive Washouts completed tomorrow. Later in the week, I hope to be working on - Crown Molding in 60 Minutes - or Less! Oh my gosh, wait till you see the videos in that one!

Video of the Week - French Cleats

Have you ever wondered how to hang a heavy item in such a way that you can just lift up on it and it comes off the wall? The best part is when the object is on the wall, there's virtually no way it can fall or tilt forward by using a method I discovered years ago. Watch this video to see how to improve your home improvement skills and magic! Oui Oui!!

Cleaning Tip of the Week - Horrible Grease-Covered Oven Racks

New oven racks are often nice shiny chrome. Caustic oven cleaners can dull this chrome. What if I told you that you can soak the oven racks in a special solution and a few hours later the caked-on grease comes off with mild rubbing using a Dobie pad? The best part is this special solution is just Stain Solver and water!

I place our oven racks in our utility sink and fill it with about five gallons of hot water. Then I add in one cup (8 oz) of Stain Solver. I let the racks soak for about three hours before I scrub and rinse. You can see a side-by-side photo of my oven rack right here.

Do you need more proof that Stain Solver is the miracle cleaner? Here's an email that Sal sent me last week:

"It really does work on beige floor grout. Stain Solver even removes black hair dye after it was dry!"

Sal carefully and wisely avoided the topic of who was using the hair dye!

Q & A of the Week - Chimney Top Construction Tips

DEAR TIM: My chimney needs some tender loving care. I had a few contractors come to assess the repairs, but none of them made me feel very comfortable. They all talked about how my chimney top, some called it a crown, was in bad shape. What they disagreed on was the method to repair it. Each contractor has a different solution. If you were going to repair or rebuild the top of your chimney, what would you do? Wanda M., Gig Harbor, WA

DEAR WANDA: I sympathize with you. The reason you're getting back all the different types of quotes for the work is because you let each contractor drive the bus. If you want really great quotes, you have to ......

Need to read the rest of this column? Click here.

Sincerely,
Tim Carter

Master Bath Remodeling

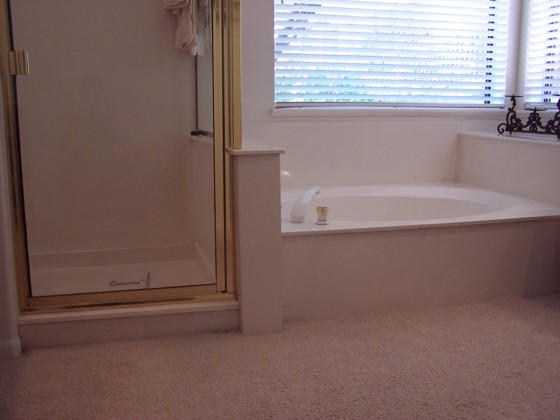
After 15 years, a shower that was starting to leak, and a carpeted master bath, it was time to upgrade the bathroom.

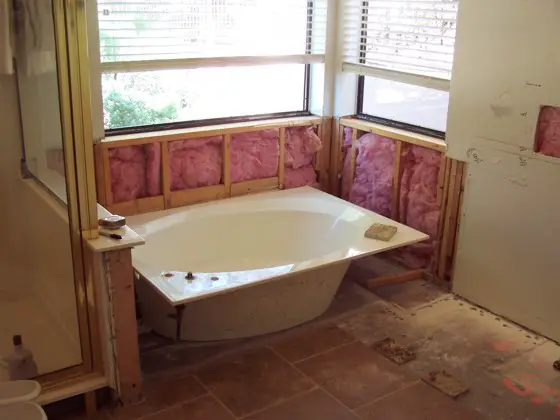
After selecting natural stone floor, shower, and wall tile, custom built cabinetry, and challenging our granite guy to fabricate a top to our existing tub, the pressure was on to build it right.

The granite and glass were done by the pros. Floor tile, plumbing, raising and moving the tub, shower demolition, new shower pan, shower wall and floor tile, fixture installation, and all else was done by the homeowner ... crazy to take on this project with two small children, and a wife who was not raised in a do-it-yourself environment.

Bring it on!

Paul Majcher

All photos submitted by Paul Majcher.

Paul Majcher's Bathroom
Paul Majcher's Bathroom - Before
Paul Majcher's Bathroom
Paul Majcher's Bathroom - During
Paul Majcher's Bathroom
Paul Majcher's Bathroom - After


If you want to submit pictures and the story behind your project, CLICK HERE to go to the Before & After Submission Page.