DEAR TIM: I'm really confused about the whole green building movement. There seems to be conflicting messaging, especially when it comes to products that advertise they are green. They seem to me to be the same products I saw ten years ago. If it's so important to be environmentally friendly, why didn't companies push this agenda decades ago? After all, we've been concerned about the Earth since the 1970's, right? I want to be a responsible person, but don't want to get hoodwinked. Sally P., Lawrenceburg, IN
DEAR SALLY: First let me say that it's absolutely impossible to discuss this green building movement in this tiny column. The subject is too broad and deep. As much as I hate to say it, thousands of trees have given their lives to publish hundreds of books on the topic. I've always thought that was very ironic. One would think that every book or magazine that covers the topic would use 100 percent recycled paper.
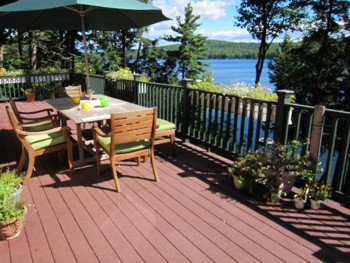
This decking can probably be considered green because it contains 100 percent recycled materials. But is it really green? PHOTO CREDIT: Tim Carter
Many who I see that attach themselves to the green building initiative try to cast their participation in an emerald shade of green. Many should use packaging that's more a murky color of olive green. I can see why you could be confused, as some products say they are green when, in fact, they may be impostors.
I'm all for being a great steward of the planet. It's our job to try to minimize our impact on the planet. But greed and personal gain are swirling in the vortex of this popular movement. I can see why consumers like you are struggling to make wise investments. That, by the way, is one of the real challenges when trying to make green choices.
One of the biggest things I see happening in the rush to purchase green products is the lack of doing one's homework. When you're comparing two products, the product that may not seem too green is actually the winner.
Let's examine a product that's been on the market for well over a decade, the tankless water heater. I've written extensively about these products, and have received lots of feedback from consumers who have purchased them. One of the selling points of these devices is the manufacturers saying you have an endless quantity of hot water when you install one.
Many of these heaters are touted as being very green and earth friendly. But what happens when you get one and you become part of the group whose fuel bill goes up because you, or members of your family, end up using MORE hot water than you did with your traditional tank storage heater? How green is that? Some would argue that you're causing more pollution and you're hogging more of the finite energy that powers the heater.
You may be tempted to purchase products that contain lots of recycled materials. Some of these could absolutely be a headache down the road. Just ask the hundreds and thousands of homeowners whose homes contain recycled fly ash from Chinese power plants. This fly ash was used as a filler in drywall.
The trouble is, the fly ash is a byproduct of burning high-sulfur Chinese coal. The fly ash inside the drywall is producing an invisible off gas that's corroding wiring, plumbing and causing health issues for some of the occupants of the homes that used this drywall. It's a green nightmare, if there is such a thing.
Trying to use earth-friendly materials can backfire in other ways. Who would ever think that using limestone dust would cause problems? After all, limestone is a very common rock and it's been around for millions of years. But when you mix limestone dust and asphalt together to help add weight to roofing shingles, you create an environment that the algae Gloeocapsa magma loves. Perhaps you have an ugly black-stained roof that has some of this earth-friendly limestone on it.
As you can see, there can be some unintended consequences when you try to be green. One other aspect is the financial angle. It could cost you more money to be green, lots more.
If you're independently wealthy, you may be one who can afford to subsidize the green building movement. But the average person, in these trying economic times, may not be able to afford the green product or the extra cost that may be involved to install it.
Add to this the return on investment (ROI) factor. It's really important for you to calculate the real ROI for the green products you purchase if you're on a tight budget. You may discover that it takes a decade or more to break even. What happens if you decide to sell your home in just five years? The potential buyer of your home may not care that it contains earth-friendly products.
I'm sorry to add to your confusion, but just be aware that there's lots of dangerous water out there as you navigate through the Sea of Green. Just make sure that you don't waste any of the green in your wallet as you try to be a good steward of our planet.
Column 897