DEAR TIM: My builder is talking about installing metal flashing as he's putting up my vinyl siding. What in the world is this material and why is it necessary? What is it usually made from? Some other people I've talked with have no idea what it is and feel it's not necessary. I don't want to waste money, so can you tell me all you can about flashing and if you would use it when you build the homes you work on or worked on in the past? - Tara P. Oak Harbor, WA
DEAR TARA: Oh gosh, I don't have near the space here to tell you everything I know about flashings of all types. My guess is I could write two or three small books to cover much of the topic. Suffice it to say that flashings have been around for hundreds of years, and if I was in charge of the building code and the best building practices manuals, these materials would be here for a millennium or more.
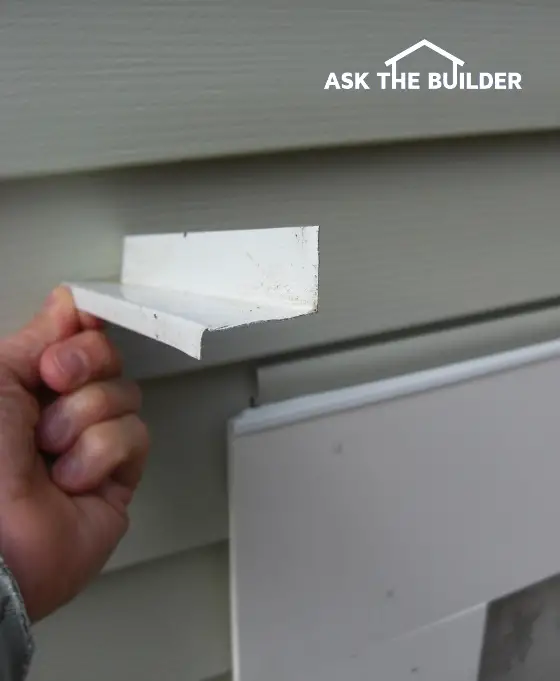
After this funny shaped piece of metal flashing is installed, you typically only see the tiny lip at the bottom. PHOTO CREDIT: Tim Carter
Flashings are used both on exterior walls and primarily on roofs. I describe them as a transitional material. When a flashing is used on a roof, it typically is used to transition from roofing material to something that's not a roof. Flashings can be made from many materials including tin, copper, galvanized metal, plastic, wood, lead, etc.
For example, you would have a piece(s) of flashing where a skylight, chimney, dormer, plumbing vent, air vent, etc. extends up through a roof. The roofing material stops at these things and something must connect the roof to them so there is no leak. That's the job of a flashing.
In your case with the vinyl siding, your exterior trim work has horizontal fascia boards at the bottom of the house and each story line. When the vinyl siding rests on top of these boards, a piece of flashing is needed to create a leak-proof conversion between the first piece of vinyl siding and the horizontal fascia board.
Here's why the metal flashing is so important in your case. You have to think about how roof shingles or feathers on a duck work to get a good understanding.
The reason ducks and birds stay dry is because the way feathers overlap one another. Water can't get under the feathers to the duck's skin. That keeps them warm and dry.
That's where the idiom "Like water off a duck's back" comes from. Water readily flows off the duck because of the composition of the feathers and the overlapping layering.
To keep your house dry so it doesn't rot, you need to build it the same way. This goes for exterior siding as well as roofing. Each time you transition between materials, say foundation, siding, brick, windows, doors, etc. you need to make sure each material sheds water over the top of the material below without getting behind or under the materials.
In your case, there is a great need for a flashing that runs along the top of any of the horizontal fascia boards. There are many different metal flashing shapes, but in your case the metal laps over the fascia board perhaps 1/4 inch, then is bent at a 90 degree angle to pass over the top of the fascia board, then bent again at a 90 degree angle to go up the wall so that it extends behind the first row of vinyl siding.
You should be able to see how this would work to shed water. Without the flashing in place, water would roll down the vinyl siding and contact the top of the fascia board. It would run along the top until it found a tiny crack and then it might flow behind the fascia. This could cause a leak indoors or start to rot the wood fascia board, the wall sheathing, or any other wood indoors.
With the flashing in place, let's see what happens. The water runs down the siding and at the bottom of the first row of vinyl siding it drips off and contacts the metal flashing as it runs across the top of the fascia board. The water then runs off the flashing because it can't go up the flashing as it extends up behind the siding. It rolls off the down-turned edge of the flashing on the face of the fascia board on it's way to the ground below.
To make sure the flashing works to it's best ability, the ends of the flashing at each far end of the fascia board should be turned up making a tiny curb. This forces the water to flow off the front of the flashing across the face of the fascia.
Without these tiny end curbs, the water can roll under the end of the flashing, especially in a fierce wind-driven rainstorm. This expert detailing is often not done by rookies or people who've not got a grasp of what's going on.
Furthermore, because of capillary attraction, the down-turned end of the flashing that folds down over the front of the fascia board should have an air space between the flashing and the fascia board. What's best is that the down-turned edge of the flashing actually should kick out away from the fascia board so the water forms into droplets that fall down to the ground.
If the flashing is tight against the face of the fascia board, the capillary attraction of the water can actually pull the water uphill under the flashing and into the back of the fascia, board. Never underestimate the power of capillary attraction. It's rotted out many a home.
Column 882