Concrete Slab How To Part 4 Video

Concrete Slab How To Part 4

Hi, I'm Tim Carter from AsktheBuilder.com and I want to show you, as they continue to pour the slab, an important thing. Look at this. The entire half of the slab is now screeded. But in one corner there is not concrete. Why do you think there isn't any concrete there?

The reason why is the last thing you want to do is to put too much concrete in the area or hole. If you do, you will have to shovel the excess concrete out of the slab. But if you take your time and work with the truck driver, you can make sure that there is just enough concrete down where it is needed. In this case, they are now filling in the last section.

Keep in mind, you are going to work hard enough as it is putting the concrete down. You don't need to be shoveling extra concrete out of the hole. So screed as you go to be sure there is just enough concrete in the area. It's as simple as that.

This is the fourth of four parts on How to Pour a Concrete Slab. Click here to watch Part 1.

Concrete Slab How To Part 3 Video

Concrete Slab How To Part 3

Hi, I'm Tim Carter from AsktheBuilder.com and we are here continuing to pour the concrete slab. I want to show you a neat tool they are getting ready to use. It's a power screed. It's really, really cool.

It has a small gasoline engine on it. That gas engine causes, through a cable, a vibration in the long blade of the screed. In this example, the workers have created two spots that they are screeding against. You will notice a spot right along the wall and the other spot in the middle of the slab.

They start at the wall and move the screed towards the center. This floats the surface of the freshly poured concrete. The operator just gently pulls the screed along the concrete, but the surface is smooth after the screed passes over it.

With a nice long pull, the powered-screed smooths a wide section of the slab. This keeps the scab surface in the same plane. You can definitely see the difference between the screeded section and the untreated areas. In the old days, it would take lots of time to float that much area.

That is a nice powered-screed. I doubt you will have one on your do-it-yourself job, but hopefully if you use professionals, they will have one. It is a great tool to do a lot of work in a small amount of time.

This is the third of four parts on How to Pour a Concrete Slab. Click here to watch Part 4.

Concrete Slab How To Part 2 Video

Hi, I'm Tim Carter from AsktheBuilder.com and I want to show you a concrete finisher using a magnesium float to float the edge of some freshly placed concrete. Watch this.

That's how you would use a magnesium float when you are doing concrete work. Did you notice what he did? He puddled the concrete by pushing it up and down. Followed by some real nice gentle strokes to make sure the float stays along the chalk line that is on the foundation wall. That is a nice trick to keep the concrete level. The concrete at this point is very fluid, making it easy to use the float on it right now.

This is the second of four parts on How to Pour a Concrete Slab. Click here to watch Part 3.

Concrete Slab How To Part 1 Video

Concrete Slab How To Part 1 Video

Hi, I'm Tim Carter from AsktheBuilder.com and we're getting ready to pour the concrete slab. The truck's here. Check this out!

What's really nice about these front-loader trucks is that the driver is in the cab and he can see exactly what the two workers are getting ready to do. By the driver moving the chute back and forth, he can make their work a whole lot easier.

Watch this. Here comes the concrete. Notice that the workers are using the hooks on the end of the come-alongs to pull the wire mesh up into the middle of the concrete.

Look how fluid that concrete is. It is flowing on its own. You can see how you can use the concrete rakes to just pull the concrete. If the concrete is the right consistency, it just flows. The concrete rakes are sometimes called come-alongs, but they look like a regular rake. They just move the material around to fill all the areas.

What's really important to note is that the concrete driver has stopped the flow of concrete while he lets the men work and place the concrete in the corner. Just a nice controlled work flow between the driver and the workers. Don't let the truck driver get in front of you. Tell him to stop the concrete flow if he is pouring too much, too fast.

This is just the first of four parts on How to Pour a Concrete Slab. Click here to watch Part 2.

Concrete Bleed Water Video

Hi, I'm Tim Carter from AsktheBuilder.com and I'm here on a job site where they are pouring a concrete slab. I want to show you something a lot of people don't get to see. It is really, really important to know because this is where a lot of concrete fails.

It is called concrete bleed water. Look at this. You can see the shine on the concrete. (This example is very light. Bleed water can be much worse than what appears on this job site. It can be large beads of water on the surface.)

What you are seeing is a really thin sheet of water up on top of the concrete. Now, what is that all about? Let's think about it for a second. What's the four ingredients that concrete is made out of? They are gravel, sand, Portland cement and what? Water.

Water is the lightest component of concrete. If you pour all the other ingredients into a bucket of water, they sink to the bottom. So concrete right after it is bull floated or screeded has the water come to the top. You have to make sure you don't float it into the concrete. It will go away on its own. But if you float it in, it will dissolve the cement paste at the top of the slab and it will make the upper part of the concrete very weak. That is one of the causes of spalling. So don't trowel bleed water back into your concrete slab.

Concrete Vapor Barrier Video

Hi, I'm Tim Carter from AsktheBuilder.com and I am here on the job site today. It is real pretty cool as they are getting ready to pour a concrete garage slab in just a minute.

But first I want to show you one part of the slab that is really important and it is something you might forget if you are doing some concrete work. Look at this. What you are seeing is a big black sheet of plastic. This goes underneath the entire slab, it's thin and it goes everywhere. The purpose of this vapor barrier is simple. It stops the water vapor from the soil from coming up through the concrete. It might be hard to believe but water vapor goes right through the concrete and it will make the inside of the garage damp if you don't have it.

Make sure you have a good vapor barrier under your concrete slabs.

Concrete Wire Mesh Video

Concrete Wire Mesh

Hi, I'm Tim Carter from AsktheBuilder.com. Guess what? They're getting ready to pour a concrete slab today. The concrete truck is on the way. What I want to show you is some wire mesh or steel reinforcing that's put in concrete. It is very important. Look at this!

What you see is a piece of wire mesh that is 6 inches x 6 inches. It is what is called 21 pound mesh. It is pretty light weigh and the best part about this particular mesh is it comes in flat sheets. Typically, it is purchased in rolls, but I don't recommend it as it is very hard to unroll it and get it to lay flat.

What the concrete men can do it tie it together if they want. But as the concrete is being poured, they will pull up the mesh and get it in the center of the concrete slab. The importance of the steel mesh is concrete has great compressive strength, meaning you can squeeze it and it won't fail. But it only has one-tenth the strength when you pull it apart or try to bend it, as compared to compressing it. But steel on the other hand has tremendous tensile strength, so it takes a lot to pull the steel apart.

So putting steel in concrete, you make it much, much stronger. It's that simple. Make sure you have reinforcing steel in your concrete.

Valley Rafter Video

Hi, I am Tim Carter, from AsktheBuilder.com. I am on a new construction site in New Hampshire. I want to show you something that you rarely get to see from this vantage point.

I'm up on top of a second story wall, balancing myself so I can show you a valley rafter, as it is being constructed. Check this out. This is common roof framing that is being done. Not roof trusses. Look at this. What you see is the main ridge beam of this house. It goes the entire length of the house. Coming off this main beam is another ridge beam. The point is where these two ridge beams intersect, you have to have a valley rafter. In this case, there are actually two, doubled up.

Here's the valley rafter coming down from the ridge beam and rest on the wall. The reason for two rafters is because it is acting as a giant beam. Here is what valley rafters do. See the little rafters between the ridge beam and the valley rafter? They all connect to the valley rafter at a very unusual cut. It is a compound cut of that rafter. Not only is the cut at a vertical angle, but also a 45 degree cut the other direction. This is called a cheek cut on the rafter where it intersects the valley. In this case, it is a gorgeous cut. You can't even get a piece of paper in there. Since it is cut at two angles, it is called a compound cut.

The valley rafter takes all the weight from the two sides of the roof. Second side of the rafters have not been installed yet. So valley rafters are very, very important. They are a little tough to put in. Probably not something a do-it-yourselfer will get right the first time.

November 16, 2010 AsktheBuilder Tips And News

What's in This Issue?

Travel News
Checklist Improvements
Super Energy-Efficient House
Crazy Heel Problem and Shoes
New Technology Trends
Latest Columns

I do product reviews frequently. Please read my Disclosure Policy to understand the relationship between me and the companies that make the products or offer the services I review.

FOLLOW ME ON TWITTER

Friendly Question Reminder!

If you have a question for me, don't hit the Reply button just yet. Go immediately to my web site and type in the keywords about your problem into my Search engine. The search box is at the top of every page of my web site. You could have your answer in seconds if you do this! Please pay attention to all links you see at my web site. The exact products and services you often need are right in front of you, and you might be ignoring them.

I've been absent from your email box for several weeks. Why? I returned late last week from a three-plus-week road trip that had me fly to Scottsdale, AZ for an Internet conference, then drive from there to Los Angeles, CA for a day. Then my buddy Russ Waters and I flew to New Hampshire for just 13 hours so I could see Kathy, Meghan and Brent, do some laundry, pack up other clothes and pull out of my driveway in the early morning darkness in a driving rain pointed towards Greenville, South Carolina.

I was in Greenville for a week attending a secret Internet conference. When that conference ended,  Russ and I headed back towards New Hampshire making some stops on the way to visit friends and colleagues. I finally got to see the US Constitution, Bill of Rights and Declaration of Independence in Washington DC last week. That was very cool.

Both conferences allowed me to fill my brain with knowledge that'll help you. How, you might ask?

One of the things was a best practice that was taught to me years ago, but I've forgotten to make part of my everyday routine. Instead of me guessing what's best for you, how about me asking you exactly what you want from me? DUH!!!!!

I could go on and on about the things I discovered that should make AsktheBuilder better, but let's do it the right way. I'll just execute and you'll benefit.

Checklist Improvements

I discovered seven months ago that you liked my checklists when we conducted the monster sale in March. But it's time to update and improve all my checklists. This summer I announced that I was going to start by improving my Roofing checklist.

I've decided to start with the Roofing Checklist because it's one of the most important parts of your home. Leaks or bad roofing jobs can cost you thousands of dollars and lots of misery

Shortly after the summer announcement, I got swept up in moving my wife and daughter from Ohio to New Hampshire. The last time I moved was 24 years ago, and just about everything I owned fit into a mid-sized U-Haul truck. This time it was far more complex, and drained me physically and emotionally.

Now that the move is over, I want to create the checklists of your dreams. Ones that will take away all of your fears and frustrations when you go to hire a contractor. After all, what you desire is to get the best value for the dollars you spend as well as a leak-free roof, right? Or maybe you desire something else. I'm hoping you'll tell me.

Please take this simple survey (survey now closed) and tell me what the perfect Roofing checklist would have on it if you could create it.

Super Energy-Efficient House

I saw an article in USA Today not too long ago. It was about a fantastic energy efficient home built up in the wilderness of Minnesota, just 20 miles from the Canadian border. You know it gets cold up there.

I'm always intrigued by articles like this as I'm waiting to discover the Holy Grail of Energy Savings. My definition of the Holy Grail when it comes to energy is affordable products and systems that provide nearly an instant payback. Alas, this column revealed that I'm still on my quest. Why? I'll let you discover that when you read the article and see what the cost per square foot was to build the house. Wow!!

Imagine taking that number and trying to calculate the true payback period on the energy-efficient items. My guess, shooting from the hip, is about 75 - 100 years.

The Holy Grail, and I mentioned this years ago in a past newsletter, may be close at hand. All we have to do is get the government to release the technology used on the outer tiles that create the skin on the Space Shuttle. If we had half-inch sheathing made from this material, we'd be able to heat our homes with candles not furnaces or boilers.

Crazy Heel Problem and Shoes

Russ and I were in historic Portsmouth, NH wandering around on the last day of my road trip. Five months before, I injured my left heel and developed a nasty case of plantar fasciitis that I couldn't shake. Fortunately it's almost gone and I was able to walk around visiting the quaint shops.

While in Portsmouth we visited a shoe store that had an interesting shoe made by MBT. It appears the shoe design may help plantar fasciitis. This shoe has a bottom that's not flat. The center of the bottom of the shoe is higher so the shoe rocks slightly as you stand on it. MBT doesn't make this claim, nor am I a podiatrist.

Based on what I saw, it appears this cool shoe design would stretch the bottom of the foot, and that's one of the remedies that's often suggested to help heal the heel.  Because of the chronic pain I've been experiencing, I can tell you that for the past five months I've NOT been in the mood to work around the house. I was in agony through the move limping as I carried boxes.

If you suffer from sore heels and are putting off working around your home, maybe this shoe would work for you. It's worth looking at.

See an update in the December 5, 2010 Newsletter.

New Technology Trends

"I love technology." Remember that line that Kip sings, if you can call it that, at the end of the Napoleon Dynamite movie? It was hilarious.

Love it or hate it, technology is seeping into home improvement. I'm constantly trying to stay abreast of it. For example, I just received a high-tech thermostat I'm going to try to test next month. It's screen reminds me of the new Samsung Galaxy S cell phone I just bought.

Here's where I need your help again. I'm wondering how you're embracing technology. It would help me to know so that I can create things that will make your home improvement projects be more successful and be completed faster. What's more, perhaps I can help you select the best product using new technology.

The new smartphone I just purchased allows me to scan a regular bar code on a product and get back information. What's more, it can also scan the new QR codes, allowing me to really connect with a manufacturer. You can do the same if you have a smartphone.

What's a smartphone? It's a cell phone that allows you to connect to the Internet. Traditional cell phones allow you to make/receive calls  and send/receive text messages. I'm looking for your input should you have a smartphone now or are getting ready to buy one. They're amazing is all I can say.

Please help me and take this quick survey. The results will allow me to figure out how I can help you. I thank you in advance.

Latest Columns

You want toasty warm floors? Then you want Floor Radiant Heat.

Have you ever seen a Foundation Footer?
Do you know all you need to know about a Concrete Foundation?
Want a gorgeous Rock Wall? One you can build with no mortar?

AsktheBuilder.com
100 Swain Rd.
Meredith, NH 03253, USA
Deck Piers

deck pier

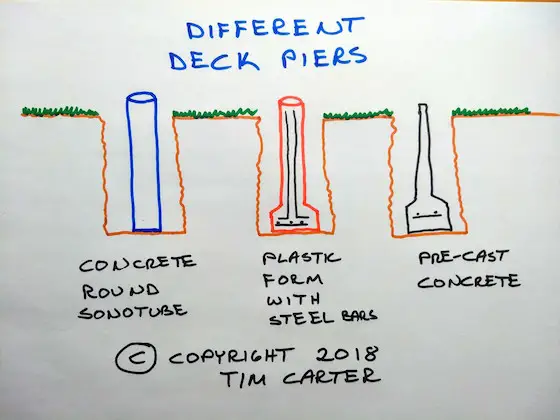
These are just a few of the different types of deck piers. The bottom of the hole should always be in solid soil and below the local frost line. Copyright 2018 Tim Carter

Deck Piers Checklist

  • A wide pier base distributes load to more soil
  • Reinforcing steel in concrete is a must
  • The bottom must be on solid soil and below the local frost line
  • Top of pier should be above grade

DEAR TIM: I’m building a deck and discovered that the wooden posts can’t rest on the soil. What I’ve discovered is that I need deck piers. What are they, and how are they made?

Are there different ways to install deck piers and footings? What methods have you used to make sure the piers are installed square and in the exact place so the deck posts are centered on the piers? Jared C., Sacramento, CA

What Deck Piers Do You Use Tim, the Best Ones?

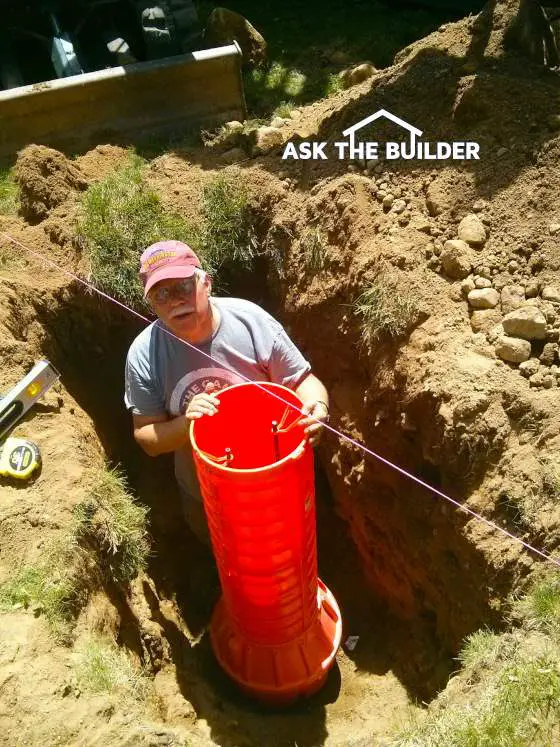
I've tried all types of deck piers and the one I prefer is the one you see me standing next to in the photo just below. CLICK THE PHOTO or CLICK HERE to order these amazing forms. It's the same one you see in the video above - the video I shot at the trade show.

deck pier form

This is me setting a deck pier form at my own home. Yeah, they need to be that deep in the ground in New Hampshire to prevent frost heave. (C) Copyright 2018 Tim Carter

Related Links

DIY Deck Pier Forms With Steel

Deck Piers and Footings - SECRET INFORMATION - Do NOT SHARE

Deck Piers - Don't Cut Corners Here

DEAR JARED: There are very few places you can place a wood deck post on the ground and have it not move. You can get away with that if you place it on bedrock or on some hard-packed material that has a high compressive strength such that the enormous concentrated load on the post doesn’t cause the post to sink into the ground. Solid crushed gravel might give you this condition as would bedrock.

Free & Fast Bids

CLICK HERE to get FREE & FAST BIDS from local deck contractors.

How Much Does a Deck Weigh?

The average deck can weigh one or two tons. That's thousands of pounds.

precast deck pier

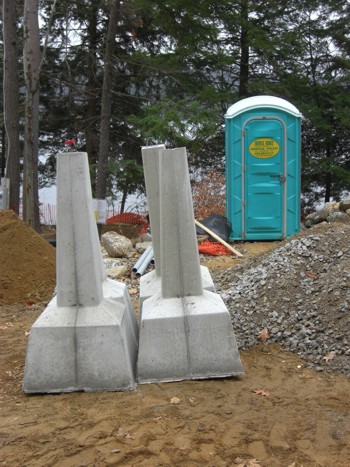
These precast deck piers look like giant upside-down golf tees. Once buried in the ground, you’ll only see the top few inches of concrete. PHOTO CREDIT: Tim Carter

I’m constantly amazed at the massive amount of weight the average deck post supports. It can be hundreds and hundreds, and often thousands, of pounds when you calculate the weight of the deck, the furniture on it, and the added weight of people. Imagine the extra weight when a deck is packed with people over for a party or a leisurely afternoon get-together.

How Much Deck Weight Hangs on a House?

If the deck is connected to your house, usually half of the total weight of the deck is transferred to the house’s foundation if the deck is not cantilevered. The other half of the weight might be transferred to the ground on just two or possibly three posts at the far edge of the deck away from the house.

If the posts are just 4x4s, that’s an incredible amount of weight concentrated on an area less than 25 or say 37 square inches!

This is why wooden deck posts must rest on a solid bearing point that won’t sink or lift up because of frost action in a soil that’s in a cold location. You can support wooden deck posts with deck piers in any number of fashions.

Are Concrete Deck Piers Safe?

Concrete deck piers are safe. I’ve used concrete deck piers for many years.

Several architects I used to work with avoided deck piers and chose to employ a deck post footing thinking this would make life easier for me the builder.

What is a Deck Post Footing?

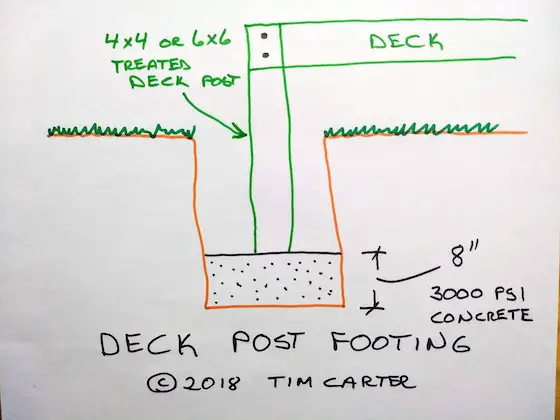
A deck post footing is simply a 20-inch or larger diameter pad of poured concrete down at the bottom of a hole that’s dug in solid soil. The bottom of the hole needs to be below the local frost level.

deck post footing footer

This is a simple deck post footing. Concrete is placed in a hole and a deck post rests on top of the concrete. Copyright 2018 Tim Carter

Are Deck Post Footings A Good Idea?

A deck post footing is not the best idea.

The wooden deck post is then placed on this concrete pad after the concrete hardens. The only trouble with this method is that the wooden post can be attacked by termites.

I’ve seen treated lumber, rated for below-ground burial, eaten by termites. I’ve come to believe it’s best not to place wood in contact with the soil as I don’t want to hope it will not rot. Hope is the emotion of last resort.

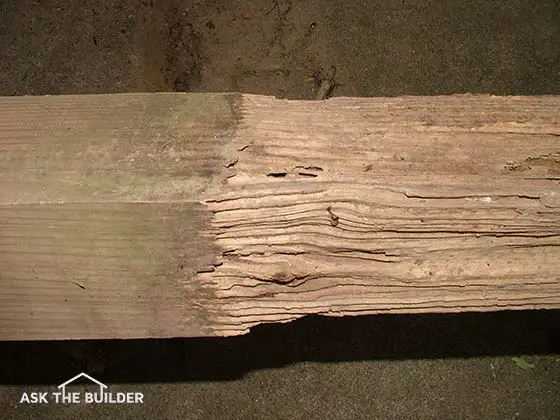
 extensive termite damage on the right side of the post

Lookie lookie, Can you see the extensive termite damage on the right side of the post? Imagine my reaction when I pulled this post out of the ground. ©2017 Tim Carter


What is a Concrete Deck Pier?

A concrete deck pier is simply a column of concrete that rises up out of the soil and a wooden post is connected to this concrete column. Usually, the pier is 6 to 8 inches in diameter.

CLICK HERE to get FREE & FAST BIDS from local deck contractors.

Can You Buy Precast Concrete Deck Piers?

You can purchase precast concrete deck piers that do a great job of providing support for deck posts. These piers are wider at the bottom than at the top.

The wider bottom helps distribute the weight of the deck on a wider footprint of soil so the pier doesn’t sink into the ground. The piers come in different heights depending upon the frost level in your area and the depth to solid soil.

Are There DIY Concrete Deck Piers?

You can also pour your own DIY concrete deck piers. There are any number of handy plastic or cardboard forms that allow you to create your own professional looking piers. The key is to place them in the exact position making sure the wooden deck posts rest centered on the concrete pier.


I’ve seen carpenters and homeowners go to great lengths to measure and calculate where deck piers should be so they are in the precise location. Time after time I see mistakes made and the wooden deck posts only partially rest on the concrete piers or miss them entirely.

What is the Best Way to Locate a Deck Pier?

I’ve found the best way to ensure the piers are in the right spot is to build the outer frame of the deck and temporarily support it. If you make sure the outer frame of the deck is level and square, bracing it to hold it in square, then you can drop a plumb bob from the deck corners down to the ground. This allows you to place the pier perfectly. It’s that easy.

How Can You Temporarily Support the Deck Frame?

If you decide to construct the outer frame of the deck all you have to do is support the outer floor joists with 2x4s that are set on a small scrap of 2x4 that lies flat on the ground. Be aware that the weight of a single heavy 2x10 treated floor joist can be enough to cause the single 2x4 to sink slightly into spongy topsoil should you not use the scrap block. The scrap of wood will distribute the weight just as the wide bottom of the concrete deck pier.

How Do You Square a Deck?

It’s easy to square the deck frame if you're building a simple square or rectangle deck. All you have to do is make sure the lengths of the parallel sides of the deck are the same. This means that if you’re building a 12 x 16-foot deck that the outer frame has two sides that are exactly 12 feet and the other two are 16 feet.

Once the outer box is nailed together you take a tape measure and see what the diagonal measurements are from corner to corner. The odds are they will be different by several inches.

When you move the outer frame one way or another you’ll quickly discover you can make the measurements the same. When this happens, the outer frame is now square. Nail a long 2x6 diagonally from two of the connecting sides of the outer frame to lock it into this square position. It’s that easy, there’s no need for a fancy calculator or tricky high school geometry.

CLICK HERE to get FREE & FAST BIDS from local deck contractors.

Column 857