Vinyl Siding

Vinyl siding is a fascinating building material. I was fortunate enough to be working full time in the construction industry when this product made its debut and blossomed into a major building-product category. As happens with many other building products, vinyl siding pushed and bullied aluminum siding out of the spotlight. I clearly remember my childhood home getting aluminum siding on it. The cost, in 1958, was $400 for labor and material. My Mom and Dad fretted about that decision for hours at the kitchen table.

If you've seen how fast vinyl siding can be installed, you may be easily tempted to read a vinyl-siding how-to booklet or guide. If you've been hypnotized by a home-improvement television show that tempts you into thinking you can tackle installing vinyl siding yourself, wake up. It's not as easy as it appears. It takes considerable skill to get professional results. What's more, you need help in most cases as well as an assortment of ladders and hand tools.

Vinyl-siding colors usually are muted, lighter tones. There's a reason for that. Deep colors absorb and retain the sun's heat. Vinyl siding reacts violently to heat, and expands significantly. If you don't install vinyl siding correctly, it can buckle, warp and distort from the sun's rays. Deep colors would simply make the situation worse. Some paints can be applied to this siding to create different vinyl-siding colors, but beware painting vinyl siding a dark color.

When you obtain a vinyl-siding cost estimate, don't panic. Rest assured that there is a significant cost for the material, especially for all of the trim pieces that are necessary when the siding abuts windows and doors as well as inside and outside corners. Vinyl siding is a product made primarily from crude oil. If the price of oil is high, vinyl-siding material costs will also go up accordingly.

Then there is the labor involved. Don't underestimate the amount of time and effort required for a typical vinyl-siding installation. There is a considerable amount of time spent in setup, trimming, dealing with utility penetrations in walls and even fighting insects. Dealing with wasp and bee nests is common, especially in warmer months. If you watch siding installers, you'll quickly discover that they spend little time installing the siding. The trim work, caulking and fitting take up a majority of time on the average job.

Because people really like the look of real wood, the vinyl-siding manufacturers discovered long ago that if they took the time to mimic wood, it would make the plastic product more appealing. This is why you see cedar vinyl siding. The patterns of horizontal cedar as well as cedar shingles have been copied for years, and are quite popular products.

Vinyl house siding is appealing to many homeowners. Many of my past clients wanted it installed because of its no-maintenance characteristics. If you live in an urban environment, all you have to do is periodically wash it just like your car to make it look like new. The color in vinyl siding is the same throughout each piece, so even if it gets scratched, you can't tell from a distance. It's fairly immune to denting in warm weather, but hail and other objects can shatter it if the conditions are favorable.

When you start to decide on a vinyl-siding color, take your time. If your house has wood siding on it now, the best way to select a color is to get small cans of paint mixed that match the vinyl siding and it's trim. Remember, you can do a two-tone mixture for your vinyl siding by using complimentary colors for the siding and various trim pieces.

Go ahead and apply the paints you like to smaller areas of your existing house siding, allow it to dry and then step back 50 feet to look at the colors. Look at the colors at different times of day to get the full range of color. Using this inexpensive method, you can make sure you get the perfect color. Who cares that your house looks funny for a few days? After all, the new siding will cover the paint.

If you're thinking of applying home vinyl siding to an existing house, you may want to consider taking existing siding off. Adding vinyl siding on top of wood siding can create issues at doors and windows where they tend to get slightly buried. Taking off the existing siding also allows you to add thicker foam insulation. There are distinct benefits to removing existing siding.

Column QA
Home Inspector – He Can Save Your Bacon

inselbric insulbrick inselbrick

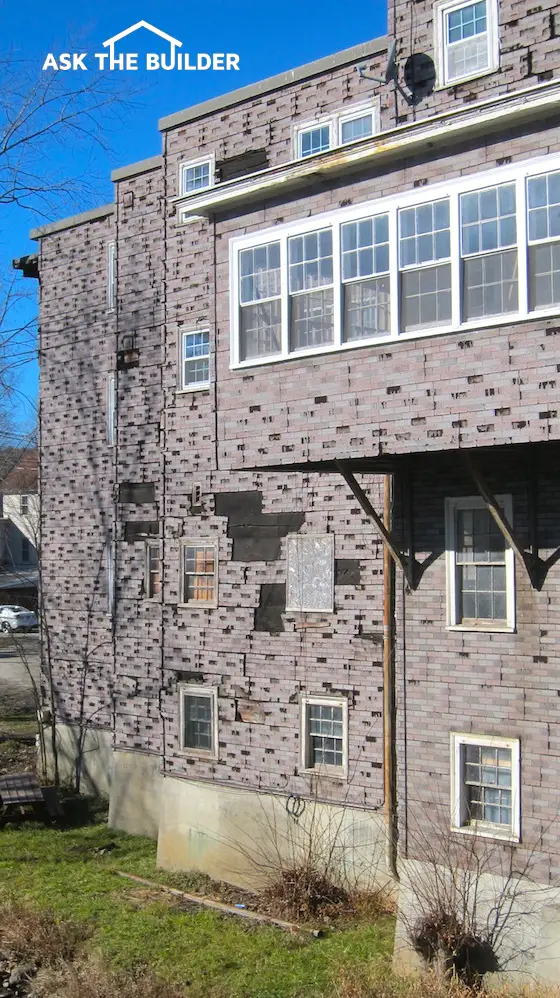
Home Inspector | This giant apartment building in Newport, NH is covered with Inselbric panels. It's possible they were installed before 1940. This wall faces south and the sun has damaged some of the surface. But the other three sides of the building look brand new! What will a home inspector say should happen? Copyright 2020 Tim Carter

Home Inspector - Get the RIGHT One or Beware

Months ago I had the pleasure of working with a home inspector in New Hampshire. I was buying an existing house. If you are building a new house you'll need a certificate of occupancy nh from a building inspector.

It was an unusual event for me as the last three houses I lived in for the past 33 years had either been completely renovated by me or built from scratch. Even though I was an experienced builder, this six-year-old New Hampshire home needed an independent set of eyeballs so I wouldn't make a mistake. Over the years, I have done lots of research about home inspectors, so I knew how to find one that would do an excellent job.

How Do You Become A Home Inspector?

If you want to become a home inspector, it's not hard. The trouble is, there's lots of competition. Home-inspector training is not really taught in schools, so it's somewhat of a challenge to become an expert at identifying all sorts of problems with homes. Imagine the broad experience you need to be able to intelligently discuss with a buyer topics ranging from the house's foundation all the way up to the roof shingle caps as well as every other thing in between. Many home inspectors that I know of have had extensive home building or remodeling experience. It's not necessary, but it's helpful.

What is the Current Trend for Home Inpsectors?

The current trend in the marketplace is to be a certified home inspector. You can achieve this by aligning yourself with a home-inspectors association. There are quite a few of these, and the requirements to get certified range from silly to stringent. You can fool some home buyers with a fancy title, but rest assured that many buyers are taking the time to discover what associations really police their members, have strict guidelines and require continuing education. That's, in my opinion, the association I would want to be part of if I was a home inspector.

Is New Home Inspection Easier?

If you plan to choose to become a new-home inspector, then your job is slightly easier. There are many issues in older homes that won't come up in a new-home inspection. But in today's marketplace, the workmanship standards seem to be falling, so as an inspector, you have to really look closely at many things to ensure the house is in great shape. Remember, just because the new house got a Certificate of Occupancy from the building inspector, that doesn't mean the house is in great shape. The building codes are minimum standards. A house that passes the building code can still have issues.

What is the Best Home Inspection Association?

The association of home inspectors I prefer is the American Society of Home Inspectors.

CLICK or TAP HERE to get FREE BIDS from LOCAL  home inspectors.

The individual I used for my New Hampshire home had this certification. This association currently has the toughest entry standards and requires continuing education that keeps their members in the zone with new issues, products and developments in the industry. I also like the code of ethics to which they subscribe.

Do You Need a License?

You may need a license in your state. But you should also wonder if you need a home-inspector license to do business. I can't answer that accurately as the laws change constantly. All I can tell you to do is to contact the Secretary of State of whatever state you want to work in. This government office usually handles this licensing. Sometimes, it may be the Department of Commerce.

How Can I Determine If I Need a License?

The best way is to visit your state's website and use its search engine. This is a great place to explore all the legal aspects of how to become a home inspector in that state. Because the real estate transactions are so large that involve the inspections, you can see why it's necessary to abide by the law, and investigate at the beginning everything you need to do to legally transact business as a home inspector.

How Much Knowledge Does a Home Inspector Have?

Don't underestimate the level of knowledge that new-home inspectors possess. Some of them are walking, breathing encyclopedias of home-building information. You want to become, if possible, a home inspector that has done hundreds of inspections. Buyers tend to look for an individual who has been in the business for some time. These same buyers often do all the necessary due diligence to ensure the inspector is still certified by whatever association he says he works under. Some certifications expire and don't get renewed.

I urge you to become a licensed home inspector. If my audience is an indicator, licensed home inspectors get more initial credibility as well as business. What's more, you may discover it's a mandatory requirement in your state.

I did home inspections many years ago before it spouted into the industry it is today. The inspections were fun, as I took them as a challenge. You are in a position where you're looking for clues and trying to discover places where a deceptive homeowner has tried to disguise or hide a defect. Those are indeed the most satisfying things to uncover in a home inspection!

Author's Note:

Bill Barnes, of Seagate Inspections Inc., offers the following comments regarding home inspectors.

"Tim, As a home inspector with over 2,500 inspections in my experience bank, I could not agree more with your advice to buyers that they should look for certified inspectors. Furthermore, and beyond just being certified is the important fact that the inspector carry E & O insurance (Errors & Omissions insurance) It's expensive but anyone in the business who does not carry it is only a disconnected phone line away from becoming untouchable.

As a company, we have performed over 25,000 inspections and can tell you that our 7 inspectors learn something new each and every inspection. It's been a long time philosophy of ours, taken from the bible, that as iron sharpens iron, so one man sharpens another. Multi-inspector firms or inspectors who have a large network of peers in the industry will always be your best choice when it comes to getting the value of experience, knowledge and service you deserve as a home buyer. The cost of a home inspection is such a small percentage of the total price of the home, that it is by far the best value a home owner will receive regarding services related to a home purchase.

We are all looking for a turn around in the market in the coming year and recommend to anyone considering a home purchase that strongly considering a home inspection should be your first move. Selling a home? A pre-marketing inspection should be considered also so you'll know what it is that your buyers inspector might uncover. You can then choose whether to repair an issue (at a much lower cost typically) or to disclose the issue and adjust your price accordingly. Why not take away the surprises and renegotiation points a buyer may request after you were prepared for a smooth sale?"

Column QA

Tin Roof

The second home I owned had a tin roof on two porches. This may not impress you, but I'll bet this does: Consider that this tin roofing was over 100 years old and the pitch of both roofs was nearly flat. Flat roofs take the most abuse from Mother Nature. Both tin roofs were leak-free when I bought the home and for the ten years I lived in that house. I've been gone from that home nearly 23 years and drive by it on a regular basis. The roofs are still there and in great shape.

The reason why tin roofing is so superior is simple. The roofing material is actually rolled steel, but it's coated with tin. Tin is a metal that doesn't really corrode when pure rainwater hits it, and it's extremely weather resistant. The tin is chemically bonded to the steel in a plating process where the steel is heated quite hot and saturated with molten tin. The steel and tin molecules that are rapidly vibrating because of the heat interlock and bond permanently to one another. This is the same process used to galvanize nails.

Tin roof repair is not too difficult if the tin coating is still in place. Regular solder will bond to the tin if you heat up the solder and the tin roofing. This is exactly how the roofers who installed the roof on my home made weatherproof seams. They soldered the seams on site, and the solder was also weather resistant and not affected by water.

I've witnessed master roofers who have soldered tin roofs. I've done my own successful soldering of tin. It's not hard to do, but it helps to have the proper tools. You can find these special tools at real roofing-material supply houses that sell the rolls of tin that are used to make the tin roofing material.

A corrugated tin roof is not hard to work with. The ripples or corrugations stiffen the tin. If you work with flat tin from a roll, it's nearly impossible to hold straight. It's as unruly as a piece of wet spaghetti. Corrugated tin roofing is often the material of choice for beginners as it's easy to attach to a wood-framed roof. It's also not always necessary to solder any of the seams, as you can often achieve a weathertight roof by overlapping the corrugated pieces of metal.

Installing a tin roof like the one on my older home is not a task for a beginner. The two primary types of tin roof are standing seam and the flat-lock system. Both are attached to the wood sheathing using blind-nailed clips. The flat-locked tin roof requires superior skill to form the pieces and more importantly, soldering the seams between all the interlocking pieces of metal. These flat-locked tin roofs are a masterpiece to put it mildly.

When you get a tin-roof cost estimate, you may be in for a shock. These roofs are very expensive because they are so labor intensive. Labor in today's world is much more expensive than it was back in the early 1900's. This is why it was not a big deal to have tin roofs on regular homes years ago.

To keep a tin roof in great shape, it needs to be painted regularly. This is why the roofs on that house I owned lasted so long. They were painted with great coatings made to withstand the punishment Mother Nature could produce. Tin roof colors are as many as you might imagine. If you can get a paint company to tint an exterior metal paint the shade you desire, your tin roof can be that color. Black and red tin roofs are traditional colors, but if you want a green tin roof or a blue tin roof, that's not an issue.

Be sure that you clean a tin roof very well with soap and water before you paint it. Use a scrub brush and get all the dirt off. Rinse the roof well with clean water. Allow it to completely dry. Follow all the directions on the label of the paint can, making sure the paint you choose is intended for metal roofing. Apply it in the cooler parts of the day. Overcast days are better than sunny, windy days.

New Windows

New windows are one of the most expensive items you can purchase in an average home. This is true whether the house is new or if replacement windows are being installed. The only other items that quickly come to mind that compare in expense are kitchen cabinets and the sum total of all kitchen appliances. New construction windows can easily run into the tens of thousands of dollars, especially if you decide to purchase high-quality ones. Believe me, if you plan to stay in the house any length of time, you want the best new-house windows you can afford.

New-home windows are the weakest link in the energy-savings chain with regards to the heat loss and heat gain your home experiences. This is true even if you purchase the most energy-efficient windows that are made. The insulating properties of the walls and ceilings in your home will be many times greater than the windows. This is true even if they have Low-E Glass and multiple panes of insulated glass. For this reason, you must consider windows that have the highest energy ratings possible.

You can purchase new vinyl windows for a new home or an existing home that have superb energy ratings. These windows can be certified by two outstanding organizations:

  • American Architectural Manufacturers Association (AAMA)
  • National Fenestration Rating Council  (NFRC)

Both of these organizations have rigid certification programs that allow you to buy with confidence so long as the windows you purchase have the labels from each of the organizations on the windows.

New window installation is critical. You can buy the best, but your builder or his carpenters can ruin the windows or compromise their function or energy efficiency if the windows are installed incorrectly. Virtually every window manufacturer has excellent written installation instructions that show you step-by-step how to install new windows. This doesn't mean you have to do it, but you should read the instructions and then observe to make sure your new windows are installed correctly.

Take many photographs from both sides during each step of the process. Pay attention to the location of shims, the location and spacing of fasteners, the exterior flashings so that water will not enter your home, and the proper insulation around the windows.

Most manufacturers call for a one-half-inch gap on the sides and along the top of the window. You don't want the windows to fit tight into the rough opening. This gap can be easily filled with an expanding foam meant to be used around windows and doors. This foam eliminates air infiltration around the windows.

Installing new windows is not really hard, nor is it technically challenging. There are several critical steps, all of which are covered in the written instructions. Don't skip this important step - get the instructions and read them. The instructions are almost always available at the manufacturers' websites.

Over the years, I installed many different types of windows. New Anderson windows were always wonderful to work with. They were always square, and when you attached the windows to the wall nailing through the vinyl fin, the job went smoothly.

New sash windows as well as new wood windows are also easy to install if you make sure the rough opening is plumb and square. To ensure all exterior and interior finishes line up, be sure the rough openings in the wall are all level and in the same plane. This is really important if the exterior is brick. It's also important if the inside has decorative wood trim or wainscoting that wraps around the windows. If the windows are not level, it will show up in the finishes.

Be sure you shop around as you look for your new windows. The certification labels from AAMA and the NFRC are very important. Take the time to understand the numbers and ratings on the labels. Get it in writing that the windows you'll order will come with the labels. Don't trust the words that flow out of the lips of the salesman. Have them prove to you the windows have the gold label from AAMA.

Slate

DEAR TIM: Slate was used in the house I grew up in. The slate tile seemed to be a random mix of squares and rectangles. I'd like to install this material in my own home. Is slate flooring a job that can be tackled successfully by a beginner? What are the top things you need to watch for when you choose and install a slate floor? Steve R., Sarasota, FL

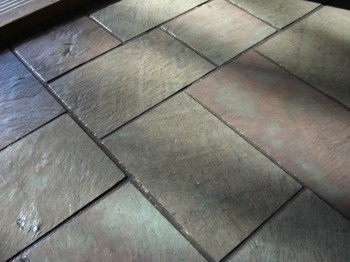
DEAR STEVE: The slate tiles you saw as a child did a great job of fooling you. Although they appeared random in size and placement, they were not. If you were to go back to your childhood home and study that slate flooring closely, you'd discover quickly that there is a pattern that repeats going both side to side in the room and front to back. This pattern oddly enough is called random Ashlar, because the intention is to make it appear the slate tile are placed willy nilly.

It's my feeling you can install slate tile if you are a person that pays attention to detail. There are several mission-critical steps that done wrong, will doom the job to failure. You need the same tools you would use to install ceramic-tile flooring, but in addition, you absolutely need a diamond wet saw or an angle grinder to cut the slate. Ceramic tile can be scored and snapped producing amazingly straight cuts. Try this with slate and you end up with shattered pieces with irregular edges.

Slate is an attractive and durable flooring material. There are many other uses for it as well around the house. PHOTO CREDIT: Tim Carter

Slate is an attractive and durable flooring material. There are many other uses for it as well around the house. PHOTO CREDIT: Tim Carter

Natural slate is set in a mixture of silica sand and Portland cement. This dry material is called thinset, and is mixed with water to the consistency of cake or pancake batter. It's important the thinset is applied evenly to the floor, and the tool that professionals use is a notched trowel. This tool creates a corduroy texture so that as you push the slate tiles into the adhesive it doesn't ooze out along the edges.

To prevent cracking after the slate floor is complete, it's important to ensure the subfloor has no flex. You can install slate on a wood subfloor system, but the floor must have no bounce to it and be as stiff as whiskey served at a Western saloon. It's also a great idea to install a crack-isolation fabric between the slate and the subfloor. This membrane prevents cracks that might transfer to the slate and grout in the event the subfloor moves due to seasonal humidity changes or minor settlement.

Slate floors also require great skills when you first lay out the pattern. It's really imperative that you maintain a consistent spacing between the pieces of slate. The joints between individual pieces is often 3/8 inch, but in some instances it may be slightly less. If you don't pay attention to this spacing, the different pieces in your pattern will not interlock well.

It's actually easy to maintain the spacing if you take the time and chalk lines that the slate follow during the installation. The primary line you start with should be parallel with the most visible wall in the room. If you make a mistake, the random pattern is very forgiving.

The slate tile flooring needs to cure in the thinset for at least 24, and preferably 48, hours. Without the grout between the slate, you can easily dislodge slate as you walk or kneel on them. Once the slate is ready to grout, be sure to apply a grout-release liquid on the top of the slate tiles. This material interferes with the bond between the slate and the grout, so make sure it doesn't drip onto the edges of the slate.

Grouting the slate floor tile is perhaps the hardest part of the job. By this time, you may have grown impatient to get the work finished. If you cut corners here, you'll regret it. The uneven cleft texture that imparts much of the beauty of slate is a demon when it comes to grouting. The sanded grout and grout paste sticks to these micro ridges in the slate like bubble gum in your hair.

Sanded grout is used because the joints between the slate is larger than 1/8 inch. The silica sand in the grout creates a miniature concrete mix. You can ruin the strength of the grout if you add too much water when you blend it, and if you use too much water as you sponge the grout off the top of the slate.

Before you decide on which slate to use, look at all the colors. Black slate is stunningly beautiful, as is green slate. My personal favorite happens to be red slate. The red hue is typically a deep earthy red that transforms a room with its rich character.

Selecting a color for a project like this can be stressful. After all, once the floor is down it's permanent. One method that has worked well for me for years is to make test panels. You can buy small amounts of slate of different colors and quickly attach them to thin pieces of plywood. You only need to make up panels that are slightly larger that 30-inches square to get a feel for the color.

Set these panels in the room where you intend to use the slate, and look at the color over a period of weeks in sunny and cloudy weather as well as at night. The slate will look different depending upon the light. If you desire the wet look, apply a wet-look sealer to the panels so you really see what it looks like.

CLICK HERE to read about using slate on the front porch.

Column 764

John Deere Snowblower Video

John Deere Snowblower

When Mother Nature gives you a lot of snow, it provides a lot of beauty, but also a lot of work. Snowblowers are fantastic machines. This model has lots of features. But first, think about using a pair of ice cleats. This pair sketches over the bottoms of your shoes or boots. These will help you walk without slipping.

A snowblower is basically like a lawn mower. A lawn mower cuts the grass and shoots it out the chute. A snowblower does the same thing, but with a different type of blade. The augers spin and chew through the snow and forces it back to a high speed impeller. The impeller then shoots the snow up through the chute in the direction you have set. Most snowblowers allow the chute to be rotated through 180 degrees, so you can discharge the snow to the left, right, straight ahead or some where in between. Some models have a control for height of the discharge.

Another thing about snowblowers is some a like a car. They have a transmission that allows different forward speeds and even a reverse. Use the lower speeds when the snow is deeper, so you do not choke the front of the snow blower. With less snow, you are go faster.

On the bottom of the blade covering, there are small, adjustable pads. These pads adjust the depth of the cut. This is important to set for the type of surface being cleaned. When using it on a smooth, flat concrete surface, it can be set low so just about all the snow is removed.

Before starting the snowblower, be sure to open the owner’s manual and read it. Be sure to follow all the safety recommendations. These machines can be dangerous and you can get hurt. They are like any other power tool. You must respect it, but if used properly, you will do fine.

A snowblower can save your back. In fact, they can make what is normally a job and turn it into fun. Some blowers even have a light for night use.

A few final tips. Before the snow season hits, be sure to clean your driveway and sideways from branches, rocks and debris. This will help the snowblower from getting jammed. This will help you get a smooth clean drive in no time flat.

January 27, 2009 AsktheBuilder News

Wake in Cincinnati

Early yesterday, we had to send Kathy's Mom back to Heaven. There will be no newsletter this week, and possibly not next week due to these circumstances.

I want to thank you in advance for any sentiments you pass through me to Kathy. I'll not be able to personally respond to you because of the obvious need to be with my family.

I'll be posting a summary of my thoughts about this very great woman on my blog in a few days while my memory of all the splendid times are fresh. I'll share the link to the post once it's complete.

In closing, consider this sage advice practiced by many of our former Native Americans:

Your heart may never be as soft as it is today.

Simply put, if you have any grudges you're dragging along with you each day, hatchets you're sharpening instead of burying them, etc., stop. Stop right now.

You may never have another chance to say the right things to the people closest to you. Fortunately, I got to say those words to my mother-in-law before I came back up here to New Hampshire three weeks ago. I knew she was sick, but never expected her to pass so suddenly.

Rest in Peace Mary Jane.

Pavers

DEAR TIM: Pavers are top on my mind. I'm planning a paver patio and want to be ready to go when the weather is favorable. Because of the harsh economy, I can't afford to hire a contractor. Will brick pavers make a durable patio, or should I lean towards concrete pavers? What's the difference? Patio pavers look great because of the seams and texture, are they difficult to install? Shelly V., Lebanon, NH

DEAR SHELLY: My wife and I have had a paver patio at the last two homes we have owned, and I have one at the home I just purchased in New Hampshire. Our brick-paver patio in our old home has been in place for over 20 years and it looks as good as the day I installed it. Mother Nature has coated it with thick ice, the sun bakes it in the summer and the brick and mortar are wearing like iron.

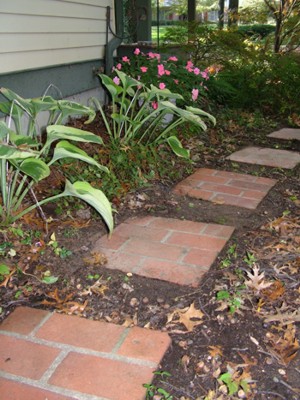
If you want to work with pavers, pick a small project like brick paver stepping stones. PHOTO CREDIT:  Tim Carter

If you want to work with pavers, pick a small project like brick paver stepping stones. PHOTO CREDIT: Tim Carter

A concrete paver is not too much different than a brick paver. The common concrete pavers that have been used to construct walkways, steps and patios are made from smaller stones, coarse sand, Portland cement and colored pigments. The colored pigments are what create the earth tones you see in these products. However, the color eventually dulls over a period of a few years. Over time, the colored cement paste wears off the top surface of the concrete pavers, and they usually develop a faded look when you start to see the actual color of the small stones and coarse sand.

You don't have this color issue when you use brick pavers. The clay that's mined and formed to make the pavers is the same color all the way through. So as the brick wear, the color always remains uniform. You just have to be very careful to purchase the correct pavers as some are not rated or certified to be used in a horizontal manner in climates like yours where you get frigid weather. Purchase the pavers from a real brick yard, and make sure they carry the severe-weathering rating.

The pavers that resist ice and snow for decades are fired longer in the kilns and sometimes at a hotter temperature. This heating process actually transforms the soft clay into an artificial stone. If you fire brick long enough, you can make them so hard and strong they'll resist heavy truck and car traffic when used in roadways. Visit downtown Athens, Ohio and you can see brick streets that have been in use and exposed to the weather for over 100 years.

When you go to install the pavers, you need to make a choice. You can set them in sand, a sand and Portland cement mix or you can mortar them directly to a concrete slab. My paver walkways and patios are all mortared to steel-reinforced concrete slabs. This is by far the hardest and most labor-intensive method, but I did so for a reason.

My first experience with pavers was a patio I built for my future mother-in-law. She had some instructions where you set the uniform pavers in a checkerboard pattern on top of compacted damp sand that was blended with Portland cement. The sand bed was 4-inches thick and it was easy to get it level after compacting it. I did that by dragging a straight 2x4 across the sand/cement mixture. The brick were set directly on the sand and then fine sand was swept into the cracks between the brick.

Those patio pavers have been down for 37 years, and they look fantastic. Over time, a few high and low spots have developed, but they add character to the patio.

A few years after this job, I tried to set thin pavers just on sand. It was a disaster. The brick drifted around on the sand, ants brought the sand to the surface, weeds grew in between the brick and we constantly tracked sand into the house.

To get pavers to stay put, have no humps and look good, I decided to mortar them to a concrete slab. As you can imagine, this requires more excavation depth, expensive concrete, lots of help to place the concrete and then countless hours of mixing mortar and carefully laying the brick pavers so they are in the same plane and shed water. If you have the desire and the time, it makes for a stunning look. I strongly advise you to experiment perhaps with a garden-pavers project so you can see how much work is involved.

Paver installation is going to be hard work no matter which method you choose. I can tell you how to install pavers, but the truth is you just need to start and see how much work you can accomplish in a weekend. Excavating earth is going to be your first hard task, and mechanical tools may be your best bet. You can rent miniature excavators or backhoes that allow you to scrape the earth, and they have a front bucket that you use to transport the dirt to a truck or low spot in your yard.

Paver patios are a popular project because they are do-it-yourself friendly and look positively stunning when the job is done. Your challenges are many, but they all can be overcome if you're determined to get this job done. The best way to get a taste of laying pavers is to just do a small area in another part of your yard. Get a feel for how much work and skill it requires to get the results you'll be proud of.

Column 763

Metal Roofing

Metal roofing is an amazing product. I've had the pleasure of working with this time-tested material for many years. Not only have I personally installed it, it was used on many of my jobs when I was still actively building. If you have a metal roof on your home or business, you know how durable they are and practically maintenance free. Older tin metal roofs need an occasional coat of paint, but more modern metal roofs have factory-applied paints that seem to wear like iron.

A sheet-metal roof can take many forms. The common style that you may be most familiar with is the standing-seam metal roof. This roofing product comes in long sheets and the joint between adjacent pieces of the roofing is formed with an interlocking vertical seam that stands above the flat area of the roofing panel.

Master roofers can take flat coils of tin-coated steel and make a flat-lock metal roof. The seams in this style are soldered to make them weather tight. Flat-lock roofing was very popular in the early 1900's, and was commonly used on low slope roofs that often were placed over large front porches. This style gets its name because the seams between pieces is hammered flat. When the roof is complete, it's nearly flat, with only minor humps at each soldered seam.

Another very popular material is corrugated metal roofing. This roofing material has a wavy shape and is used on shacks, sheds and sometimes pole buildings. It's not considered as weathertight as other metal-roofing materials when subjected to extreme wind-driven rain. This roofing is extremely do-it-yourself friendly, and it tends to work best on roofs that have steep slopes that shed water quickly. Corrugated metal roofing is the only material I would ever suggest a homeowner try to work with, and only on some outbuilding.

When you go to install a metal roof, you must pay attention to details. The slightest mistake can result in a leak. You need special tools to work the material. Most metal roofing can't be successfully installed by a rookie. I would venture to say that supply houses that sold most metal roofing would not in their right mind sell it to a beginner.

There are many things you must do when installing metal roofing to ensure you don't void the warranty. If you intend to have this installed on your home, I would encourage you to get the written instructions from the manufacturer and take the time to read how the job should be done. Make sure the roofer you hire will do the job as is called for in the instructions.

The metal roof cost estimate you receive may take your breath away. It's absolutely more expensive than asphalt roofing, even the top-of-the-line shingles that come with a superb warranty. But keep in mind that a metal roof could last 100 years or more and offer you complete peace of mind. In certain situations, metal roofing is a smart financial choice if you want to eliminate the need to ever have to install a second or third roof in your lifetime.

Part of the reason the cost is high is that metal roof installation is a somewhat slow process, and you need skilled craftsmen working with the metal. When you compare this to the simple laborers needed to install regular asphalt shingles, you can see why labor costs can be much higher.

If you're considering a roof like this and want to get different metal-roofing prices, be sure to compare systems that are nearly identical. There can be wildly differing prices when you look at a standing seam roof vs. a flat-lock or other metal roof. It also pays to study the warranty. Longer warranties often cause prices to be higher because better material is used or the replacement costs on future warranty claims is built into the cost of the material.

Residential metal roofing is appealing to many who look for it to keep them safe in addition to being dry. If you live in a part of the USA that is prone to wildfires, you know that metal roofing helps protect your home from fires started by glowing embers that drop from the sky during firestorms. Those with wood roofs or worn asphalt shingles have much to worry about, but if you have a metal roof, you can rest a little easier in the event you're forced to evacuate your home.

If you're serious about using metal roofing, give standing-seam metal roofing a serious look. This style has a classic look and looks stunning on certain homes. This roofing material is commonly used as a starter strip about four or five feet up from the lower edge of roofs for those who live in areas of heavy snow. The metal roofing is an excellent method of stopping the leaks that result from pesky ice dams. You won't make a mistake installing it on your home.

Screen Porch

All you have to do is come to my old neighborhood in Cincinnati, Ohio any month of the summer, and you can see why a screen porch is a great idea. The mosquitoes and flies are ferocious and make life miserable. The second home Kathy and I owned had a marvelous screened porch that we would sit on for hours by ourselves and then with our first child Meghan when she entered the world. It was also a wonderful place to relax with our friends and relatives.

Screen porches are popular in many areas of the USA. They are called by different names in different regions. For example, in Florida you might call one a lanai or a lanai enclosure. If you've never seen a Florida lanai, they are something to behold. Many are fabulous two-story screened enclosures that provide a wide-open feeling as if you're in the real outdoors sans bugs! Many Floridians install these screened enclosures over their swimming pools as well.

To screen a porch, you have to have a certain amount of skills assuming you want to do the job yourself. If that's not your plan, all you need to do is have a professional give you an estimate. There are many ways to achieve this, some of them very unique. One method I saw years ago consists of custom-measured screens that fit the openings on your porch. They attach to the horizontal beams and vertical posts with Velcro TM. This allows you to remove them when the screens are not needed. It also allows you to have a better view, as even the best and finest screens limit clear vistas.

This Velcro TM system also offered clear-plastic panels in case you wanted to cut down on wind and try to use the outdoor porch as a three-season room. That was a very nifty idea in my book.

You may want to discover how to screen a porch. To build a screen porch from scratch is a big task. One of the best ones I ever did started out as an ordinary outdoor deck. The architect drew the screen-porch plans with a treated-wood deck up off the ground about 30 inches. This way the floor of the screen porch was even with the first floor of the home. I then installed 4x4 wood posts at each corner and intermediate posts on each wall. On top of those were beams that supported a spacious hip roof that was left exposed. When painted a light gray, the underside of the roof look very good.

Screen porch designs are virtually unlimited. If you can dream it, in all likelihood it can be built. If you decide to go with a traditional design that calls for wood frames, be sure these frames are primed and painted on all sides and edges before the screening company installs the screening. A common mistake is to allow the frames to be screened then painted. If you do this, water will flow down the screens and soak into the  unpainted wood. This will cause premature failure of the paint and possibly wood rot.

An aluminum screen porch is probably the best way to go. They require virtually no maintenance, and they can be fabricated at a factory. Typically a salesman takes measurements of what you want, and then the screen panels and any support structure is computer designed. Your screen porch comes as a kit that professional installers can install in a day or less. The aluminum comes in different colors, so you can usually match just about any color scheme you have on your current home.

When you start to settle on your screen-porch design, don't make the fatal error I've seen so many times. All too often people make their screen porches too small. When you look at a plan and see what appears to be a massive 10-foot by 12-foot space, you think that's a great size. In reality, that's very small.

The best way I've discovered to size a screen porch is to take existing chairs and tables that you have and set them on your patio. If you desire to have a table with chairs, set that up as well making sure you love the arrangement and there is comfortable space between all the furniture. Then take a tape measure and see what the dimensions would be around this assortment of furniture. My guess is that you'll quickly discover that a screen porch should probably be 14 feet by 18 feet in size.

No matter what outdoor screen porch you build at your home, get ready to enjoy it. Be sure to plan for electric and some way to install an overhead paddle fan or other fans to move air. If you live in a humid environment, you'll want to be able to create a cooling breeze in the event Mother Nature takes the night off.