What’s in This Issue?
Friendly Question Reminder
Bosch Multi-Construction Drill Bits
Pandora
Stain Solver Sale
White Linoleum That’s Now Yellow
Pictures of Pentagrams
Applying Thinset to Concrete
LED Flashlights
TheCabinetFolks.com Update
Latest Columns
Friendly Question Reminder!
If you have a question for me, don't hit the Reply button just yet. Go immediately to my web site and type in the keywords about your problem into my Search engine. The search box is at the top of every page of my web site. You could have your answer in seconds if you do this! Please pay attention to all links you see at my web site. The exact products and services you often need are right in front of you, and you might be ignoring them. Looking out on the loch here today, I'm reminded of one of the final scenes in the classic Robert Redford movie Jeremiah Johnson. Jeremiah's in the high mountains cooking a rabbit when his mentor "Bear Claw" Chris Lapp runs into him. They eat together and muse about what month it is, as they're so disconnected with civilization they can only mark time by the change of seasons.
Jeremiah Johnson is one of my favorite movies, as the spirit of survival, the scenery and the imagery in the movie are very powerful. The snow is just about gone up here in the Lakes Region of New Hampshire, but there's no open water here at the north end of Lake Winnesquam as the ice still holds court over the lake. You know spring is coming, but it still acts like winter. It's a magical mysteria, especially for a new resident like me. I doubt I'll ever tire of the beauty up here. You see something new each day.
Bosch Multi-Construction Drill Bits
I tested some new Bosch drill bits this past week. Oh my are they wonderful. These robust bits allow you to drill through all sorts of different materials without changing the bit. The have a special carbide tip that bites into wood, as well as new fluting on the shaft that works to expel the chips and dust of whatever is being drilled. These bits work well on concrete, tile, wood, cement board, wood, brick, aluminum or other soft metals, PVC pipe, etc. You won't be disappointed by these bits.
Pandora
If you're working in a room where your computer is, you can listen to all sorts of great music you like for free. Or maybe you can pipe your computer's speakers to another room. Just go to Pandora and have a blast. Pandora allows you to name a song or artist you like, and then it plays that mixed in with similar music. Make as many stations as you want. I'm listening to my John Waite station as I compose this newsletter. Right now the acoustical version of Missing You is playing.
When I listen to the tunes I like, it reminds me that I need to get my left thumb fixed so I can get back to playing my 12-string B25-12 Gibson acoustical guitar. It's 45 years old, and in mint condition. I wish I could say the same for my thumb. A series of injuries over the years, that happened while I was still building every day, has taken away 60 percent of the gripping power of my left thumb. When I try to grip the neck of my sweet guitar, all I get is lots of pain and lousy chords. Next up on Pandora is a little Def Leppard!
Stain Solver Sale
I promised you a huge sale on Stain Solver in the last newsletter. If you're a brand-new subscriber, Stain Solver is a multi-purpose, non-toxic oxygen-bleach green cleaner. I make a special formulation that's gotten rave reviews. It's not something I hawk for some company. Kathy, my wife, and I discovered oxygen bleach about 13 years ago. It cleans just about everything.
I'll be using my Stain Solver in a couple of weeks to clean the treated lumber on my dock. You can use it on your wood deck before you apply Defy Extreme. Maybe you want to clean your ceramic floor tile grout. Boy, does Stain Solver clean grout. With money tighter than a banjo string, you can use Stain Solver to restore anything instead of buying new. Remember, if something has a stain in it, you have nothing to lose trying to clean it.
For the next week ONLY, I'm giving you a generous 25-percent reduction in the normal price. That's a sweet deal no matter how you look at it. Buy plenty if this is of interest to you as I don't know when the next sale will be. Sales over the past two months are running 300 percent above normal with NO promotions! It's crazy busy in the warehouse. In fact, Kathy and Ellen thought I was nuts to do this sale as we have more business than ever. I told them I promised the sale, so my word's my bond. You'll love Stain Solver if you've never used it. Go read some of the reviews. They're real, not made up. Look at the Before and After photos. They'll blow you away.
Here's the promo code for the discount. Remember, this promo code won't work a week from now:
25off
Sales ends on April 12, 2009.
White Linoleum That's Now Yellow
Cheryl, from Spring Hill, FL wrote to me:
"I purchased Armstrong Congoleum linoleum in white 7 years ago and it is turning yellow. It is no wax and I don't use wax on it. I like the flooring but don't know how to remove the yellow. Please help."
Well Cheryl, you may be in a world of hurt. My first questions to you are do you have a blacktop or asphalt driveway? Is the yellow in distinct pathways on the floor? If so, there's a 99 percent chance the yellow is caused by oils from the asphalt you're tracking in on your shoes. I say this assuming you don't take off your shoes after you enter your home.
Now, if you don't have asphalt, or you take off your shoes at the door and/or the yellow is uniform throughout the entire floor, it's possibly something in the cleaner you're using. If this is the case, contact Armstrong and see if they have a chemical that can bleach out the color that's in the clear protective layer.
Pictures of Pentagrams
I could use your help. I'm trying to locate photos of the circular painted geometric pentagrams that were very popular years ago on barns. The pentagram symbol is translated in two ways: some people feel it's evil and associated with witchcraft, while many feel it's a way to ward off evil from a homestead. I'm in the second group, and want to decorate my house to protect it from the lake monster and any liggers that might be in the forest that abuts my property.
I've noticed that here in New Hampshire many people use a five-pointed star in place of the geometric pentagram. The five-pointed star is the foundation of a pentagram design.
So I ask you, do you know of any of these colorful pentagrams? I've searched endlessly online for books that contain them, websites that have a collection, etc. I've already got the special waterproof plywood cut into perfect circles. I just need several patterns to mimic. I'd love to see actual close up photos of pentagrams that you might see on a barn. I'll take color designs as well. If you can help me, I'd appreciate it.
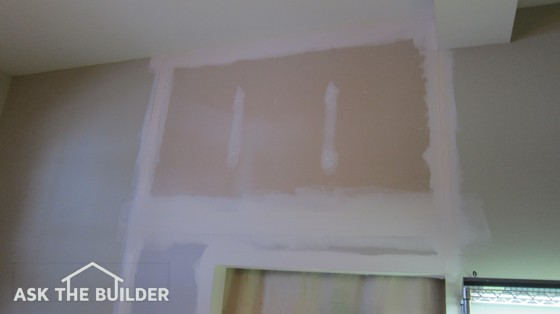
Applying Thinset to Concrete
I just taped and loaded nine new videos to my YouTube channel. I'll share them in the next newsletter, but if you can't wait just go to my AsktheBuilder YouTube channel.
You can subscribe to my channel while you're at it. Here's a quick tip about YouTube. Be sure to ALWAYS rate a video after you watch it. See the 5 stars below the video player? Click whatever star you think it's worth.
One of the videos I uploaded was about applying thinset to a concrete slab. You may want to watch this if you plan a tile project. I share a tip that I've never seen anywhere else. It has to do with suction. Dry concrete slabs can pull the moisture out of the thinset too quickly. I also explain in the video exactly what thinset is and why it's important to use with floor tile.
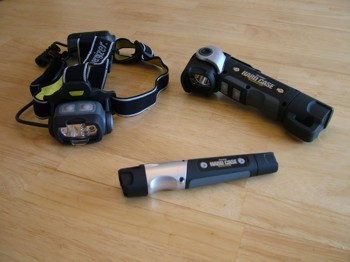
LED Flashlights
I just completed testing of some sweet LED flashlights made by Energizer. WOW is all I can say. I was so impressed that I'm using the topic for my syndicated column that still goes out to many papers. That's about to end, by the way, but I digress. Newspapers are disappearing faster than donuts out of a box at a police station. :-> I can see all the emails from law-enforcement officers now. ... Just kidding all you New Hampshire State Troopers.
Anyway, the coolest flashlight in the bunch I tested was one you wear on your head like a miner. Once I took the time to adjust the elastic straps, it was so comfortable I couldn't tell it was on. This model, and one with a swivel head, are equipped with red night-vision LEDs and a special green LED that enhances your vision when trying to inspect objects that have defects like cracks. They also have the normal bright white LEDs. The LEDs use much less power, so battery life is really enhanced. You'll love the compact Inspection LED flashlight that fits in a purse, your man purse or on your belt in a handsome fabric case that comes with the flashlight.
These flashlights would make great present for yourself if you're narcissistic (just kidding!), or if you want to create a grin on your significant other's face. You can't have too many flashlights as far as I'm concerned.
TheCabinetFolks.com Update
Several weeks ago, I told you about a company that sells kitchen and bath cabinets online. TheCabinetFolks.com
I got to meet Craig, one of the principals in the business, face-to-face a few days ago when he delivered a set of cabinets that we're using for a cool project. I was blown away by the quality of the cabinets as I inspected them. They're made as well as any I've installed in my long career.
Craig has launched a new website design that's getting better each week. If you have a project that needs one cabinet or 50, you should really go to his website. You can buy cabinets online safely, and they'll be delivered in great condition to your doorstep. I'm really confident you'll get better quality for less money than you'll spend at a big box store or even other cabinet dealer. When you contact Craig, ask him for the brand I used.
I'll continue to update you about this as I begin install them. Wait until you see some of the close up photos of these gorgeous white cabinets, not to mention the videos I'll tape about installing the cabinets.
Latest Columns
Ever wonder what it takes to be a building inspector?
Do you have some home repair plumbing to do?
Are you going to build a deck this year? Here are a few tips.
Are you new to home improvement? Discover floor tile facts here.
Do you think you want to get electricity from the air? Read my
wind-energy column.
Having a tough time Cleaning Tile Floor? Never Again!!!!!!
Next week it's Video Fest ! ! Buy Popcorn at the store this week!!!!
Click here to read past copies of my newsletters.
AsktheBuilder.com