Saving Trees During Construction

Ten years ago this month, Kathy and I purchased the wooded lot where we now live. It was an incredible find. A one acre lot with all underground utilities which backed up to an undeveloped portion of a city park. The lot also contained a variety of specimen trees: American beech, pin oak, ginko, tulip, fir, and maple. One tree, a pin oak, was huge, approximately 4 feet in diameter and about 80 feet tall. The challenge was to build the house and save the trees.

Several trees had to be cut down. One was a maple tree that was in the center of the dining room. Another, a cherry tree, was in the breakfast room. Several others were dangerously close to the foundation of the house. One of them was the giant oak tree.

Calling the Arborist

Kathy has the green thumb in our family. She has always been interested in plants and trees. Fortunately, she knew that we had to obtain the advice of a professional in order to save the trees. She called Dave Stang, a certified arborist who worked for one of the largest nurseries in the area. Dave said he would come to visit our site.

It is important to note that I had not yet started to build the house. All that I had done was to clear the lot of underbrush and cut down the two previously mentioned trees. I had laid out where the house foundation lines on the ground. This would allow Dave to see exactly where the house would be in relation to the trees.

Dave showed up and quickly sized up our situation. To make a long story short, he said that all of our trees could be saved, even the huge oak tree which was only 6 feet away from the laundry room foundation! The American beech tree, Dave said, was the most susceptible to damage. Any work beneath this tree which would compact the soil or cut its roots would spell disaster.

The Outcome

We followed Dave's advice. He said that it would take a minimum of 5 - 7 years to see if all of the trees would survive. To this date, all of the trees are alive and healthy! Kathy and Dave saved the trees. Without their advice, I'm sure that my construction activities would have killed several, if not all of the trees.

Construction + Trees = Trouble

Trees that grow in a forest are usually in perfect balance with their surroundings. This is especially true of the soil in which the tree is growing. The quality of the soil and its makeup are critical to the survival of a tree. Simply said, if you alter the soil beneath a tree, you risk temporary or permanent damage to a tree.

Soil, especially topsoil, contains a tremendous amount of air. You can demonstrate this by pouring water on some soil. If it readily soaks into the soil, there is lots of air in the soil. The water is flowing into the empty air spaces around the soil particles.

Trees need the oxygen located around the feeder roots in the topsoil. They use this oxygen in the chemical reactions necessary to pick up nutrients from the soil.

Construction activities can remove this air. The most common cause is compaction of the soil. You can easily compact topsoil by rolling over it with a heavy object. Heavy objects include dump trucks, concrete trucks, bulldozers, delivery trucks, and repeated compaction by "light" weight pickup trucks and cars.

The compaction of soil causes a secondary problem for trees. Compacted soil does not readily accept rain water. There simply is no where for the water to go. Remember, water enters soil that has air. Trees deprived of moisture can become weak. They are more susceptible to disease. It can lead to death.

Digging up & around Roots

Trenching activities in and around tree roots can cause massive problems. Tree roots serve two primary purposes. They extract food and water from the ground. This is taken to the leaves and turned into energy. This energy is then stored in the roots to be used the following spring to create new leaves and seeds. It's that simple. If you cut off the roots to a tree, you remove this life line.

Some trees can take more abuse to their roots than others. For example, in my case, Dave the certified arborist, told Kathy and I that our pin oak trees could have up to 50% of its roots disturbed. However, he said that our American beech tree could only withstand minimal root disturbance. I told him that I had planned to trench a gas line right under the tree disturbing a good 40 percent of the roots. Dave said that I would have plenty of beech firewood within 3 years!

Soil Chemistry

Certain trees like certain soils. Soils have different chemistry, that is, one soil may be more acidic or alkaline than another. Construction activities can radically affect the chemistry of soil.

Concrete and brick mortar are very alkaline. Every time a concrete truck delivers concrete to a jobsite it must be cleaned before it leaves the jobsite. The chute is cleaned as well as every other object that got concrete splashed on it. Bricklayers clean out their mortar mixers at the end of each day. If this washout water from either the concrete or mortar soaks into soil around a tree, it can kill the tree.

Fuel oil spills from bulldozers or other heavy equipment can affect the soil as well. Often, scrap materials from a job are buried on site. Drywall scrap is very alkaline. Paints and thinners can change soil chemistry. These things simply poison the soil.

Protective Measures

You might be surprised as to how much a mature tree is worth. Next time you talk with your house insurance agent ask him or her. Depending upon its species and age, an insurance company might pay you thousands of dollars if you loose a tree on your lot . Furthermore, you simply can't replace large trees. It pays to protect trees on a construction site. They add value and beauty to any building site.

Historically, only the trunks of trees were protected during construction. Heavy equipment might scar a trunk. Now we know that it is far more important to protect the root zone which lies underneath the drip line of the branches. There are many ways to do this.

All too many people simply install small flags or caution tape stapled to wooden stakes. Construction workers scoff at these flimsy barricades. You might consider the bright orange vinyl construction fencing for starters. If you really want to get serious, lightweight chain link fencing will offer the highest form of protection. Attach signs to the fencing indicating that the root zone is off limits.

The problem that you face is serious. Unless you communicate clearly and effectively that you want the trees protected, construction workers will simply drive beneath them. They will unload materials there, work in the shade of the tree, or do just about anything. If you want to save your trees you must become aggressive.

Penalties

The smart homeowners negotiate penalties in their construction contracts. These penalties are assessed to the builder or sub who violates a fenced in area. Your certified arborist can help you establish realistic penalties depending upon the tree which is being protected.

It is important to post signs on the construction fencing to notify all visitors to the sight of what will happen should they cross the fence. One concrete truck crossing the soil one time could possibly kill a tree.

The Certified Arborist

Let's see, what does a small ten foot high specimen red oak tree cost installed? Maybe $800 -1,000. It could take 25 -35 years for the tree to mature.

Knowing this, do you think a $1,000 consultation fee would be worth it to save a tree or numerous trees on your new home lot? I thought so. Who knows, maybe the consultation fee will be half that or less.

The point is this: you are talking pennies on the dollar. Hire a certified arborist before your builder shows up. He will develop a plan to help you save your trees. You will never regret spending this money.

Tree Associations

  • American Forests (AF)
    P.O. Box 2000
    Washington, D.C. 20013
    202-667-3300

  • International Society of Arboriculture (ISA)
    P.O. Box GG
    Savoy, Illinois 61874-9902
    217-355-9411
  • National Arbor Day Foundation (NADF)
    100 Arbor Avenue
    Nebraska City, Nebraska 68410
    402-474-5655
  • National Association of Homebuilders (NAHB)
    1201 15th Street NW
    Washington, D.C. 20005
    800-223-2665
  • Scenic America (SA)
    21 Dupont Circle NW
    Washington, D.C. 20086
    202-888-4300
  • World Forestry Center (WFC)
    4033 SW Canyon Road
    Portland, Oregon 97221
    503-228-1867

Publications concerning Trees and Construction

The following publications are available from the associations listed above. The initials following each publication should match the initials behind one of the associations listed above. Simply contact this association for costs (if any), availability, and ordering information.

A Reader for Global ReLeaf Natural Resource Experts AF

"Construction Damage to Trees", Journal of Arboriculture, Compendium Volume 1 ISA

Municipal Tree Ordinance Manual ISA

Building with Trees NADF

How to Save Trees During Construction Tree, City USA Bulletin #7 NADF

A Systematic Approach to Building with Trees #20 NADF

Trees and Parking Lots #24 NADF

Trenching and Tunneling near Trees NADF

How to Save Trees Resource Guide NAHB

Tree Conservation Ordinances SA

A Technical Guide to Urban and Community Forestry WFC

Videos concerning Trees and Construction

The following publications are available from the associations listed above. The initials following each publication should match the initials behind one of the associations listed above. Simply contact this association for costs (if any), availability, and ordering information.

Effects of Construction Damage to Trees in Wooded Areas ISA

Avoidance of Construction Damage to Trees on Wooded Lots ISA

Evaluating Trees for Hazard ISA

Trees are Treasure, Sustaining the Community Forest SA


The associations, publications, and videos listed on this page were compiled from an article that appeared in the January 1994 issue of Tree Care Industry. The article was titled Trees and Construction authored by Scott Cullen.

Column B93
Water Softener Salt Types

Have you ever stayed in a motel or hotel that softened their water? If so, you probably experienced that "soapy" feeling when you took a shower. In other words, you probably wasted 20 gallons of water trying to get the soap off your skin that had been rinsed off 5 minutes earlier. People accustomed to hard water showers often complain about the feeling of being soapy.

That is a small price to pay (even though all the soap is off) when you factor in all of the benefits of using soft water.

Hard vs. Soft

The water that comes out of the faucets in your home has lots of things in it. It very likely has some bacteria in it. It could also have dissolved gases in it such as oxygen or carbon dioxide. Dissolved gases are easy to see. Simply fill a clear glass with some hot tap water. Within a few moments you will see very tiny air bubbles cling to the inside surface of the glass.

The tap water also has, depending upon your water source, varying amounts of dissolved elements.

The dissolved elements most common in water seem to be calcium, magnesium, and iron. Often there are others. However, these three cause fits in many household plumbing systems.

Iron in water can cause stains on your clothes and plumbing fixtures. Calcium and magnesium cause the common white, hard water deposits on plumbing fixtures. These same deposits can form on the insides of pipes, boilers, hot water heaters, and plumbing fixtures.

The quantity of dissolved elements is not same for given sources of water. The water from a well in the country may have 5 times the dissolved minerals than water from a river or stream.

You measure water hardness by determining the amount of dissolved elements in a gallon of water. This measurement is usually referred to as grains, one grain equaling 1/7000th of a pound. The weight of one grain equals that of a singular standard grain of wheat. Evidently, it takes approximately 7,000 grains of wheat to equal a pound.

The Big Switch

The Soviets, back in the early 1900's, figured out that you could make hard water soft. They did this through a simple substitution. It seems that certain other chemical elements will readily take the place of calcium and magnesium. These being sodium and potassium. They will also substitute for iron. It is not quite unlike some athletic games.

In a nutshell, hard water enters a tank which contains small resin beads. The surface of the beads contains the sodium and/or potassium. As the hard water (containing the calcium and magnesium) passes by the beads, the sodium jumps in. Well, this forces the calcium and magnesium to jump onto the beads. BINGO, the hard water becomes soft. Eventually, the beads fill up with calcium and magnesium.

Through a regeneration process, the calcium and magnesium are flushed from the tank. During this process, the substitution process occurs again. Sodium, from a separate brine tank is injected into the resin bead tank. At this point, the tank is ready to start softening water again.

The Sodium Salts

Based upon the process I just described, you can see that you need to periodically "feed" your water softener with salt (sodium and or potassium). If you have purchased salt for a softener, you may have noticed that there are different kinds of salt.

There are basically three different types of salt that you can purchase for a water softener. While the purity of the different salts is similar, there are significant differences.

The least pure salt that you can purchase is standard rock salt. This is salt which is simply mined from underground deposits and crushed. It receives absolutely no processing. The highest grade of rock salt is found in mines in the state of Louisiana. There are other salt mines in the USA, however the salt is less pure.

The second type of salt you can purchase is solar salt. This salt has a higher purity than common rock salt. It is produced by evaporating sea water. This is done by pumping sea water into very shallow ponds. The sun and wind rapidly evaporate the water leaving salt behind. They continue this process for about one year until a thick layer of very pure salt has formed. The salt is scraped from the pond areas, washed, and then set out into the sun again to dry. It is then ready for crushing and packaging.

The highest quality water softening salt is a processed salt which comes in the form of processed pellets. This salt goes through a purification to remove almost all impurities. Furthermore, some brands are available with extra ingredients. These ingredients work inside the exchange tank of your water softener to cleanse and protect the resin beads. If the resin beads become fouled with impurities, they do not perform very well. It is a good idea to invest the extra money to purchase the salt which contains the resin cleansing chemicals.

At the very least, possibly alternate between the different salts, so that every other bag, you use the salt which contains the cleansing chemicals.

Pumping Iron

Many people who have wells pump iron each and every day, that is, they pump water containing high amounts of iron into their houses each day. This iron can stain fixtures and clothes, give the water a metallic taste, and even cause the water to have a harsh odor.

The salt manufacturers have a special salt that not only softens water but will help to remove massive quantities of iron from the water. It is a good idea to remove this iron, as it can damage the resin beads in your water softener.

Low Sodium Diets

There is a myth circulating that soft water contains massive quantities of salt. People on low sodium diets shy away from soft water. If you are such a person, have another talk with your doctor. Ask him (her) to review the facts. For example, if you have average hard water, an 8 ounce glass of water may only contain 35 milligrams of sodium. To put that in perspective, a 1 ounce serving (that's small, about one link!) of pork sausage has over 400 milligrams of salt. Now, when was the last time you ate just one sausage link at a breakfast. If you drank a half-gallon of soft water, you would have consumed 360 milligrams.

Is there an alternative? Yes! You can purchase a special salt for your softener. It doesn't contain sodium. It contains potassium. The salt is called potassium chloride. It usually is available from feed mill stores or other stores that specialize in water softening salts. It does the same job in softening water, but without the presence of sodium.

You will pay slightly more for this product. However, if you are concerned about your health, how can you put a price tag on this substitute?

Soft Water and Soap

Do you remember the last time you washed a brand new car? Did you let it air dry? Was it rinsed with hard water? If so, I'll bet you ended up with water spots on the hood. Those spots were the calcium and magnesium in the water. It is the same process that causes stalactites and stalagmites to grow in caves.

This same thing happens in your clothes. When you dry your clothes, the calcium and magnesium stay behind. After a period of time, colors fade because the dyes are simply coated with these elements. The dye hasn't washed away. White clothes turn dingy and an off shade of light grey. All because of hard water deposits.

What's more, hard water interferes with the cleaning action of soaps. Soap simply doesn't work well in hard water. You may find yourself using more soap than necessary to clean something.

Ask anyone who uses a water softener. They will tell you that they use small amounts of soap to clean themselves and everything else in their house. What's more, just about everything washed and rinsed with soft water looks good. Give water softeners serious consideration in your house.

Water Softening Salt Purity

The best water softening salt would be one that 100% pure sodium chloride. This means that there is absolutely nothing else being introduced into your softener. Well, it's almost impossible to get 100% pure sodium chloride. But guess what? You can get pretty darn close!

The lowest grade of water softening salt is often referred to as rock salt or salt crystals. Remember, this is the salt which is derived from underground mines. It usually contains 98.9% sodium chloride! The other 1.1% contains impurities.

The next highest grade of salt is solar salt, that being derived by evaporating seawater. This produces salt which is just slightly better. The sodium chloride content of solar salts is usually 99% or 99.2%. That's a little better, however there are still impurities.

The processed salts offer the highest purity available. They are very nearly pure. Just about each salt supplier boasts a purity of 99.8% for their processed salts.

The potassium chloride substitute salt has a purity of 99.1%

Column B89/p>

Carpet Types and Characteristics

Full Disclosure Carpet Manufacturers Harmful Household Cleaners

Carpet ..... What a great invention! Have you ever had the pleasure of falling asleep on a soft piece of carpeting? How about the ability of carpet to set the 'mood' of a room? There is no doubt in my mind that carpeting, when chosen with patience and care can become an asset to a home.

Oooooooooops! Did I mention something about patience and choosing? Carpet shopping in the past required lots of patience, as it always seemed like the carpet showrooms were smoky and filled with mirrors. Your decision was often based upon look and feel. There was little crisp, definitive information available to assist you in making an informed purchase.

Trust

I am a firm believer in the philosophy that people make their buying decisions based upon trust. Sure, every now and then you might be attracted by low price. But, an informed buyer 'trusts' that an item will perform, suit his/her needs, last, etc. before handing over the money. Buying carpet should be no different, especially since the purchase may involve a large sum of money.

Give Me The Facts

Carpet buying is tough. Take the materials used to make carpet: nylon, polyester, olefin, and wool. Are all great fibers. Each has distinctive positive qualities. However, these fabrics can be made into a carpet that performs poorly. It can depend upon how the material is used to make the carpet and where the carpet will be used.

Different areas of your home receive different amounts of traffic. Bedrooms traditionally receive much less traffic than a family room. Certain carpets will perform well in each room. However, how do you determine what carpet and fiber will perform well without knowing the true facts about each piece and type of carpet?

Things You Should Know

To make an intelligent decision when purchasing carpet, you need to know about things such as carpet pile, fiber type, face weight of fibers (measured in ounces per square yard), fiber density (how many fibers in a given area), twist and tuft bind, and durability rating. Without comparing these features, you will be basing your carpet purchase on hope. That's a dangerous thing to do.

Fibers

We already talked about the four primary fibers used in carpeting. Nylon probably is the most widely used fiber in modern carpets. It is tough and resilient. Nylon is also very soil resistant.

Polyester fibers are the softest available. It accepts coloration very well, which explains why many vibrant colored carpets are made using polyester.

Olefin fibers is a very strong fiber. It is extremely stain resistant, as often the color dyes are actually heated and fused into the actual fiber.

Wool is a high cost natural fiber that accepts colors well. It stains more readily. Wool carpeting is considered by some people to be the most luxurious carpeting available.

Face Weight

Face weight is quite simple. It simply is a factual measurement of how many ounces of fiber are present in each square yard of carpet. For the most part, common sense tells you that the more weight, the more carpet you are receiving. Sub standard carpet manufacturers can 'fluff' a carpet to make it look like it has many ounces of fiber. The best way to measure is not look, but by actual weight.

Fiber Density

Density is simply a measurement of how close one fiber is next to another fiber. Think of a balding person like me. The density of my hair is not remotely close to what it was 15 years ago. My wife constantly reminds me of this every time she cuts my hair! The greater the density, the better, as your carpet should withstand a greater amount of abuse.

Twist / Tuft Bind

If you look very closely at a carpet, you will notice that the fibers are twisted. Some carpet fibers are twisted more than others. This twist is usually measured by seeing how many times in 1 inch the fiber makes a full 360 degree turn. Four or more twists per inch is good.

Tuft bind is a measurement used for carpets that are loop pile carpets. These carpets take the fibers and tie them into the backing of the carpet. You walk on the tops of the loops. Well, if the fibers aren't tightly tied into the backing, they will pull out, similar to a snag in a piece of fabric. So, look for a carpet that has the highest tuft bind strength, especially if you have animals with claws!

Durability

"How long do you think this carpet will last in my house?" How many millions of times do you think this question has been asked in carpet showrooms? How could it be definitively answered? In all fairness to carpet salespeople, they can't predict, or know, how you will treat your carpet.

But, what if a carpet is subjected to an actual wear test where real humanoids walk on the carpet? Believe it or not this happens! My guess is that there are no mall walkers to contend with in Dalton, Georgia, as they are all getting paid to walk on carpets in test centers.

What happens is that a carpet sample is put down and subjected to exactly 20,000 steps (who counts???). Then the walked on carpet is compared to an identical piece of the same carpet which was not walked on. The examiners look at shedding, matting, crushing, and overall appearance. After these things are measured according to industry standards, a rating is assigned. The rating scale is from 1 to 5, 5 being perfect. As you might imagine, no carpet made yet has received a 5. If that happens, that carpet company will go out of business, the same as the company that made light bulbs that lasted 50 years (there actually was such a company!).

Seriously, no carpet, after 20,000 steps, will look exactly like a piece not walked on. That's why a 5 rating is impossible.

Carpets that are rated 2.5 and above should provide normal durability, while carpets rated at 4.5 or higher can have tanks driven across them. 🙂

Padding

Padding is very much misunderstood. Many people think that thicker is better. No way! A thin, firm pad is the best. In fact, manufacturers have very strict guidelines with respect to padding. Never install a pad thicker than 7/16 of an inch.

Thick pads allow the backing of a carpet to flex too much. This can lead to product failure.

Carpet selection can be very easy when you look for a carpet that carefully measures all of the things we have talked about. If the information we discussed is not printed on the back of a carpet sample, keep shopping!

Full Disclosure Carpet Manufacturers

At the time of publication of this column, I could locate only one manufacturer who markets their products using a full disclosure policy. This has to be a first with respect to my columns, as normally I can list five or more manufacturers in a product class. My research indicated that many of the other major carpet companies are waiting to see if this method of selling will work. Can you believe that? What do you think? Don't you feel that you would be more willing to buy if you had the facts? My guess is that within 6 - 9 months the other carpet manufacturers will follow suit.

Shaw Industries, Inc. Dalton, Georgia 30722, 800-441-7429, www.shawfloors.com

Visit their web site or call them and ask for How to Make Sense Out of Carpet. It is a great pamphlet that will help you select carpet. You can also ask to be connected to Shaw's technical department in the event you need other literature or have specific questions concerning carpet. Good luck with your purchase!

Common Household Cleaners and Products that can Damage Carpeting

People often freak out when something is spilled on carpet. And well they should! Certain common household liquids can in fact harm a carpet. The worse thing you can do is try to clean a spill without knowing how or what to do.

You can obtain some fantastic carpet care literature from the Carpet and Rug Institute (www.carpet-rug.org). Call them at 706-278-3176. Ask for two pamphlets in particular. Hopefully, they will send them to you at no charge. Ask for: Carpet and Rug Care Guide and Carpet Spot Removal Guide. Both of these are fine pamphlets that will come in handy one day. Additional information can be found on their web site. Check it out.

Harmful Products

Ever seen those horror movies where someone gets dumped into a vat of acid and dissolves? Well, neither have I, but I have heard about it. Strong acids can dissolve things, weak acids can also damage things but not always to the same extent. Many foods, drinks, and liquids contain acids. For example, citrus fruits and drinks contain citric acid. Vinegar is a weak acetic acid. Certain toilet bowl cleaners contain hydrochloric acid. The list goes on and on. Acids can hurt carpeting. They can alter the color of your carpet very quickly.

Medications also can contain harmful chemicals. Take acne medication as an example. Some acne products contain benzoyl peroxide. This chemical is the opposite of acid, as it is a strong oxidizing agent. It can destroy carpet dyes!

Common ordinary bleach can hurt your carpet. Most people would make this connection, as bleach 'whitens' clothes. Well, anyone who has used it on a new pair of jeans knows that it also rapidly removes color! Guess what has bleach in it? Most swimming pool water! Ever walked into a house with a dripping bathing suit? Hmmmmmmmm, bet you'll think twice about doing that again.

Insecticides contain chemicals that can actually alter the dyes in carpets and change your carpet colors. Has an extermination company ever sprayed your house for some insect? Think again before letting them spray the baseboards near your carpeting. If they must, make them sign a paper stating that they will replace your soon to be two toned carpet with the racing stripe!

Are you a plant lover like my wife? Do you ever fertilize your indoor plants? Better not spill that water or plant food onto your carpet! These drippings or spills can oxidize your carpet. You will have stains that are impossible to remove in most cases.

Do you use oven cleaner or drain cleaners? These products contain highly caustic chemicals that react just like acid does on your carpet. Watch out!

Urine from animals contains uric acid. Do I have to say more?

People or animals that get sick on carpet can cause huge problems. The regurgitated food is often accompanied by gastric juices from your stomach. Guess what is in that juice? Yep, you're right, hydrochloric acid. This is a strong acid that, in a different form, is sometimes used to clean bricks. Think of what it does to your carpet.

Removing Stains

I could write a book about removing carpet stains. But why? The Carpet and Rug Institute has done a great job! Besides, they are the experts. Call immediately and order the two pamphlets I spoke of. They are unbelievable and will come in handy.

A quick word of advice: Read the pamphlets when you get them. Do not wait until a spill happens! You need to act fast when a spill occurs. Time is of the essence. You will fumble through the pamphlet wasting valuable time.

Column B83

Noise Control Product Manufacturers

Sound & Noise Control
Manufacturers of Sound Deadening Products & Tips

Noise is different things to different people. For example, when my son beats on his toy drum, it's noise to me but a very pleasant sound to him. Sometimes my wife considers my conversation to be noise. That's the funny thing. Certain sounds can pleasant at one time but yet noise 2 hours later.

To protect yourself from these unwanted sounds, you need to understand sound. With this understanding, blocking unwanted sounds from getting to your ears becomes somewhat easy.

Vibrations

It's been a long time since my high school physics class, 25 years to be exact. Anyway, I do seem to recall the teacher talking about sound and demonstrating tuning forks. Striking the tuning fork against a hard object, such as my head, made it vibrate. This vibration resulted in a hum. I also remember seeing a movie where they somehow got a camera inside of someone's throat. The movie showed a person's vocal chords vibrating as they talked. It wasn't a pleasant sight, as I recall.

The point is this: sound can only be created when something vibrates. If you stop vibrations, you eliminate sound.

Have Sound Will Travel

Once something is vibrating, it begins to push against the air next to it. The molecules of air then begin to push against more air molecules until the air molecules next to your ear push against your eardrum. Your eardrum then vibrates and BINGO, you brain interprets this air movement as sound.

Air is the pathway or super highway of sound and noise. If you want to stop sound or noise from getting to your ears, you need to block as many direct paths of air between the source of the sound and your ears. It's that simple.

The Energy of Sound

Did you grow up in an older home? One that had plaster walls and ceilings, solid pine or oak doors, solid wood floors? Did that old house seem to be more soundproof than your newer home which happens to be constructed of drywall, plywood, and hollow core doors?

Have you ever noticed how outdoor noise is virtually eliminated when you go inside your basement or any other structure which is constructed of concrete block or solid brick?

The reason for this phenomena is very simple. It has to do with energy and vibrations. We talked about vibrations already. Now let's talk about the energy of sound. When something vibrates, it exerts a certain force against the air around it. For example, tap a pencil against a desk. That is a small amount of vibration and energy. Now drop a book on the desk. That's even more vibration and energy. Now imagine how much vibration (energy) there is inside a diesel locomotive engine. Lots!

Bear with me, this will begin to make sense in just a few paragraphs. Take your desk outside, close your windows, and have someone go outside and tap the pencil on the desk.

More than likely, you will not hear the sound, unless your window weatherstripping is shot. Have them drop the book, maybe you might hear a dull thud. Now, have that locomotive rush past your house, not only will you hear it, you will quite possibly feel it as well. The thing is vibrating so much that it vibrates your entire house. That's why locomotives, jets, and big trucks are so noisy.

Blocking loud noises (or any noise for that matter) also depends upon how easily the vibrating air can then, in turn, make another object vibrate. In our previous example, you couldn't hear the tapping pencil outside of your house because the pencil couldn't produce enough energy to vibrate the glass in the window.

In a nut shell, that's the whole trick. Build walls, ceilings and floors that are either thick, dense and/or are very difficult to vibrate. That's why your old house was more soundproof. Plaster is much denser than drywall. It takes more energy to get plaster to vibrate.

Sound and noise can be controlled. You simply need to understand how it's produced and how it gets to your ears. This is why high quality hotels hire acoustical consultants. They understand sound. They use materials that absorb sound, block air, & minimize vibrations.

Manufacturers of Fiberglass Sound Batts

  • Certainteed Corp.
    P.O. Box 860
    Valley Forge, Pennsylvania 19482
    800-523-7844

  • Georgia Pacific
    P.O. Box 105605
    Atlanta, Georgia 30303
    800-447-2882
  • Guardian Fiberglass. Inc.
    1000 E. North Street
    Albion, Michigan 49224
    800-748-0035
  • Knauf Fiber Glass
    240 Elizabeth Street
    Shelbyville, Indiana 46176
    800-825-4434
  • Owens-Corning (excellent literature source)
    Fiberglass Tower
    Toledo, Ohio 43659
    800-GET-PINK (438-7465)


Acoustic Associations

  • National Council of Acoustic Consultants
    66 Morris Ave.
    Suite 1A
    Springfield, New Jersey 07081-1409
    201-564-5859

  • North American Insulation Manufacturers
    44 Canal Center Plaza Suite 310
    Alexandria, Virginia 22314
    703-684-0084

Call or write to these associations for excellent literature concerning sound and sound control. You will be amazed at how easy it really is to control sound.

Manufacturers of Acoustical Floor Underlayments

  • Environmental Flooring Products, Inc.
    P.O. Box 125
    2211 Lithonia Industrial Boulevard
    Lithonia, Georgia 30058
    800-533-2675 (CORK)
    This company makes a wonderful cork underlayment that you can install beneath just about any flooring material. Cork is an excellent sound control product because it can absorb sound waves and minimize vibrations caused by foot falls.

  • Kinetics Noise Control, Inc.
    6300 Irelan Place
    P.O. Box 655
    Dublin, Ohio 43017
    614-889-0480
    Kinetics N.C. makes a very unique underlayment. It is made using two layers of dense molded glass fibers. Between these two sheets is a rigid, but flexible, honeycombed core. The product can be used under hardwood flooring, ceramic tile, slate, marble, or just about any flooring material.
  • Wicander Enterprises, Inc.
    P.O. Box 276
    Exeter, New Hampshire 03833
    800-666-2675 (CORK)
    Wicander also manufacturers cork underlayment.

Soundproofing Tips for Residential Construction Existing Construction

Existing houses, condos, and apartments are the toughest challenges in sound attenuation (control). The reason is simple: the most effective way to control sound is to incorporate certain materials and building practices during construction. However, there are some things that can help.

First, determine the source of the sound. For example if the sound is originating outdoors, quite possibly you are hearing it because of an air leak. Very often, the sound is working its way around a window or door which is poorly sealed. Often, one of the first comments I hear from customers when installing replacement windows is how quiet the house becomes. Check the caulking around the window both inside and out.

Noise which travels from room to room can also be caused by air leaks. Seal the holes inside of electrical boxes (CAUTION: Be sure power is turned off!), caulk between the edge of the electrical box and the drywall or plaster, caulk any and all cracks at door trims, baseboards, beneath baseboards, etc. Try to imagine filling the room with water. Anywhere that water would leak out of the room as it were filling should be caulked.

Bedroom doors can be weather stripped, just like exterior doors. You can even go to the trouble to install an exterior door that has full weatherstripping and a bottom door sweep. This is the type of door that is used in my radio studio. It really blocks noise from getting into or out of the broadcast studio.

You can fill the cavities between studs with blown-in fiberglass insulation. This will help, to a small degree, control airborne sound that gets into a wall cavity.

A more aggressive approach would be to try to increase the density of a ceiling or wall surface. I did this very effectively on a recent job. We had to soundproof a bedroom which was above a family room. So, we installed two layers of 3/8 inch drywall on top of the existing drywall. This extra drywall was installed on special metal furring strips called acoustical channels. These were purchased at a commercial outlet that sells steel framing materials for commercial jobs. After the first layer of 3/8 inch drywall was installed, the joints and corners were taped, even though another layer (the final one) was going immediately on top. This was done to block any airborne sound. The net result was incredible. The homeowner said that the difference was like night and day. The bedroom was very quiet.

In the basement, look for and isolate any pipes or ducts that vibrate or rub against wood framing. These things can make floor joists or wall studs vibrate and act like giant tuning forks!

New Construction

If you are getting ready to build a new home, remodel, or add a room addition, you can do some small things that will go a long way to minimize noise. Some cost little or nothing, while others add just slightly to the project. The first place to begin, if it can be squeezed into the budget, is to hire an acoustical consultant. For a fee of $300 -500 you may be able to obtain some excellent advice. Trust me, you will never regret obtaining this advice. If you can't afford such services, maybe some of the following ideas will be of help.

Always caulk beneath wall plates when walls are being constructed. Critical rooms should have two wall systems. In other words, instead of a conventional rough wall being one row of 2x4 studs 3-1/2 inches in depth, you would maybe have two rows of 2x4 studs on top of a 2x6 plate. The wall depth would be 5-1/2 inches thick. Inside of this wall, would be sound batt insulation. Also, make sure that electrical boxes are caulked before the drywall goes on. Caulk every hole into the box. Caulk all holes that penetrate wall plates as well.

Consider using insulated ductwork if you have a forced air heating or cooling system. Definitely use cast iron drainage pipes for your plumbing system. Use type L copper for your supply lines. Where ever a pipe penetrates a floor joist, stud, or wall plate, wrap the pipe with a piece of rubber or strong foam. Do not attach pipes directly to framing members with U shaped clamps! Use special acoustical hangers or wrap the pipe, at the connector, with rubber.

Glue and screw the plywood subfloor to floor joists. I always screw the floor after the roof is on and just before any finish materials are applied on top of the subfloor. This is especially critical in hallways and other areas where you know you will be walking in a room.

Use acoustical underlayments (cork, acoustical honeycomb composite underlayments, etc.) under all hard surface floors (tile, slate, hardwood, vinyl flooring, etc.).

Increase the mass of as many wall an ceiling assemblies as possible. This means adding another layer of drywall in critical rooms. It will be worth it!

Use an air infiltration barrier on the outside of the house. Purchase the best, tightest fitting windows and doors that you can possibly afford.

Column B71

Anti-Scald Device Installation

Anti-scald Tub & Shower Faucets Descriptions & Installation Tips

Hot water in many homes poses a real danger. As adults, we know how to adjust faucet valves to avoid getting burned. Curious little children and elderly people, however, can and do get burned on a regular basis. What's more, sometimes adults get injured by falling in a shower when the water temperature rapidly changes. In an effort to move out of the way from the hot stream of water, a person can easily slip and fall.

Fortunately, new tub and shower faucets are available which can minimize the chances of getting scalded from hot water. However, there are important differences in the faucets. Some of them are not foolproof. It is important for you to know how these faucets work, so that you can purchase one which offers the necessary protection for you and your family.

How Hot is Hot?

Very few people that I am aware of know the actual temperature of the hot water which comes out of their faucets. It isn't something that people normally check. The reason, I believe, that most people don't know this is because they rely on their own personal pain threshold to monitor hot water temperatures. However, this isn't consistent among adults. And what's more, little children and elderly people have more sensitive skin.

118 degree F water generally is the average temperature which produces pain in healthy adults. A rise of just 2 degrees, to 120 degrees, will produce immediate discomfort, should you put your hands in water at this temperature. In order to receive a first degree burn, you would need to leave your hand in a constant stream of this water for eight minutes.

However, as the temperature of hot water rises, the time it takes to get burned decreases dramatically. At 130 degrees F, it takes just about 28 seconds to receive a first degree burn. Raise the temperature to 140 degrees F, and it only takes 3 seconds. If you expose your skin to 140 degree F water for just 5 seconds, you will receive a blistering second degree burn. For these reasons, you must learn to respect the ability of hot water to quickly take someone by surprise. The best initial defense to prevent burns is to adjust your hot water heater so that it is discharging water at 120 degrees F. Purchase or borrow an accurate thermometer to check this.

The Three Types

Anti-scald vales can be manufactured in such a way as to respond to differences in temperature, pressure, or both. The safest valves are those that respond to both temperature and pressure differences.

Virtually every major plumbing code has adopted a section which calls for one of these valves in every shower or tub / shower combination.

The least expensive valve to manufacture and market is one that responds to pressure changes only. In many instances of residential scalding, pressure differences can be traced to a majority of scalding events. However, these valves can still deliver scalding water, if, by chance, the temperature setting of the hot water heater is increased after the valve is installed! In these instances, the valve must be recalibrated. Not everyone knows this.

Thermostatically controlled anti-scald valves are usually very expensive. They often cost hundreds of dollars. In fact, I priced a major manufacturer's valve here locally as I wrote this bulletin. Their chrome tub and shower thermostatically controlled valve retailed at $522.00 plus tax!

Some pressure balanced valves can be purchased for less than $100. However, depending upon the manufacturer, finish, options, etc. you can easily spend $150 -250 dollars on a pressure balanced valve.

It is important to note that there are two different types of pressure balanced valves, the piston type and the diaphragm type. Both types are reliable and operate on similar principles. Simply put, if the cold water pressure decreases, the valve responds instantly to limit the volume of hot water to prevent scalding.

These valves are great products and you should consider installing them if you don't already have them in your home. Children, being the curious creatures they are, have a habit of twisting and turning tub and shower valves. Accidents can be prevented, as long as you have one of these valves.

Anti-Scald Faucet Features / Options

Tub and shower faucets have come a long way in the past 5 - 10 years. Prior to 1985, there was a very limited selection of faucets, styles, and finishes. Times have changed!

Tub and shower faucets offered by each manufacturer often are available in 5 - 10 different styles. Some manufacturers have 15 - 25 styles! The finishes can range from chrome, antique brass, polished brass, gold, painted, brushed chrome, etc.

Many manufacturers also offer interchangeable parts, so that you can mix and match handles, trim plates, etc.

The latest fad in the top of the line faucets are multiple head shower systems that feature shower heads and other spray heads that aim water at your body, arms, and legs. A word of caution. If you are leaning towards polished brass finishes, or any other finish than chrome, check to make sure that the finish has some sort of long term guarantee. Bathrooms can be filled with harmful chemical vapors, believe it or not!

These vapors can harm some delicate finishes. For example, certain hairsprays, deodorants, or other spray products emit fine sprays into the air. These sprays vaporize and can coat and react with your plumbing fixtures. Chrome is a very stable finish and is rarely harmed by these vapors. Ask hard questions and get the answers in writing to be safe. Some of these valves, as you will find out, are expensive. They can also be quite expensive to replace. Remember, the warranty doesn't always include labor for replacement, so you must do your homework in order to avoid disappointment.

Anti-Scald Valve Installation Tips

Modern faucets, especially anti-scald faucets, have sensitive inner parts which can be damaged by heat, sediment, rust particles, debris, or sand. Newer faucets often contain high-tech plastics that have long term performance characteristics. However, we all know that many plastics will melt or deform if subjected to high temperatures!

The first thing to do when installing a new faucet (and I might add that this first step is often forgotten by professional installers) is to thoroughly read the instructions that come with the faucet! I know this takes 10 minutes, but, really, it just makes sense. For example, some faucets have a top and a bottom which isn't always clearly marked. Often it is important where the hot and cold water lines are connected to the faucet. Reversing the water lines may cause a malfunction!

If you are not experienced at soldering, absolutely buy a faucet that has threaded connections. These faucets are piped with adapters that change from threads to soldered fittings. Always try to solder a stub of pipe into the adapter first, away from the faucet. Let this cool before applying pipe dope or Teflon to the threads. After installing this assembly into the valve body drape a wet rag over the connection to the valve before soldering the next fitting. The wet rag will absorb heat that may damage the valve or melt the pipe dope.

Always adequately flush the water supply lines before making your final connections to the valve and piping. Small bits of solder, flux, pipe dope, teflon, rust, sand, etc. can clog or cause a malfunction in the anti-scald mechanism.

When you eventually turn on the water to the faucet to test for leaks, turn on the water supply valves slooooowly. Turn on the hot and cold water to the faucet at the same time. Do not pressurize one side (hot or cold water line only) at a time! Too much pressure too fast can jamb the anti-scald mechanisms! I often turn on the lavatory and kitchen sink faucets to allow the overall system pressure to be lowered. Because several valves are wide open (both the hot and cold water side) not as much pressure and volume will be pushing against your new valve. Just make sure you don't forget about these faucets being on! Once I flooded a kitchen because I failed to realize that the drain was slow. The sink filled up while I was in the bathroom finishing my work! Oh well, live and learn.

Remember, these valves are sensitive and often expensive. Take your time and you will have great success!

Column B55

Caring For Marble And Installation Tips

Natural stone products are by far some of the most impressive building materials that I am aware of. I believe that the reason for this lies in the fact that imitation material is just that, imitation. The look, feel, density, and hardness of natural products is almost impossible to duplicate. A manufacturer may be able to improve one aspect, however, the other attributes usually fall short of the real product.

Take granite for instance. Granite counter tops are increasingly popular. The manufacturers of solid surface (plastic) countertops picked up on this trend and many offer "granite" substitutes. If you put the two materials side by side, there is absolutely no comparison. The natural granite has deeper colors, larger crystals, and often a more random pattern. In all fairness to the solid surfacing materials (which, by the way, I like very much), they have other positive attributes that make them attractive.

Marble vs. Granite

I have installed both marble and granite on many of my past jobs. Both have performed well. Marble, far and away, is a much softer material than granite. This has to do with the composition of the materials. Marble is nothing more than limestone which has been "pressure-cooked" deep in the earth for many, many years. Granite is often an igneous rock that has a high concentration of the mineral quartz. Quartz, silicon dioxide (SiO2), is very hard. It is comparable to standard glass, as glass is composed primarily of silicone dioxide.

Both materials will last a lifetime if professionally installed and maintained. The only disadvantage that I find with both products is that they are difficult to repair if damaged. Scratches, as long as they are not too deep, can be buffed out without noticeable appearance changes. Large chips, on the other hand, are virtually impossible to repair. Think of it, how do you recreate a matrix of random quartz crystals? Or, how do you recreate exactly the color and swirl pattern of a piece of marble?

Slate vs. Terrazzo

Slate is a natural stone product that is very beautiful as well. I have mottled (mixture of greens, browns, and purples) slate in my entrance hall. I have red slate in my sun room. Both floors are durable and stain resistant. The slate comes in different size pieces ranging from 4" x 6" to 12" x 12". They fit together in a regular pattern, however, when the floor is finished the pattern appears random. The slate that I used is only 1/4" thick, however, it gives the appearance of being much thicker. The joints between the slate are simply grouted with standard colored sanded grout just like ceramic tile. Slate, when purchased like this, is also very affordable.

Terrazzo is a very unique flooring alternative. Used primarily in commercial applications, it offers unlimited design and color variations. Terrazzo is comprised of small (usually 1/4 - 3/8 inch) marble chips. By mixing different colored marble chips in different proportions, you can create virtually any colored floor. Also, terrazzo is usually installed in blocks separated by aluminum or brass strips. As you might imagine, you can create any pattern with the metal strips and then fill each block or area with a different mixture of marble chips! You can make a giant checkerboard on your floor or a compass rosette. Let your imagination run wild.

Terrazzo is a very messy product to work with and requires special subfloors in order to achieve maximum performance. For instance, in commercial applications terrazzo is virtually always installed on concrete slabs. The subfloor must be solid so that the terrazzo will not crack. If you decide to have terrazzo applied over a wood sub-floor system, make sure that the floor is framed with little or no deflection (large floor joists such as 2x10's or 2x12's with plentiful bridging) and use 3/4 inch plywood, NOT oriented strand board products. It is always best to consult with the terrazzo installer BEFORE the floor is framed, if at all possible. Let him (her) tell you what the minimum requirements are for a solid wood sub-floor system. Also, use epoxy terrazzo.

Terrazzo costs here in Cincinnati are about $10 per square foot installed. That compares with $6 per square foot for hardwood floors and $7 - 9 per square foot for ceramic tile.

Whichever product you choose to install, as long as you follow the installer's care instructions, you will be rewarded with a floor that will generate many compliments!


Marble, Granite, & Terrazzo Care Tips

Marble, terrazzo, and granite require special cleaning and periodic sealing to maintain their beauty. The problem, however, is that there are different procedures for different stones. No one procedure is safe for all stone products. There is a very real danger that you can ruin a piece of marble, terrazzo, or granite permanently if not cleaned correctly. For this reason, you must not try to experiment yourself with cleaners or polishes. Also, don't necessarily believe the labels on cleaning products, note who wrote the label!!!

Do NOT clean natural stone products with vinegar, ammonia, or kitchen cleansers! Marble, granite, & other stone products must be cleaned with neutral pH cleaners. Vinegar is actually an acid! Ammonia is a base! Cleansers can scratch stone products.

Marble is an alkaline substance. Its surface can be harmed and stained by acids, even very dilute acids. Many common foods and beverages are acidic! Citrus juices, alcohol, vinegar, and other common items can etch the surface of marble. Spills need to be cleaned immediately! If your marble or granite becomes stained, call a professional. Different stones require different treatments!

Natural stone products need to be sealed to minimize staining possibilities. However, you must use a breathable sealant. Do not apply certain waxes! Some waxes do not breathe and they can discolor over time.

Marble, because it is a softer stone, should be maintained at least once a year. Remember that stone is very similar to wood. It is porous and can and will absorb liquids. Just as wood requires periodic recoating, so does marble, terrazzo, and granite. Marble and terrazzo, however, tend to require more maintenance than granite. Granite, because it is much harder, requires somewhat less attention.

ALWAYS obtain from the installer of your marble, terrazzo, and/or granite specific, written care and maintenance guidelines. Never trust your builder's or remodeler's word. These products require very specific care and the supplier or installer knows what is best. Go to the source!!

Contact the HMK Company. They manufacture a full line of stone care products. They quite possibly have a distributor near you. Ask for their full line product catalog. You can reach them at 800-424-2465. They are located in San Francisco, so keep in mind their west coast time zone.


Design & Installation Suggestions

Design Possibilities

Marble, granite, and slate have many uses. I have seen them all used for floors, countertops, backsplashes, fireplace hearths, fireplace surrounds, tabletops, windowsills, components for free standing woodstoves, etc.

Slate fireplace hearths are dramatic. Granite kitchen countertops can be breathtaking. I installed a Blue Pearl granite countertop in conjunction with some solid white cabinets. The result was spectacular. I have also installed a fine grained midnight black granite vanity countertop that left the homeowner speechless. The vanity top had undercounter bowls in white that gave an unbelievable contrast.

Because of the growth of the use of these products, the fabricators have at their disposal many tools to shape the stone products. They can create various edge treatments for countertops similar to those found in solid surfacing materials. Fabricators also have special epoxies that enable them to glue multiple or different types of marble and granite together. By combining different, yet complimentary, stones together in one piece, you can achieve dramatic results.


Installation Tips

All professional jobs involve planning. You should do the same if you want maximum performance from your products. Marble, granite, terrazzo, and other natural stone products require preplanning before installation. Often the subfloor or cabinets need to be strengthened to support any extra weight.

Because stone is very rigid, it has one drawback. All stone products have very little tensile strength. This means that when "stretched" they will crack easily. Stone can "stretch" if it is allowed to bend. Stone will bend if it is unsupported (hollow spots) or is laid on top of something that periodically moves (weak wood floors that deflect when loaded with people or things). So, make sure that you plan ahead.

Never hesitate to consult a structural engineer or supplier to determine the minimum strength requirements for your application. Cracks in stone work are impossible to repair!

Column B56

AsktheBuilder on YouTube Video

AsktheBuilder.com's Tim Carter invites you to watch his informative and entertaining videos on YouTube. From remodeling tips to building advice, he has the information you need.

Watch his video tips and project suggestions at www.youtube-nocookie.com/askthebuilder. While you are there, be sure to subscribe to his channel. Videos that will save you time and money are being added all the time at YouTube - Broadcast Yourself.

Water Heater Anode Rods

"Tank corrosion is the #1 cause of water heater failure. Keeping a water heater anode rod in good shape prevents failure."

Water Heater Anode Rod Checklist

  • the anode rod is hidden in the tank
  • it sacrifices itself to save the tank
  • it must be replaced every seven years
  • water heater can last forever if you replace the rod regularly

Water Heater Anode Rod - Replace Every Seven Years

The water heater anode rod you can't see is why you have delightful hot water in your home. There's nothing quite like that warm shower in the morning or after a hard day's work.

Do you take hot water for granted? We use it throughout the day for bathing, washing dishes, clothes, etc. It has become a necessary element of our lives.

Related Links

Tough Love Truth About Tankless Water Heaters - DO NOT SHARE! Angry Companies

Venting Water Heaters - Do it the SAFE WAY

Free & Fast Bids

CLICK HERE to get FREE & FAST BIDS from local plumbers who can install a new anode rod.

Where are Anode Rods?

A water heater anode rod is suspended inside the water heater tank. The anode rod protects the water heater from corrosion.

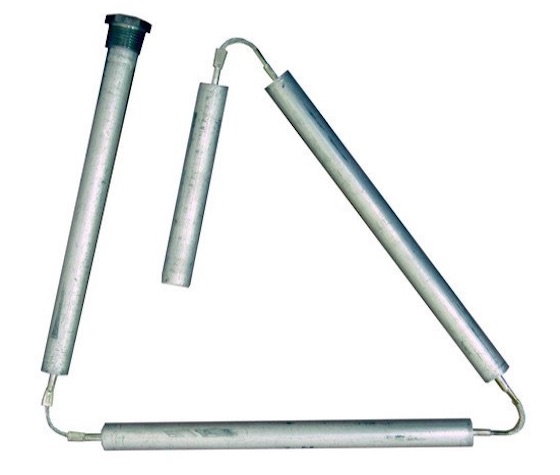
aluminum anode rod

This is a replacement anode rod made from both aluminum and zinc. It prevents the rotten egg smell you get with magnesium anode rods. It's in sections so you can get it into the tank with a low ceiling above the water heater. CLICK THE PHOTO to have a new anode rod at your home in two days.

Water heaters are very simple mechanical items. They have virtually no moving parts. Electric water heaters have very small switches that turn the current on and off automatically to each heating element.

Gas water heaters have small parts within the gas valve that control gas flow when it is necessary for the burner to cycle on or off. Rarely do these moving parts fail.

Why Do Water Heaters Leak?

Tank corrosion is the #1 cause of water heater leakage and failure. Keeping an anode rod in good shape prevents failure.

High-pressure failures are also becoming a problem as well. Both of these problems can be somewhat controlled. You simply need to consider several alternatives before you install your next hot water heater.

What Causes Corrosion in a Water Heater?

Corrosion within hot water heaters can be caused by water acidity, electrical conductivity, dissolved oxygen, and temperature. Water can react chemically with metal parts inside of the water heater.

Acidic water can actually eat away at the metal. This corrosion process is accelerated with temperature. So as we heat the water for our usage, we actually can hurt the tank!

CLICK HERE to get FREE & FAST BIDS from local plumbers who can install a new anode rod.

When Did Water Heaters Get Glass Linings?

Water heater manufacturers began lining the steel tanks with a thin coating of glass in the 1950s. This coating isolated the steel tank from the corrosive water.

Any part of the water heater tank not coated with glass is a place where corrosion can begin.

The inlet and outlet holes of the tank are not glass coated. These areas are subject to corrosion.

Are Gas Heaters Likely to Corrode Faster?

Gas water heaters are likely to corrode faster. Every time the burner turns on it heats the metal at the bottom of the tank. This heat causes the metal to expand.

When the burner shuts off, the metal contracts. This constant expansion and contraction weakens the metal at the bottom of the tank. It can also cause microfractures in the glass lining. Water can then get in contact with the bottom of the tank and begin the corrosion process.

Do Dissolved Minerals in Water Cause Problems?

Yes, dissolved minerals in water allow the water to conduct electricity. The electricity accelerates corrosion of the steel water heater tank.

Distilled water, on the other hand, is virtually pure water. The distillation process removes the dissolved minerals. However, it also loses its taste. Dissolved minerals give water its taste.

Is Pure Water an Insulator?

Pure water (100 percent H2O) is actually an insulator. Electricity will not pass thru it easily.

However, water which contains dissolved minerals is a great conductor. Electricity passes readily thru this type of water. That's why household water (as well as ocean, river, lake, etc. water) poses an electrocution hazard. Almost all water in nature contains dissolved minerals.

Does Mineral Content in Water Vary?

Depending upon the source of the water supply, the dissolved mineral content can be high, medium, or low. Also, there will be different minerals present.

What Causes Electricity in a Water Heater?

The heating of water within a water heater and the motion of the water cause tiny electrical currents to be generated within the water heater. These electrical currents start to eat away at any exposed metal.

That's why water heaters have anode rods as a part of their construction. The anode rods attract the electricity like nectar attracts bees. The anode rods sacrifice themselves so the water tank doesn't corrode.

What Are Water Heater Anode Rods Made With?

These anode rods are made of magnesium. The magnesium attracts the electrical current and corrodes more easily than the steel tank. Some anode rods are made with aluminum and zinc. This type will prevent the rotten egg smell you sometimes get with a magnesium anode rod.

CLICK HERE to have a replacement anode rod at your home in days.

However, if the anode rod completely dissolves, the electricity within the tank will begin to look for some other metal. That's why you need to check your anode rod periodically.

What is the Difference Between Hard and Soft Water?

Many people know the difference between hard and soft water. Hard water is water that has a high amount of dissolved minerals. When hard water is heated, some of these minerals can precipitate out of the water and form a scale on the inside of the water heater.

Can Scale Collect in a Water Heater Tank?

This scale can flake off and begin to collect on the bottom of the tank. This lowers the efficiency of the water heater by acting as a barrier to the flow of heat from the burner to the water.

This scale can also corrode heating elements on electric hot water heaters in a very short period of time. Friends of mine have had to replace electric heating elements every 3 months because of this problem.

Does Electrolysis Damage Water Heaters?

Electrolysis causes damage to your water heater tank. Iron is the primary metal used to construct hot water tanks. You can see this iron at the top of the tank where the hot and cold water pipes attach to your heater.

Often rookie plumbers or homeowners simply install a copper male adapter into the female iron tank fittings. This metal to metal contact of two dissimilar metals can lead to corrosion.

These connection points need to be isolated "electrically" from the water pipes. There are several different connectors made for this purpose. I, personally, choose to use di-electric unions. Good Luck!

CLICK HERE to get FREE & FAST BIDS from local plumbers who can install a new anode rod.

This column was SO GOOD that I shared with the 31,000 subscribers who read my August 7, 2018 AsktheBuilder Newsletter under making your water heater last.

Column B192

Residential Fire Sprinklers

I have always been fascinated with fire sprinklers. It goes way back into my childhood. My mother would take me shopping to a major department store in downtown Cincinnati called Shillito's. As we would ride the escalators between floors, I would always stare at the fire sprinkler heads above me.

Maybe, it was the colored liquid in the glass vials that grabbed my attention. It could also have been their shiny appearance, as most of them were polished chrome. All I can remember is that there were hundreds of these things sticking down from the ceiling just about everywhere.

I didn't fully understand the importance of them as a child. No doubt Mr. Shillito did, though. The sprinklers were put in to save his business. He quite possibly was encouraged to do so by his insurance company.

To this day, there has never been a catastrophic fire in this building. Oh sure, there probably have been fires, maybe they were reported deep within the newspapers. But, the sprinklers probably extinguished them or controlled the fires before the fire department ran into the building.

CLICK HERE to get FREE & FAST BIDS from local specialists who can install a sprinkler system to protect your home from fire.

Fire & Mathematics

If you have an adequate supply of combustible materials, an unlimited amount of oxygen, a match, a watch, and pencil and paper, you can witness a sobering display. The growth of a fire is rapid. If you could effectively measure the amount of fire (this can be done by scientists), you would see that the size of the fire doubles, triples, or quadruples in size but yet the time that has passed has not doubled, tripled, or quadrupled. Mathematicians call this a non linear function. Professional firefighters call it a recipe for death and destruction.

If you pay attention to eye witness accounts of the spread and or growth of fires, you know that this is true. Often you here of people who say that, "...all of a sudden there was fire everywhere. Just moments before I was in the room and there was nothing going on."

I visited a residential house that had been heavily damaged by fire just about one year ago. This fire started near the furnace in the basement. A mother, child, and a painter were in the house. The painter was working in the living room, while the mother and child were in the basement family room, just 10 feet away from the furnace room.

The painter noticed faint smoke issuing from a heating vent. He went to the basement to inform the mother and child. They opened the door to the furnace room. It was filled with smoke and fire.

They ran out of the house to a neighbor. The neighbor called 911. The closest firehouse was less than 600 feet away! All of what I described so far happened in 3 minutes. The fire department responded immediately and began to extinguish the fire.

The house was heavily damaged by fire. Well over $100,000. I walked through the house the day after the fire. The telephone in the kitchen had melted from the heat. The shower curtain in the second floor bathroom had melted, yet there was no fire on the second floor.

The second floor area was full of ash, heavy smoke, and steam damage. Virtually all of the possessions of this family were ruined! Fortunately, everyone got out of the house unhurt. Think what might have happened if this fire had occurred at 2:30 a.m.??

Sprinklers

In the story I just described, I forgot to mention that a water pipe was only 10 feet away from the furnace. A plumber could have installed a simple $8.00 sprinkler head in the furnace room. This sprinkler would have begun to discharge water as soon as the temperature would have reached 155 degrees F in the furnace room.

Do you think that would have helped? I thought so. How much would it have cost to install? Maybe $150 if you had a plumber do it. A DIY'er with plumbing experience could do it for less than $20.

If building a new home or remodeling, fire sprinklers should be given serious consideration. New residential fire sprinklers are sleek, attractive, and available in different finishes. They bear no resemblance to their cousins that I used to see at Shillito's.

You will receive a healthy discount on your house insurance. You will have peace of mind. They can save lives and property. I urge you to think about this. TC

Fire Sprinkler Information Sources

Residential fire sprinklers have received very little attention. This is unfortunate, because they can dramatically increase your chances of survival in a fire. They also go a long way in limiting damage caused by a fire. Sprinklers simply make sense.

The following Associations offer free literature concerning residential fire sprinklers. This information is fantastic. All you have to do is call or write them a letter asking for the information. You will be delighted with the amount and quality of the literature.

If you want a really dramatic example of the effectiveness of residential sprinklers, I highly recommend that you consider purchasing a 35 minute video produced by the National Fire Sprinkler Association (NFSA). I contacted the NFSA and they indicated that they would offer this video to readers of my column for the same price they sell it to their members. The cost to you, for the video, is only $29.95. It normally sells for $59.95!

CLICK HERE to get FREE & FAST BIDS from local specialists who can install a sprinkler system to protect your home from fire.

This video will convince you, in all likelihood, to install sprinklers. I was amazed at how quickly the sprinklers work! This $30 expenditure is well worth it. If you decide to purchase this video, MAKE SURE you identify yourself as a reader of my column. Also, mention the name of Mr. David Van Deyar. He is the NFSA individual who authorized the reduced price of the video. Maybe an NFSA member will rebate the cost of the video to you should you choose him as the installation contractor. Consider giving it a try. It never hurts to ask.

  • National Fire Sprinkler Association
    Robin Hill Corporate Park
    Route 22
    Patterson, New York 12563
    914-878-4200
    Fax 914-878-4215
  • American Fire Sprinkler Association
    12959 Jupiter Road, Suite 142
    Dallas, Texas 75238-3200
    214-349-5965
    Fax 214-343-8898

Contact both of these organizations. They have different literature, all of which is very helpful. Also, if after you review the information you have questions, consider speaking with an official of your local fire department. They can possibly offer helpful advice as well.

If you would like some technical information regarding the installation guidelines of residential sprinklers, contact the National Fire Protection Association. Ask for NFPA 13D (1994 edition) Sprinkler Systems in One - and Two-Family Dwellings and Manufactured Homes.

This is the standard by which sprinkler systems are installed. This bulletin speaks to sizing, spacing, flow rates, etc. It will allow you to judge whether or not your system is being installed properly. Note, there may be a charge for this publication.

  • National Fire Protection Association
    1 Batterymarch Park
    P.O. Box 9101
    Quincy, Massachusetts 02269-9101
    617-770-0200
    Ms. Julie Reynolds


Residential Fire Prevention Tips

Many people are unaware as to how quickly a fire can reach deadly proportions. In as little as 7 - 10 minutes after ignition, a residential fire can produce carbon monoxide, smoke and temperatures that can kill within seconds. If you are asleep while the fire is in progress, you may not even have a chance to escape!!!

Many people often think that fires can't happen to them. If you are one of these people, I suggest you walk or drive down to your fire department just as soon as you finish reading this. Ask them to tell you about the most recent fatality in your neighborhood.

I'll bet that you will be shocked as to how recent and how close it was to your house. Those who have a healthy respect for fire and its dangers practice fire prevention. They have evacuation plans. They are prepared. You should do the same.

Call 1-800-950-7665 just as soon as you can. It is the Fire Prevention hotline of Aetna Insurance. They will take your name & address and send you a wonderful fire prevention pamphlet - worksheet. This phone call may save your life or one of a loved one. Please do it now before you read any further. Thanks!

All of the fire prevention tips that I would speak to are mentioned in this fine pamphlet. Call for it today. It is illustrated and shows a drawing of each item they speak about. Consider giving the 1-800 number to as many people, friends, relatives, neighbors, etc. as possible. Everyone will thank you.

Also, call your local fire department. Virtually every fire department in America has a fire prevention division. They often have excellent literature as well. The fire department will, in many cases, visit your house at no charge to do a visual inspection. They will point out your problem areas. They will help you establish an evacuation plan.

Want more information on the importance and use of Fire Sprinkler systems? CLICK THE IMAGE to get the ultimate guide to Fire Sprinklers.

Ask the fire department about explosive flashovers, backdrafts, etc. Ask them about temperatures inside of houses and rooms that are on fire. Ask them about their self-contained breathing apparatus (SCBA). Ask them about visibility (or lack thereof) in residential fires because of smoke.

Ask them about their response time in the event of a fire at your house(the elapsed time from the initial 911 call until the first truck arrives at the fire scene). Ask them how long it takes to get hoses stretched and charged with water once they have arrived at your house. Make sure they are answering the questions regarding your house, NOT average response times to all fires in your city or town.

After you have added up all the time, look at your watch and see just how long this period of time really is. Think. Could you survive or wait that long? How much damage will have occurred in that time period? Don't forget, these times assume that you had time to make the call before exiting the burning structure!!!

NOTE: FIRE DEPARTMENTS DO NOT RECOMMEND THAT YOU STAY IN THE BURNING HOUSE TO MAKE THE CALL!!!! In the event of a fire in your home, EXIT YOUR HOUSE IMMEDIATELY and make the call from a neighbor's house!!!

Fire Sprinkler Manufacturers Consider giving these manufacturers a call. They have excellent product literature about residential fire sprinklers. You will be amazed at how attractive and effective these things really are. You can bet that when I remodel my house, I will install fire sprinklers! TC

  • Globe Fire Sprinkler Corp.
    800-248-0278
  • Grinnell Fire Protection
    401-941-8000
  • IntelliNet
    813-434-5888
  • Star Sprinkler Corp.
    800-558-5236
  • The Viking Corp.
    800-968-9501

Installing Sprinkler Heads - Piping

Installing fire sprinkler heads is not really too hard. In a residential installation, it can be accomplished by using standard copper tubing, fittings and solder. At the location where each sprinkler head is located, all you have to do is solder in place what we call a female adapter. Virtually, all sprinkler heads come with male threads.

Sizing the System

You have to make sure you have the right size pipe for the sprinklers to work. If you run 3/4 inch pipe to all but the last few remaining sprinkler heads, you will be okay. You can get a great booklet from the NFPA on sizing sprinkler systems. It was mentioned earlier in this column.

If you make the mistake of installing piping that is too small - such as 1/2 inch everywhere - you can have significant pressure loss and low flow when you really need it. The booklet from the NFPA will help you with this.

Wet Systems

Sprinkler systems come two ways - wet and dry. The system in a residential house will almost always be wet. This means that the pipes leading to the sprinklers are full of water. With this in mind, you just can't install the pipes anywhere - especially if you live where you get freezing temperatures.

If you want to see how easy it is to install a sprinkler head, I suggest you start in your basement or furnace room or anywhere you have an exposed copper water line.

Simply solder in a Tee fitting and extend the line to a point in the ceiling where you can protect part of the room. Install the proper sized female adapter that fits the sprinkler head. Apply pipe dope or Teflon to the sprinkler head, tighten and turn the water back on.

If you have any sort of leak, you will know immediately. If you are daring or inquisitive, you can hold a match to the head and see what happens in a real fire! Wear a bathing suit!

CLICK HERE to get FREE & FAST BIDS from local specialists who can install a sprinkler system to protect your home from fire.

Column B34

Tape Measure Video

Tape Measure Video

Most home improvement or remodeling jobs require measuring. Some people have asked how to use or read a tape measure. The majority of tape measures are marked in feet and inches. The individual inches are broken down into fractions - 1/2, 1/4, 1/8 and 1/16. Each division is represented by a smaller and smaller line, with the 1/2 inch mark being the largest.

Some tape measures have color coded marking indicating the 16" on-center spacing. Be careful when reading a tape measure upside down.

Remember, take your time, measure twice and cut once!