Iron Pipe Handrail Disaster

maple handrail on drywall

This stairway handrail looks easy to install. It’s much harder to get right than you might imagine. There are very strict building code and common-sense guidelines you must follow. Copyright 2024 Tim Carter

Iron Pipe Handrail Disaster - DIY Inexperience Creates Danger

Several weeks ago I shared a story about a young woman with you. She attends our church, and my wife and I are friends with her. A week ago she reached out to me with a new problem. She was attempting to install a new iron pipe handrail on two flights of stairs in her condominium. CLICK HERE to see an assortment of iron pipe handrails.

This woman had the best of intentions. She got her younger sister to jump in and help. Within an hour or two, they ran into significant difficulties. I can imagine this happening to you.

The problem started when she purchased the handrail. She went to a large online retailer and purchased a pre-fabricated handrail made from black iron pipe. I’m convinced she felt that the manufacturer would sell a product that would work. That’s a very long bridge to cross in my opinion.

Iron pipe handrails are not nearly as difficult to install as over-the-post oak handrails. You need years of finish-carpentry experience to install one like this.

Farmcrest stars lower flight wide

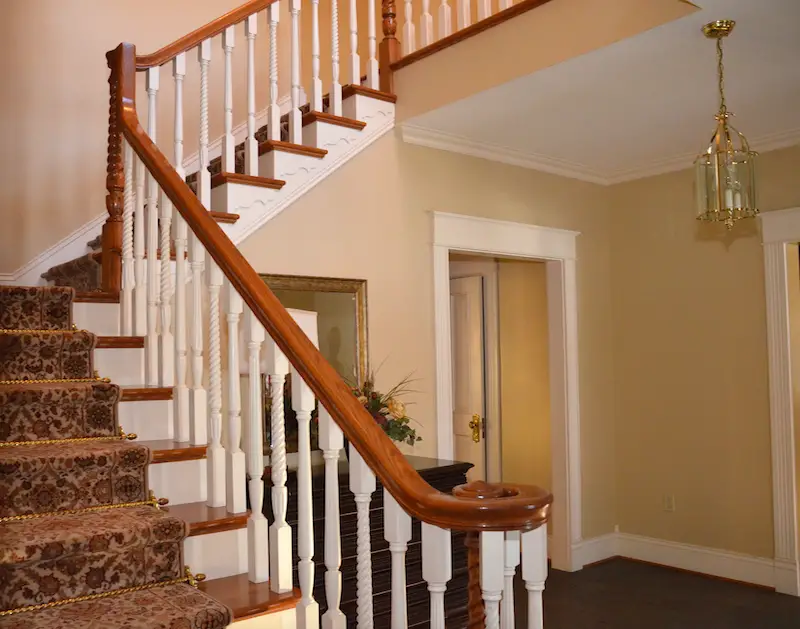
I installed this handrail system in my Cincinnati Queen Anne Victorian home. Copyright 2018 Tim Carter

Staircase Falls are Frequent

Staircases create significant safety risks. A white paper published by the National Library of Medicine states that, on average, 1,076,558 people are treated in emergency rooms each year in the USA after getting injured on stairs. That means the injury rate is higher because some people may not go to an ER for help. That equates to just under 3,000 people a day or about 125 injuries per hour.

This high rate of injury is addressed in the building code. The causes of injuries can be the design of the stairs, the handrails, etc. Code officials for years have developed very good guidelines and requirements for stairs, landings, and handrails.

The issue is you may not be focused on these. You’ve used handrails your entire life and not thought much about how they should be done and more importantly, how they should be installed so the handrail doesn’t pull out of the wall causing you to tumble down the stairs.

Railing Length is Critical

The building code stipulates the length of the handrail must match the length of the stairs. This makes sense as you want to be able to grasp it at the top step as well as right before your foot steps off the last step on the floor below.

This woman purchased a handrail that wasn’t long enough. What’s more, the handrail came with circular flange plates that are screwed to the wall.

The emergency help text she sent me had photos of the pre-drilled holes in the circular flanges. She thought she was doing the right thing by screwing these flanges onto the short stubs of iron pipe as tight as possible. This caused some of the holes to be blocked by the handrail. It was impossible to drive the screws.

I told her, “You have to unscrew the flanges so all the holes are not blocked by the railing. The flange doesn’t need to be screwed tight to the pipe nipples. Once the handrail is up, the flanges can’t unscrew.”

Inferior Design Sets You Up for Failure

The design of the handrail was inferior in my opinion. The pre-cut pieces of pipe placed these round flanges at distinct points along the railing. The odds of the flanges being centered on a wall stud were very low.

The manufacturer sent along simple plastic anchors to put into the drywall. The railing is now a disaster waiting to happen. The woman told me that after she adjusted the flanges and installed the screws, the railing was loose and wobbly.

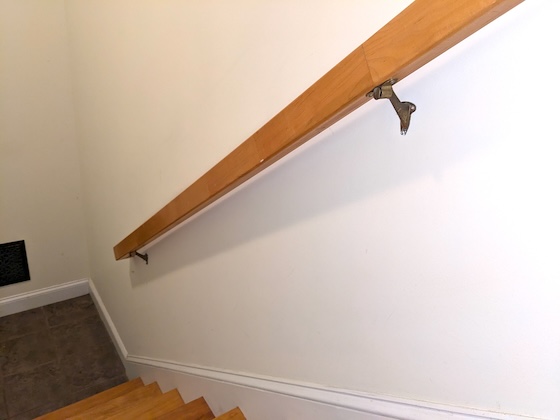
Railings Must be Parallel With Stair Nosings

The building code stipulates that stair handrails must be parallel with the line created by the front nosing of the steps. The vertical distance from the front tip of a stair nosing to the top of the railing in a plumb line should be between 34 and 38 inches. I’ve found from years of practical experience that 35 inches is very comfortable.

You can easily create this parallel line on a wall by creating a rectangle using stiff cardboard. Make the cardboard four feet long by 28 inches wide. Be sure it’s a perfect rectangle. Place the four-foot edge on the steps so this long edge is touching three or four stair nosings. The top of the cardboard will create the line for the top of the handrail. Slide the cardboard up or down the steps making marks with a pencil creating the line.

The next challenge is to locate the center of the wall studs. There are many stud-finder tools you can use to do this. I then like to attach the metal brackets to the handrail. If you’re using a simple wood handrail, I’ve found spacing the brackets 6 feet on center gives lots of support. Attempt to get a bracket as close to the top and bottom of the handrail as possible.

The screws should penetrate into solid wood at least 1.5 inches. Drill a pilot hole to make the installation easier. The pilot holes diameter should be about 40 percent of the outer diameter of the screw threads. The pilot hole depth only needs to be 70 percent of the depth the screw will penetrate into the wood.

How I'll Fix Her Handrail

I'm going to repair this woman's handrail. She wants the work to start after Christmas. We'll need extra help. A person needs to be stationed at each of the round flanges that touch the drywall.

I'll remove the crap plastic anchors. The holes will be enlarged to accept 1/4-inch toggle bolts. Each flange will have four toggle bolts.

1/4 inch toggle bolt

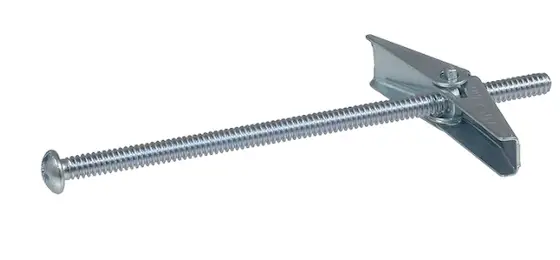
Each person at each flange will be tasked with inserting the toggle bolts into the holes in the drywall. This has to be done in unison since the handrail is so rigid.

The handrail will not wobble once all of the bolts are tightened.

Column 1588

Oldest and First Home Improvement Channel on YouTube

Oldest Home Improvement Channel on YouTube - Ask the Builder

Ask the Builder was the first home improvement channel on YouTube. Ask the Builder was part of Google Video before Google purchased YouTube.

Tim Carter is the founder of Ask the Builder, one of the first home improvement websites on the Internet. The Ask the Builder website launched in September of 1995 with 200 pages of content. Most websites in 1995 had five pages of content.

screenshot of ask the builder youtube channel

This is the look of Ask the Builder on YouTube circa 2024. It looked much different in 2006!

Google Video Before YouTube

Tim Carter was invited to attend the October 2005 Google Zeitgeist. The Google Video team approached Tim, asking him if he had produced any home improvement videos. Tim responded that he had a library of two hundred 90-second videos he had produced as the home improvement expert for the ABC and NBC-TV affiliates in Cincinnati, Ohio. The Google Video team knew that video was going to dominate the Internet. They desperately needed video content to attract advertisers.

The Google Video team asked Tim to upload all his videos to Google Video, a competitor to YouTube. YouTube launched eight months before, in February of 2005. This didn't go unnoticed by Google's top management.

Tim realized video would be a major part of the Internet back in the late 1990s. He negotiated, as part of his contract with the ABC and NBC-TV affiliates in Cincinnati, that he would own the copyright to the segments since the information was created from Tim's knowledge, not that of the TV stations. Tim also negotiated that the affiliates had to provide him with a copy of each segment on VHS tape with a custom close where Tim said, "I'm Tim Carter, Ask the Builder." Tim knew how important it would be when the videos were shown on the Internet instead of local TV.

Google Buys YouTube

Google purchased YouTube in February of 2006. Google Video was folded into YouTube. The Ask the Builder channel was one of the first 50 partners on YouTube. YouTube grew and, within a few years, being a partner, lost all of its prestige. Tens of thousands of channels became YouTube partners.

Rusted Joist Hangers

rusted corroded joist hanger next to a new one with zmax coating

The joist hanger on the left was 13 miles from Chesapeake Bay in Baltimore, MD. Imagine what they might have looked like had the house been built just back from any beach near a sea or ocean. The new joist hanger on the right shows you what yours should look like with no rust. Copyright 2024 Tim Carter

Rusted Joist Hangers are Dangerous

One of my newsletter subscribers, Robert, does handyman work on the weekends for friends and other homeowners. Eleven years ago, he wanted to learn how to frame a large shed including common roof framing. He volunteered to help me build my 16x24-foot two-story shed. We’ve been fast friends ever since that week we worked together.

Robert was repairing a deck three months ago. This deck was about thirteen miles from Chesapeake Bay in a Baltimore, MD suburb. The joist hangers had severe corrosion. He reached out to me one day and said, “Hey Tim, I’m rebuilding a deck, and the joist hangers are rotted. Would you like me to send them to you?”

I responded, “You bet! I’ll gladly pay for the postage.” I felt like a kid on Christmas morning when the box arrived. The corrosion was severe. Robert even sent some of the rusted joist hanger nails. A few of them had lost well over 60 percent of their steel! The bottom of several hangers had holes in them, and the remaining metal was paper-thin.

rusted joist hanger nails

Look how corroded the nails are! They've lost most of their holding power. Photo credit: Tim Carter Copyright 2024

This deck was a disaster waiting to happen. The structural integrity of the hangers and fasteners was compromised.

I decided to reach out to the Simpson Strong-Tie company. I’ve installed their galvanized steel framing connectors for decades and never had a rust issue. The public relations firm that works with Simpson connected me to Ms. Annie Kao. Annie has worked for Simpson for eighteen years and before her most recent promotion, she was VP of Engineering. That’s exactly who would know the answers to my questions!

Mystery Manufacturer

It’s important to realize we had no idea who manufactured the joist hangers Robert replaced. They could have been a cheap import with minimal or an inferior galvanizing treatment. Early in our discussion, Annie shared what I thought was the biggest change for Simpson Strong-Tie over the years.

It turns out that years ago, Simpson purchased raw steel in coils for their products. Simpson had their own galvanizing operation in house. The engineers at Simpson determined it was better to let the steel mills do the galvanizing. This gave birth of the ZMax labeling you see on the Simpson products. ZMax stands for maximum zinc.

I wanted to know what Annie thought about the distance Robert’s hangers were from salt water. She shared some fascinating data from a Federal Emergency Management Agency (FEMA) document. It was titled Corrosion Protection for Metal Connectors and Fasteners in Coastal Areas - NFIP Technical Bulletin 8 - June 2019.

300 - 3,000 Feet From Salt Water is Not Good

FEMA maintains that the width of the high-corrosion area near breaking salt-water waves is anywhere from 300 to 3,000 feet from the shoreline. Invisible drops of salt water enter the air when waves break on a rocky coast or the shoreline. This is similar to the tiny drops of windshield washer fluid that cover your windshield when a car hundreds of feet ahead of you cleans its glass.

Backing up my suspicion, the FEMA document verified that accelerated corrosion can happen up to ten miles inland. My guess is that’s a function of the strength and speed of the prevailing wind and how big the waves are crashing against rocks and sand.

This didn’t square with Robert’s situation. The deck he was working on is located at the far northern end of Chesapeake Bay. There’s very little wave action there like you’d see on Mt. Desert Island at Acadia National Park.

Avoid Cheap Joist Hangers

This leads me to believe the homeowner or builder of the deck used an inferior cheap joist hanger. You may have these on your home. Salt water exposure is by no means the only cause of severe corrosion of metal connectors on your deck and outdoor play sets.

Severe corrosion can happen in moist, warm climates where salt water is hundreds of miles away. The copper preservative in the treated deck lumber leaches out with each rainfall. This liquid brew corrodes bare steel and fasteners like child’s play. Treated lumber comes in different ratings containing high amounts of copper preservatives.

High-quality galvanizing that incorporates lots of zinc has a magical property. Should the galvanizing get scratched, the zinc next to the scratch corrodes faster and fills in the scratch! It’s self-healing magic.

Corrosion can be prevented by using stainless steel joist hangers, fasteners, etc. Stainless steel is available in different grades like many things. 316 stainless steel is the best. Specify or purchase that for your next deck.

It’s imperative you inspect your deck or any exterior structure that incorporates metal connectors. Check for corrosion. Extract a few random fasteners and see if they’re rusted. Replace connector nails with #9 1 and 1/2-inch-long galvanized connector screws. They have far greater holding strength.

Column 1587

Repair Concrete Cracks

crack repair products epoxy caulk and foam

Repair Concrete Cracks - Which of these products is the best way to patch a crack in a concrete wall? The answer might surprise you. CLICK HERE if you are impatient. Copyright 2024 Tim Carter

Repair Concrete Cracks - Many Bad Options

Several days ago I had a texting exchange with a very smart single woman who attends my church. She reached out to me the day before with a photo of water inside her garage and another showing a crack in the garage foundation wall near the water puddle. A rain shower happened the day before after weeks of no rain.

My wife and I have become friends with her. We go out to dinner with this woman every now and then. I’ve done some emergency repair work for her at her condominium. Understand this woman is fearless and possesses a will stronger than titanium. I admire all of these qualities. They come in handy when you have to deal with contractors.

It’s important to realize this woman’s job is reading contracts to discover loopholes that could cost her company money. She’s an expert at making sure contracts are crystal clear. The young lady also helps craft specifications included in these contracts.

I, on the other hand, have thirty years of experience listening to the sorrowful lamentations from homeowners just like you who hired a contractor hoping he would do the right thing. I’ve received tens of thousands of emails from homeowners sharing their dissatisfaction with the work done at their homes. Your local BBB office will confirm that contractor complaints are at the top of their list.

I made the mistake of sending extra information to this busy woman. All she asked me when she sent me the photos was, “What trade do I hire to fix this problem?” I replied, “a handyman.” I should have stopped there. I thought giving her more information would ensure the repair would be done right.

Very early the next morning I decided to write up a short step-by-step summary describing how the crack should be repaired. If you have a crack at your home that does leak water, I feel you should follow my AsktheBuilder.com motto: “Do it Right, Not Over! In her case, I doubted the water entered through the crack. I know the grading around her garage sends water away from the foundation.

This thought went through my head the day before when I saw the crack photo, “Well, most of the handymen she’ll hire will probably not fix the crack the correct way. Redoing the work will be that much harder and cost three times what it should have cost in the first place. I’ll send an email sharing how the crack should be repaired and give her links to the best products.”

She thanked me for sharing it and as we texted back and forth before the workday began for both of us she said, “I just want to hire a reliable person.”

Reliable means the person will show up. Reliable doesn’t mean the person is qualified to make the repair. Those two things were swirling in my head based on the thousands of email exchanges and phone calls I’ve had with other homeowners

The email I sent contained not only the concise and simple step-by-step repair guidelines, but also links to the right products. I felt armed with this knowledge, she’d cut to the chase when interviewing contractors to see if they knew the best way to patch the crack.

Moments later she told me she had no intention of interviewing anyone. She was going to base her hiring decision on reviews in an effort to locate a reliable person.

Tell me, how many ways can you think of to patch a foundation crack? Here are a few:

  • get a tube of concrete crack caulk at a local hardware store
  • purchase a small tub of pre-mixed concrete patch material and trowel it in and over the crack
  • slather on roofing cement
  • gorder some magic sticky material hawked by a carnival barker
  • guse concrete epoxy with fiberglass tape

I could imagine all of these possible methods, and a few more, being proposed by the reliable people the woman might hire. I can see most of those methods failing and the crack reopen. My money was on a handyman buying a tube of caulk. Caulk will fill a crack, of that there's no doubt. But there's a much better product.

caulk for repairing concrete

Don't be fooled by the label. This will fill a crack in the concrete. Make sure your child buys it so you get the longest warranty. Photo credit: Tim Carter Copyright 2024

The text conversation started to get a little contentious. At that point, I decided to end the conversation for fear of blowing up the relationship.

Here’s the kicker. Hours later she called me on the phone as if nothing happened. She told me, “Guess what? I found what caused the leak. A gallon jug of drinking water up on a shelf sprung a leak! It had nothing to do with the crack at all!”

Are you like this woman? Do you trust everything is going to be done right? Don’t hope. Use the concrete epoxy with fiberglass tape. The epoxy has a 2,900-pounds-per-square-inch tensile strength. That’s over seven times the tensile strength of the concrete. CLICK HERE to get the best epoxy.

Column 1586

Clean Inside of Toilet Tank

clean inside toilet tank

Clean Inside of Toilet Tank - A standard toilet tank has many parts. They can make cleaning difficult. There’s a better way. Copyright 2024 Tim Carter

Clean Inside of a Toilet Tank - Two Ways, One is Best

Ed subscribes to my free weekly newsletter. He lives in western North Carolina as does his son. His son’s house was not flooded by a portion of the trillions of gallons of water Hurricane Helene unleashed on the interior of the Southeastern USA. That said, his municipal water system was ruined, and the water in the water mains was polluted. Ed's son wants to clean and sanitize the inside of his toilet tank.

Ed’s son thought he was doing the right thing by asking one of the artificial intelligence (AI) engines the best way to clean and sanitize the inside of his toilet tank. Ed sent me the computer-generated answer and it made me grimace.

How Not to Bake a Cake

The best analogy I can offer up is how to bake a cake. Turn on your oven. Mix some flour with sugar and a few eggs. Stir these up and pour into a pan or two. Bake until the a toothpick doesn’t have batter on it when you pierce the center of one of the pans. Remove from the oven, let cool, and slather on some icing.

If you’re a pastry chef or know a thing or two about baking cakes from scratch, my step-by-step instructions above would lead to a culinary disaster. So too the AI instructions about cleaning and sanitizing the inside of a toilet tank.

Vinegar is Not a Sanitizer

Ed’s son was most interested in sanitizing the toilet tank. Flood water is almost always polluted. The AI instructions said to use vinegar to sanitize the tank. The US EPA doesn’t recognize vinegar as a household disinfectant. Chlorine bleach is a powerful sanitizer and disinfectant. The chlorine ions can kill 99 percent of the bacteria in less than 60 seconds. You must use a 50/50 mix of water and chlorine bleach.

Toilet Tank Parts Get in the Way

The parts inside a standard toilet tank make it difficult to clean. The fill valve, overflow tube, flapper valve, and flushing handle can get in the way of your cleaning efforts. My recommendation is to remove and discard the fill valve and flapper valve as part of this cleaning and sanitizing project. Both are very easy to replace.

Before you take everything apart, the first thing to do is to fill several five-gallon buckets with clean water. Do this if you only have one toilet in the house. You can use this water to flush the toilet should you have to use it as you work on the tank. If you only have one bucket, you can refill it with water from your tub spigot, shower head, or garden hose.

Method One - Easy But Not Perfect

I’ve cleaned and sanitized my own toilet tanks in the past without removing the parts. I turn off the water supply to the tank and then flush the toilet holding down on the handle. This keeps the flapper valve up and gets most of the water out of the tank. Let go of the handle once the water has drained from the tank.

I then fill up a bucket with very hot water. I fill the toilet tank up to the top of the overflow tube in the center of the tank. The next step is to add two cups of powdered oxygen bleach to the water in the tank. It should immediately begin to bubble. The oxygen ions are starting to clean the tank and all the parts without your help.

High-quality oxygen bleach is also a great sanitizer. It’s not on the official EPA list because it can’t get the 99% bacterial kill as fast as the standard requires. That said, if you let the oxygen ions bubble in the tank for 45 minutes, you’ll get the desired 99% kill rate.

You can flush the toilet after an hour. The tank will fill with clean water. You may want to flush it a second time. The inside of the tank may be stained from years of bacteria growth, iron stains, etc.

Method Two - The Best Way

To get the inside tank surface as clean as the day it was installed, it’s best to remove the fill valve, the flapper valve, and the flushing handle arm. It’s very simple to do this. There are many online videos showing you how this is accomplished.

The cleaning process is now easy because you can get your hands and different brushes into the tank with minimal interference. Liquid dish soap should do a great job at getting most of the stains off the china.

Oxalic Acid Removes Rust and Iron Stains

Iron staining can be cleaned by spritzing the inside of the tank with an oxalic acid solution. Discover the magic of oxalic acid here. Oxalic acid is a dry powder you can purchase online. You can also fill the tank with water and add the powder.

Install the new flapper valve making sure the valve seat that’s part of the overflow tube is clean. With the flapper valve in place, you can fill the tank again with clear cold water. Add a cup of oxalic acid powder, stir it up, and let it sit for hours. You’ll be stunned at how the rust stains disappear with no scrubbing.

Neutralize the oxalic acid with baking soda before you flush the toilet. You don’t want an acid solution harming your septic system or creating havoc in your city sewer system.

Safety WARNING

When working with any chemicals, stop and read all the safety instructions that come with the product. Wear goggles, gloves, be sure the room is well-ventilated, and by all means don’t mix two chemicals together! For example, never mix chlorine bleach with ammonia.

You’ll undoubtedly have to scrub the inside of the tank to get the best results. It’s no different than taking a shower. Your hands rubbing your skin are the primary reason you get clean. Cleaning requires mechanical agitation for the best results.

Column 1585

Concrete Patching Compound

concrete patching compound botched job

Concrete Patching Compound - This botched concrete repair might be traced to poor eyesight, poor skills, and/or an I-don’t-care attitude. The truck keys, fob, and Mike Mulligan charm are for scale. Copyright 2024 Tim Carter

Concrete Patching Compound - Sand and Cement is Best

Every seven weeks I sit in my barber’s chair and say to Mikayla, “Take no prisoners. Cut each and every one of them.” She giggles to humor me.

ricks barbershop nh

This is where Mikayla works. Her chair and station is on the far right. Photo Credit: Rick's Barbershop NH

I have to step up from the asphalt parking lot to a concrete sidewalk to get to the shop door. Someone tried to patch a crack or a spalled area in front of the barbershop a few years ago. Spalling happens when the top surface of the concrete pops off. The best analogy I can offer is peeling paint.

Concrete Patching Compound Nightmare

My eye was drawn to this botched repair job days ago. I noticed this spot was repaired at least two times. The color of the repair attempts was different.

Hairline cracks crisscrossed the most recent concrete patching compound repair. The surface of the repair was not even. An amateur performed the repair was my first thought. I would get the same result if I attempted to apply icing to a wedding cake. That said, if the wedding cake needed a sand and cement finish, I’d make the bride happy.

The original concrete sidewalk had a sandy finish. This promotes excellent traction which is desired in snowy and icy New Hampshire. A sand finish on concrete works well in any climate because when it’s wet, it provides great slip resistance.

Inferior Pre-mixed Patching Compound

I was convinced the repair was made using a premixed concrete patching compound. These are commodity items found at any home center or hardware store. They come in small buckets. The label says they’ll work well if the area to be repaired is 1/4-inch or less in depth. I have no idea how deep the hole was that was repaired.

The repair stood out like a large scar you might see on a person’s face. I grimaced peering at it. If only the person had read some of my past columns, the sidewalk would have looked so much better.

Stones and Rock Make Concrete Durable

Have you ever thought about the durability of concrete? Concrete that’s been mixed, placed, finished, and cured with care can last for decades. After all, it’s artificial rock. My college degree is in geology. I find it fascinating that concrete is just reconstituted rock!

Basic concrete has but four ingredients:

  • stones or aggregate
  • sand
  • Portland cement
  • water

Portland cement is made from limestone and shale. Sand, for the most part, is just tiny pieces of rock of different types and sizes. Every ingredient in concrete is rock except for the water!

Stop and think how strong Portland cement is. Once mixed with water, a chemical reaction begins. Countless crystals start to form. They’re not unlike the hook-and-loop Velcro™. The crystals bind the sand and stones together to make a hard durable material.

Knowing this, why wouldn’t you just use inexpensive Portland cement and sand to make the repair? You already know that the cement will bond to the existing concrete.

Cover the Entire Block

I would have repaired the damaged concrete by making sure my repair would cover an entire block of the sidewalk. This sidewalk had tooled crack control joints every five feet and the sidewalk was five feet wide. I’d just have to cover 25 square feet with an 1/8 inch of fine sand mixed with Portland cement to achieve a professional repair. Fine sand can be compared to grains of table salt. It’s that small.

Let’s assume the spalled area was about 1/2-inch deep. I would have gathered some coarse sand to use in that deep area. The sand particles could be up to 1/8-inch in diameter. This larger sand makes the repair mix stronger in that deeper hole.

Step one of the repair process is to remove all loose and flaking material. I might tap the area with a hammer to ensure the concrete is solid. I’d then broom away all dust and even scrub it with clear water and a brush.

The weather is very important. You might think a sunny breezy day is the best time to work. It’s not. The sun and wind cause the repair compound to dry too fast. I’d want to do the repair when it was overcast and calm. An air temperature of 60F would be ideal.

I’d mix two measures of sand with one measure of Portland cement. Blend these together dry until the color is uniform. I’d then add just enough water to make the patching mix the consistency of firm applesauce.

I’d then mix up the secret ingredient, cement paint. Cement paint is made by mixing pure Portland cement with clear cold water. Add enough water to make a mix that has the consistency of warm gravy.

If the area to be patched had dried, I’d spritz it with a water mist. It’s important to realize you don’t want the concrete to be wet. You just want it damp. Brush on a thin layer of the magic cement paint and then immediately cover it with the sand and cement mixture.

Use a straightedge to get the patching compound even. Then wait a few minutes and swirl a magnesium or wood float over the compound to produce a professional sand finish. An hour after finishing is complete, cover the patched area with plastic and weigh it down so it can’t blow away. Keep it covered for 48 hours.

Column 1584

Patio and Deck Sizing Secrets

outdoor patio with hot tub fire pit and kitchen

Patio Deck Sizing - This new patio looks perfect but it might be a little cramped when it’s time for a big family get-together. Copyright 2024 Tim Carter

Patio Deck Sizing Secrets

Are you planning a new deck or patio soon? There’s a very good chance you’re going to make it too small. I know this based on the thousands of complaints I’ve received over the years from homeowners just like you.

Most people don’t have the ability to look at a plan drawn by an architect or design contractor and then visualize that actual patio or deck in their minds. The sad thing is most people know how big these outdoor rooms should be based on the rooms in their own homes.

I built a patio for my future mother-in-law. She was smart and sized it perfectly so she could drink hot coffee under the shade of the ash trees in 95 F weather.

The First Ask the Builder Video

I’ll never forget the first video I recorded thirty years ago. The topic was Sizing a Deck. The video was recorded at the producer’s house. She had a tiny 10-foot by 10-foot deck. She told me it looked huge when the builder was putting the railing on, but after he left and they put the table and chairs on it they realized how small it was.

The small deck made it hard for someone to get around the 4-foot-diameter table to get to an empty chair. There was no room on the deck for the BBQ grill. The homeowner was not happy about the situation as you might expect.

I showed in the video how to make scale cutouts of the furniture using graph paper. It turns out that’s too much work. This spring I’m going to re-shot the video. I’m going to go inside my house and show my dining and living rooms. After all, most patios and decks are just carbon copies of rooms in your home.

Study Existing Rooms in Your Home

Think of how you intend to use your patio or deck. Is there a room in your home now that you gather in? Is the room too small? What happens when you have a party? Where do the overflow people end up? I realize you won’t have parties each weekend, but try to imagine what you’ll have to do to seat more than your immediate family and a small handful of friends.

Dining rooms that have a standard table are almost always 12 feet wide. Fourteen feet is ideal. A 12-foot-wide dining room with a 4-foot-wide table provides 4 feet of space on either side of the table. The back of a chair when someone is sitting at a table is at least 2 feet away from the edge of the table. A 12-foot-wide room allows for two feet of space for a person to walk behind someone seated at the table.

Do you have a delightful great room or living room? Does it work well for conversations with a group of people? Measure the size of the room and add two feet minimum to each dimension to create a spacious patio or deck.

Fire Pit Areas Must be Big

Firepits on patios or decks can create headaches if you’re not familiar with these delightful accents. I recently saw a new patio built with a lower area that has a fire pit. When the fire pit and chairs were set on the pad, there was only 16 inches of space from the front edge of the chair to the outer surface of the fire pit.

outdoor patio with fire pit and hot tub

This is the same patio as above but from a different angle. Copyright 2024 Tim Carter

I guarantee people will have to scoot back and put their chairs on the grass when a good-sized fire is burning. This mistake can be avoided by looking at how architects design a fire pit or outdoor fire-ring area for a hotel. Each fire pit I’ve ever sat around has a minimum of 4 feet of space from the front of a chair to the fire pit or ring. If a person wants to scoot closer, they can.

Stage Furniture on Your Lawn

Are you planning to put a BBQ grill, accessory table, water feature, etc. on your new patio or deck? You can avoid planning oversights by laying out all you plan to put on your patio or deck on your lawn early in the planning process. You don’t have to buy everything to do this.

Pick out what you want and get the sizes of everything. Take large pieces of cardboard and create the footprint of the item. Lay the cardboard pieces on the lawn in the exact place you think they’ll be on the patio or deck.

Create enough space around each one so you can walk around everything. Make sure the BBQ grill is not too close to the table where people will be seated. Once you think you have all the pieces set at the correct distance from one another, surround all of them with string to create the outer edges of the deck or patio.

This method takes a small amount of time, but it will pay off in spades once the deck or patio is built. You won’t be a sad sack like my video producer. She ended up having to rebuild that deck by the way!

I used this same staging trick to show how to size a shed. Watch this video:

Column 1583

Fix Pavers Uneven

chipmunk nest under concrete paver patio blocks

Fix Pavers Uneven - This chipmunk cafeteria is now closed for business. The little demons rolled 30-50 acorns through a labyrinth of tunnels under the concrete paver stones to stock the cafeteria pantry. Copyright 2024 Tim Carter

Author Note: The patio featured in this column was a rush job for my wife. I feel the best way to install a patio is to mortar brick to a 5-inch-thick steel-reinforced concrete slab. You can read about this method in my past columns:

Concrete Patio with Brick

My Mother-in-Law's Patio Before I was a Builder

My Son's Deluxe Brick Patio

Fix Pavers Uneven - Chipmunk Tunnels Cause Pavers to Drop

I installed an attractive concrete paver patio for my wife seven years ago. I knew it would fail, but didn’t know when. She wanted the patio completed as soon as possible. This tight deadline requirement dictated I had to set the patio stones on sand instead of mortaring them to a steel-reinforced concrete slab.

My new flat patio soon was not so flat. It's now time to fix the pavers that are uneven. The sand beneath the pavers was being transported away grain-by-grain by union members of chipmunk miners local 104. They found the sand easier to dig through than the sandy soil under my lawn. The concrete pavers provided a sturdy roof to keep their nests dry.

Frost Heave Can Cause Uneven Pavers

I live in central New Hampshire. The winters bring cold weather. Frost heave is a reality. The up and down seasonal movement wreaks havoc on things that rest on the soil. Ancient stone walls built two hundred years ago to outline livestock pastures tolerate this movement to a great extent. Flat patio and sidewalk stones not so much.

Chipmunk Miners

The greater threat is burrowing mammals like chipmunks, mice, and who-knows-what. In my case, it’s chipmunks. These cute furry demons are as prolific in my neighborhood as vacationers who overrun my state year-round.

Chipmunks tunnel through the soil like you might dig in a huge pile of styrofoam packing peanuts. It’s child’s play for the tiny creatures to create an extensive labyrinth of interconnecting tunnels. They do this for survival, and it’s baked into their DNA.

chipmunk tunnel maze under patio pavers

The red arrow points to one of the tunnel entrances. The chipmunks have no less than three ways in and out from beneath the concrete pavers. Seven years ago all you would have seen is the light-colored sand. At least 40% of it has been removed by the wretched mammals. Copyright 2024 Tim Carter ALL RIGHTS RESERVED

My large-format concrete pavers range in size from 8x16 inches all the way up to 16 by 24 inches. The pavers are 2.5 inches thick. They’re heavy. The chipmunks can’t move the pavers but they can make them drop an inch or more by removing the dry sand beneath them.

My wife asked me to repair the uneven patio a month ago. Some small and medium pavers would tip back and forth as you walked on them. The last thing I want is for my bride of fifty years to fall and break her hip.

Plan A: Sand and Cement

I didn’t know the extent of the damage when I came up with my repair plan. I thought, at first, that just a few stones needed to be lifted back up. I purchased a few bags of dry sand and a bag of pure Portland cement. I was going to mix 3 parts sand to 1 part cement and place it under the sunken pavers.

My plan was to start at one corner of the patio and work a rectangle that was about 5 feet wide and 12 feet long. I was stunned when I lifted up the first paver. Fifty percent of the sand was gone. A small maze of tunnels was under this large paver. The interconnecting tunnel system grew as I pulled up more and more stones.

Three pavers in the center of the patio required emergency repair. I pried up a small 8x16-inch paver and lifted two adjacent larger pavers. I stood back in awe, shaking my head, looking down at the local chipmunk cafeteria.

Packed dried oak leaves were brought from outdoors. The chipmunks used these to create a nest. Next to this was a pile of 30-50 fresh acorns. The chipmunks, no doubt, were none too happy about me discovering their lair.

I made a temporary repair using just sand. I’d perform a permanent repair on this section in the spring. Sand and cement was not going to do the job. I had to come up with a permanent fix.

Plan B: A 2-inch Thick Concrete Slab with Steel

I purchased twenty-five 60-pound bags of dry concrete mix. I also purchased 3/8-inch steel reinforcing rods. These rods are often called pencil rods because they're just about the same diameter as a pencil. My new plan was to install a thin flat concrete slab the pavers would rest upon. The chipmunks would never harm this new 2-inch concrete slab.

The steel rods laid 16 inches on center both directions would ensure the concrete would stay in the same plane over time. The chipmunks might re-create their tunnel maze in the gravel and soil under the slab, but the concrete will span the 2-inch-wide tunnels and not drop.

Look at this photo. This is the BEST way to install a brick paver patio. CLICK HERE to watch me lay two bricks.

I removed all the old sand. The hole was now 4.5 inches deep below the top of the patio. My plan is to install the dry concrete mix in two 1-inch lifts. The first lift will be compacted and I’ll lay the steel rods on the mix. I’ll then install the second inch of dry concrete.

I’ll take great care in getting this second concrete mix layer flat to resemble the surface of the sand as I installed it seven years ago. I’ll then mist the concrete with water to start the hydration chemical reaction that transforms the concrete into artificial stone.

A day later I’ll lay the concrete pavers on the hard concrete. They’ll be installed in the exact same interlocking pattern as I did seven years ago. The chipmunks delight my wife, but for me they’ve become my back’s nemesis.

Your takeaway should be this. If you have tunneling mammals where you live, don’t use sand. Install dry concrete mix in place of the sand. Don’t forget to put in the steel rods.

Column 1582