How to Eliminate Chipmunks, Rats, and Squirrels

chipmunk den hole in soil

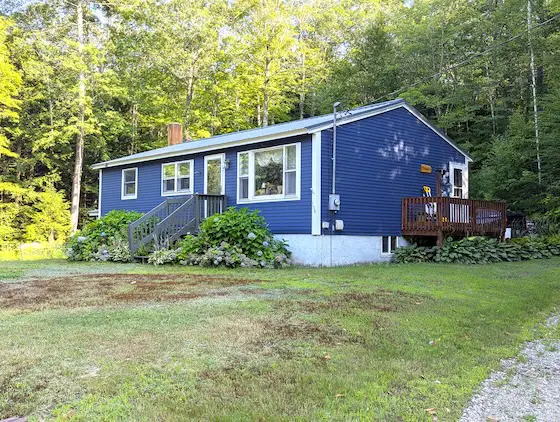
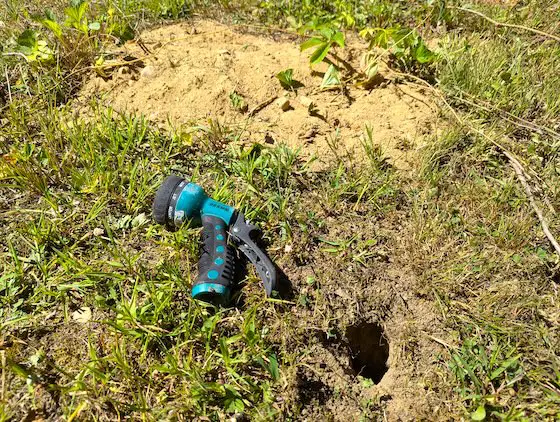
This is just one entrance/exit to a large chipmunk den in my yard. Look at the huge pile of dirt the critters brought to the surface.. Copyright 2025 Tim Carter

Chipmunks, Mice, Rats, and Squirrels - How to Eliminate Them

You and I share the planet with lots of other creatures. Quite a few of them can be very problematic. A year ago, I shared with you how chipmunks had ruined my patio made with concrete pavers. The fuzzy brown pests created a maze of tunnels under the stones, causing them to tilt and rock when you walk on them.

Mice, chipmunks, birds, and all sorts of insects can make your day go from bad to worse. I live in central New Hampshire, where mice do everything possible to cohabitate in just about every house. All those cartoons and children’s books featuring harmless mice who live behind the walls and up in the ceilings are based on fact.

Mice can be very destructive. Two years ago, a mouse chewed through a water line in my home. It created a pinhole leak that caused just under $40,000 of damage to my home. It was extremely disruptive as we had to move out of our entire first floor to have all the wood floors refinished.

Mice love to chew fabrics, clothes, and upholstery. They use the fibers to make cozy nests. I’ve discovered that mothballs do a very good job of repelling mice from items stored in my attic. The issue is that you have to replenish the mothballs from time to time.

Several days ago, a good friend of mine reached out to me. He had his blacktop drive replaced a year ago. The old blacktop was removed and new put down. A chipmunk had created a nest under the old driveway. My friend thought he would fill the hole with small rocks before the new blacktop was installed.

This plan failed. He sent me a photo showing a 2-inch-diameter hole in his new blacktop driveway just above the nest location. The blacktop immediately surrounding the hole was sagging down towards the hole. You can imagine how upset he was.

I told him to carefully chip away the blacktop to enlarge the hole. It’s important to eliminate the sagging depression. Water puddling on the blacktop will cause future problems.

I then instructed him to get a bag of Portland cement and some fine sand. These materials would be used to create a slurry that would be poured into the nest opening.

The slurry is made by mixing one measure of Portland cement with two measures of sand. You blend these together dry until the color is uniform. Add enough water to make the slurry the consistency of a watery applesauce.

Using a large-mouthed funnel, pour the slurry into the nest. You’ll be stunned by how much slurry it might consume. Chipmunks are industrious and clever builders. The nests are convoluted to protect them from predators and the elements. A thick slurry will not penetrate deep enough into the nest.

Be aware that the chipmunk nest will have no less than two entrances/exits. It would behoove you to try to locate these openings and pour the cement slurry into them as well.

The chipmunks are determined, and they remove rocks you stuff into the holes you see in your yard. They won’t be able to remove the hardened cement slurry.

That said, it’s possible the critters will just get back to work and create new entrances and exits. You need to realize you’re in a war and the tiny brown pests have a very strong survival instinct. They will not be waving a tiny white flag anytime soon.

I’ve tried to drown the chipmunks by putting my garden hose into the holes. I’d turn on the water, and much to my surprise, the water rarely fills up the nest and overflows out of the holes. I’m astonished by how many gallons of water disappear into the soil.

I’m not a fan of using poison. The poison can enter the aquifer and then seep into my well. It can also poison things I don’t want to harm. I suggest you adopt the same strategy and shy away from toxic brews that might have unintended consequences.

You might also adopt a live-and-let-live policy. Try to adapt. Channel Mother Nature. Do some research and discover the predators one link up the food chain that love to feast on tender chipmunks. You might start doing things to attract these animals to your yard.

Hawks, owls, serpents, etc. might become your new friends as you wage war against the brown furry mammals that skitter across the grass like an all-star soccer player!

Column 1627

Solving the Starter Home Crisis

small ranch home nh

This is a very modest home just three miles from where I live. It’s the perfect size and shape for a starter home. Copyright 2025 Tim Carter

Starter Home Solution - Build Very Small Simple Homes

We have a true crisis unfolding here in the USA. It’s very difficult for a young person or couple in their mid-twenties to purchase a home. My youngest daughter, who is thirty-three, is facing this grim reality.

My other two children own a piece of the rock. I helped my oldest child, also a daughter, build her own home. She designed and drew the plans for the simple two-story home. My middle child, a son, was fortunate to purchase a new modest two-bedroom home three years ago. I’ve been working with him the past year on weekends to convert his massive basement into 1,200 square feet of finished living space, including a full bathroom.

I’m bound and determined to help my youngest daughter experience the joy of stepping across the threshold of her first home. In the process, I believe I can help you or your children do the same thing.

My college degree is in geology. One of the founding fathers of Earth science was James Hutton. He lived in the 1700s. He is credited with the profound statement, “The present is the key to the past.” I feel the opposite is the key to unlocking our current starter-home crisis. The past is the key to the future.

I grew up in Cincinnati, Ohio. My parents purchased a very small two-bedroom home when I was two years old. They paid $16,000 for it, and the mortgage payment was a staggering $60 a month. My mother told me she was stressed that they couldn’t afford it. I’m sure you have a similar story to share about your childhood home.

3101 Riddle View Lane Cincinnati OH

This is the house I grew up in. The lot is 40 feet wide. There's an 8-foot driveway on the left side of the house and a 6-foot-wide strip of grass on the right. Do the math! Photo Credit: Google Maps

This house was on a lot 40 feet wide by 150 feet deep. The two-story house was 22 feet wide and 22 feet deep. It had a full basement, one half of which was a one-car garage. Remove the thickness of the solid masonry exterior walls, and you only have about 950 square feet of living space.

This home had one tiny 5-foot by 7-foot bathroom. The first floor consisted of a living room, dining room, and kitchen. The living room and the stairwell to the second floor occupied the left half of the first floor. The dining room and kitchen comprised the second half. The second story includes two bedrooms, a bathroom, a hallway, and four closets. The furnace, washer, dryer, and a small, dank storage room could be found in the basement, located on the other side of the wall from the garage. My mom, dad, sister, and I lived here and thought everything was hunky dory.

New homes always cost more per square foot than an existing home. Twelve years ago, I was a member of a writers group at our local library. A divorced woman in this group purchased a tiny one-bedroom hobbit house in my town for less than $70,000 at that time. It had no garage, no basement, and was perfect for a single person. I think the house had less than 600 square feet of finished living space.

Entire neighborhoods in the suburbs surrounding Cincinnati are filled with tiny homes that were built for all the GIs coming back from the Great World War II. Silverton, Golf Manor, and Westwood are filled with these tiny two-bedroom homes like mine that look just like the green plastic homes in the Monopoly board game.

satellite view of Golf Manor

Last week I sold a power tool to a small independent builder who lives in a nearby town. We were sharing tales, and he told me how he was helping his son build his home. “We’re already at $600,000 in cost, and that’s not counting all of my free labor,” he mentioned. I then discovered this house is quite large and filled with all sorts of very nice finishes, including granite countertops, and top-of-the-line windows and doors.

I then shared what I’ve written just above. I talked about how if I were still building full-time, I’d be building small houses similar to the ones I was surrounded by in my childhood. This man asked me to draw the floor plan of my childhood home.

His eyes lit up like a Christmas tree when he saw my drawing. He instantly connected the dots. I shared how everything in a new home like this would be bare bones. The new starter homes would feature plastic laminate countertops, basic cabinets, windows and doors that barely meet current energy codes, and the least expensive flooring available, which should have a service life of at least ten years.

I guarantee you he’ll be building a test home within the next year to see what happens. I know he’ll sell it before it’s completed. It will be so much cheaper than renting.

My youngest daughter just moved back from California to my New Hampshire home. She told me the rent for her two-bedroom two-bath apartment was $3,200 a month. I almost choked while I was taking a sip of my lemon-lime ice water.

I went online and discovered that in today’s mortgage market, one can procure a thirty-year loan for $250,000 and have a monthly payment just under $1,600.00. The building costs for a bare-bones house in a Midwest market can be done for just under $200 a square foot in 2025 dollars. You need to add the lot cost, utilities, and permits to get to a final figure. In the end, it’s all about reducing the square footage in a new starter home.

Column 1626

AI and Home Improvement

billboard hiring plumbers

This billboard is advertising jobs that Artificial Intelligence (AI) will not devour. Is your job vulnerable? Copyright 2025 Tim Carter

AI and Home Building & Improvement

What do you know about Artificial Intelligence (AI)? Have you tested it? Do you think it will be your friend or foe when it comes to building your next new home, or when you tackle a project at your existing home? I’ve immersed myself in AI, and am here to tell you that your head should be on a swivel.

I don’t have enough space in this column to share all I want you to know about AI and home improvement. I will probably do a series of future articles doing deep dives into how it can both help and hurt you.

Days ago, I was continuing my research on AI. I came across a document that listed the jobs AI was about to replace. The document also had a list of jobs that are immune to AI. It was a sobering moment.

Writers and authors like me are among the top professions at risk. Technical writers and editors are also going to be devoured by AI. The jobs that are safe from AI attack are the trades. Plumbers, carpenters, painters, electricians, HVAC techs, etc., will always have work. Share this tip with your children and grandchildren.

I’ve been mentoring a young plumber in Oklahoma for the past year. He’s been investing in his future by scheduling consult calls with me. Just yesterday, I coached him on how to start up his own business. I shared what plumbing jobs I’d never do, leaving those high-risk, physically demanding jobs to my competitors.

I can assure you this young man is going to be one of the best plumbers, no matter where he ends up living and working. The good news is that there are young people entering the trades who have great attitudes, ethics, and the desire to create a vocation. The issue is we need more of them. It may not be too late for you to switch careers if you feel AI is going to replace you.

AI is going to crush all of the weak home improvement websites you might rely on. The data centers that fuel AI have already gobbled up all of the content on just about every website visible on the Internet. AI generates answers to your questions based on this pirated content. Authors like me are reconsidering whether to post new information on our websites, as AI will steal it. This content vacuum is destined to harm you. Why should authors and writers like me be expected to work for free?

What happens as we march down the AI timeline? What does the future hold when AI uses stale or bogus information to generate an answer? You, the trusting consumer, risk getting a pile of refuse with maybe some whipped cream on top.

Allow me to show you how AI can help you save hours of time. Let’s assume you have a problem at your home. You go to the Perplexity large language model (LLM) AI engine and type in something like: My house has a basement water leak. What are the primary sources of the water, and what are the best ways to stop the water from entering my basement?

In the past, you might have spent hours on Google, clicking blue links, hunting for the answer to the above dilemma. Each click opens a new tab in your browser. Soon, you have ten or twenty tabs open, and your head is exploding with all sorts of information. At this point, you may have invested an hour or two.

Go ahead, type my sample question above into Perplexity. Within ten seconds, you’ll have a mind-blowing experience. Several pages of content from my www.AsktheBuilder.com website were used to produce the answer you’ll see.

You can have AI write the specifications for any job around your home. You use these to hire contractors. This way, each bidding contractor is producing estimates based on the exact same scope of work.

How will you know if the specifications are correct? You may need to hire a professional like me for just 15 minutes to review them. Only a fool would assume the AI LLMs produce the exact specs you need for your particular situation.

You may not feel it, but you’re living in a time in history that is as significant as the 1100s, 1455, 1492, 1776, 1859, etc. 2025 will stake its claim in history to this prestigious list of historical events. What happened during all those years listed above? Go to Perplexity or ChatGPT and discover for yourself.

You can rest assured I’ll be sharing more insight about the benefits and dangers of AI when it comes to solving problems at your own home, condo, or apartment. If you need help from a human, don’t hesitate to arrange a phone call from me to ensure AI doesn’t give you bad advice.

Column 1625

DIY Deck Building Dangers

deck under construction treated lumber

This new deck being built near my home has no less than three serious flaws. Copyright 2025 Tim Carter

DIY Deck Building Dangers - Death is Possible

Is a deck in your future? You might want to build one to create a delightful outdoor living space. You may visit a friend’s home and step out onto their deck. You may be in a dancing throng of people on some other deck. I urge you to go to YouTube and watch any number of deck and railing failures before you do any of the above. Decks can be very dangerous places should they be built by someone who has no understanding of structural principles.

A month ago I inspected a deck for a single mom. She was thinking of buying a house that had been in her family for decades. This house was built on a fairly steep hillside. The outer edge of the deck was every bit of 14-16 feet in the air. I put minimal pressure on the railing and it wobbled. I immediately condemned the deck railing instructing her to not allow anyone on the deck until the railing was replaced.

The original builder of this deck had used lag bolts to bolt 4x4s on the outer rim joist of the deck. Lag bolts, in my opinion, should be outlawed for deck construction. These bolts can lose their gripping power from being overtightened. Weathering and wood rot can also cause them to produce a very weak connection.

Through bolts or special deck tension tie hardware are superior methods to connect a 4x4 railing post to the under carriage of the deck. I’ve used the deck tension tie hardware on my own deck, and the railing posts are rock solid.

You can watch a video showing the amazing deck tension tie hardware on my www.AsktheBuilder.com website. Type: “deck railing post danger” into my search engine. This video demonstrates a serious flaw many make when installing deck railing posts. I point out what happens when you notch a deck railing post.

This same tension tie hardware should be used to connect the deck joists to the house joists. Decks can and do pull away from houses for a host of reasons. A friend of my daughter broke her neck and ruptured her spleen when a deck she was standing on fell to the pavement below in Old San Juan, Puerto Rico. She’s lucky to be alive.

Days ago I drove past a large new deck being built near my home. I stopped by, and observed several serious mistakes.

This deck projects out from the house over 25 feet. This requires a support beam under the joists. The carpenters supported the beam with several 6x6 posts. This is all well and good, but they forgot to install special hardware on top of the posts that create a solid connection between the beam and the posts. Instead, they just put a few nails driven at an angle through the beam into the top of the posts. One of the nails was so high on the beam, my guess is it only penetrated into the post about one-half inch.

I didn’t see any diagonal braces nailed to the underside of the deck joists. In all fairness to the carpenters, they may decide to do this after the deck is complete. The joists need to be perfectly spaced before you install the bracing. If you install the bracing first and the joist spacing is not correct, it’s nearly impossible to move the joists left and right to achieve the correct spacing as you install the finished decking on top of the joists.

This diagonal bracing is very important. It prevents a deck from swaying sideways. This can happen should a large crowd on the deck start to dance. You should use large-diameter timber screws to fasten your 2x6 bracing under the joists. Install two of these fasteners per joist. They should penetrate at least two inches into the joist.

The carpenters did install a sheet of copper flashing behind the rim joist that was attached to the wall. However, the house is covered with Zip™ sheathing that requires no house wrap. The carpenters may install a strip of adhesive tape over the top of the flashing securing it to the Zip™ sheathing.

I doubt the adhesive in the tape will stand the test of time. Hundreds of expansion/contraction cycles can lead to the tape detaching from the sheathing. Water that gets behind the finished siding can then get behind the all-important flashing meant to prevent this water intrusion.

I feel it’s much better to install this copper flashing behind the rim joist but only as a secondary barrier to water entry. I feel it’s much better to install a copper flashing that extends up the wall above the deck, then across the top of the treated rim joist, then turns down over the face of the rim joist. It should extend down the face of the rim joist about 1.5 inches and have a 45-degree-angle kick out.

This kick out forces water drops to form on the tip of the flashing and fall to the ground. This precision detail requires a small 45-degree-angle fire cut to me made on the top of the joists. This fire cut doesn’t take away any of the structural integrity of the deck joists.

You can obtain a detailed illustration of this precision deck flashing detail from me. It also shows how to use the deck tension tie to connect the deck to your house.

Column 1624

Chip Seal Your Driveway

chip seal road surface

This rural road near my house was just coated with small stone chips embedded in a thin layer of asphalt cement. You can do the same thing on your driveway. Copyright 2025 Tim Carter

Chip Seal Your Driveway - Make it Colorful

What would you say if I told you your driveway doesn’t need to be boring blacktop or ho-hum gray concrete? Can you envision a red, orange, green, or light khaki color driveway? Would you like a driveway that provides maximum traction should you have to deal with snow and ice? I used to have a driveway like this and loved it. I’m talking about a chip seal or tar and chip surface.

A rural road in my New Hampshire town was repaved last week using the chip seal method. The contractor sprayed about one-half gallon of hot liquid asphalt per square yard on the old road surface. A special spreading machine then carefully dropped about 25 pounds of small stone chips per square yard onto the hot, gooey asphalt cement. A large roller then compacted the chips into the liquid tar.

A paving contractor in Cincinnati, Ohio, used to specialize in this paving alternative. They purchased stunning medium-brown flint chips scooped from the Wisconsin River in central Wisconsin. This stone looks similar to butterscotch candy you might use when baking cookies. The stones were tumbled in the riverbed, and the rough edges were nice and smooth.

I used this material and paving method for my own driveway. People walking past my house would always stop and look at it. I’d answer questions about it if I happened to be outdoors doing yard work. I loved being the spokesman for this unique and colorful pavement. You can watch a video of my tar and chip driveway on my www.AsktheBuilder.com website.

You can embed any stones you like in the liquid asphalt. You may live close to a gravel pit that has unique colored stones. Granites and marbles come in a vast variety of colors. A stunning red granite can be found on Mt. Desert Island in Maine. Imagine if a local quarry had a pile of small chips of this granite!

The chip seal method of paving is time-tested. It was the way many miles of roads were paved in the early 1900s. Thousands of miles of secondary roads are still paved this way today. Chip seal is quite common out West, where the distances from blacktop mixing plants are too far away from where the material will be used. Chip seal contractors just have to keep the liquid asphalt hot in special heated tanker trucks. This is easy to do.

Modern blacktop paving differs from chip seal in a few ways. Your blacktop driveway material is a mixture of small stones, sand, and the same asphalt cement. It’s blended together in a giant rotating drum. The sand and stones get completely coated with the asphalt cement, which, when cooled down, binds the aggregates together.

No sand is used in a chip seal pavement. The chip seal stones don’t get completely coated with the asphalt cement, allowing the color of the chips to be on display. The underside of the stones is bonded to the sticky asphalt cement. The bond is permanent. Snow, ice, and snowplows can’t easily pluck the stones from the asphalt.

The chip seal surface is not for everyone. I’d not recommend it if you play basketball on your driveway. The surface is not as smooth as concrete or blacktop. Chip seal is also unforgiving when it comes to toddlers’ skinned knees.

Your best bet at locating chip seal contractors is to call all the blacktop companies in your area. They’re the ones who deal with asphalt cement on a daily basis. The question is whether or not they have the truck that sprays the asphalt and the stone-spreading machine.

Let’s say you don’t want the chip seal surface, but you do want a colored driveway. Blacktop sealers are available in a variety of colors. These sealers are used by companies that maintain tennis and pickleball courts. There’s no reason why you can’t use these same bright colors on your driveway.

Your dingy, plain-vanilla concrete drive can be transformed to a stunning art piece by installing a thin cement stucco coating. You can add countless dry-shake pigments to the stucco just as stamped concrete contractors colorize regular concrete.

If you really want a challenge, you can do intricate stucco patterns on your driveway, much like terrazzo contractors create murals using different colored marble chips and the dry-shake pigments in the cement.

There are many videos on YouTube showing how to colorize concrete or stucco. I urge you to watch them. Experiment using cheap concrete paving blocks you can buy at a home center. Once you’ve perfected your technique, then advance to coating your driveway. I’d love to see photos of your completed project.

Column 1623

DIY LVP Flooring Install

LVP flooring on concrete

The staggered pieces of LVP will be snapped into position in less than 30 seconds per piece. If you can fog a mirror, you can install LVP. Copyright 2025 Tim Carter

Save Thousands of Dollars Installing LVP

I found myself driving through the breathtaking sheer granite walls of Franconia Notch in New Hampshire last Sunday. Cannon Mountain was on my left, and Mt. Lafayette was on my right. I was on my way to the quaint community of Sugar Hill to conduct an in-person consultation for a single mother.

The young woman was considering purchasing a house owned by two of her aunts. My job was to develop a list of must-do and should-do projects. I was then tasked with determining the labor and material costs required to complete each item on the two lists.

The cost of labor was astronomical. My estimates were on the high side because I wanted the woman to hire the contractors who would do each thing right the first time. I shared with her a story about another single woman I helped out of a bind just months before.

This other woman decided to sell her condominium. She had luxury vinyl plank (LVP) flooring installed throughout the condo two years prior. The installers were jobbers who worked for one of the big-box retailers. They forgot, or were not prepared, to install small pieces of decorative trim where the LVP met up against pieces of woodwork.

The young woman was manic about hiding these small gaps. I had her purchase and paint the small wood trim. I installed the trim in minutes, packed up my tools, and left without accepting any money. She, instead, treated my lovely wife and me to dinner.

Fast forward to my son’s house. I’ve shared in past columns about how I’m helping him finish about 1,200 square feet of basement in his new home. We’ve speculated on how much money I’ve saved him in labor costs. The number is now approaching $100,000.00.

A few days ago, we started installing his LVP flooring. We selected this material for several reasons. LVP is the perfect material to use in basements because it’s waterproof. The material is also eye-catching. Most people who see it will think it’s real wood.

You may want a new LVP floor in your home, but you’re holding back because the labor estimates have taken your breath away. I’m here to tell you that if you can fog a mirror and comb or brush your hair, you can successfully install LVP. The best part is that you need only simple tools to do the job in most cases.

The flooring surface below the LVP must be in the same plane. This means there should be minimal or no low spots or humps. The pieces of LVP interlock.  These tongue-and-groove connection joints can fail over time if the LVP flexes as you walk back and forth across a hollow spot under the LVP.

Your first task is to use a long, straight edge to locate any dips or low spots. Use floor-leveling compound to carefully fill in these areas. This is time well spent, and you’ll discover the LVP will install with ease once the subfloor is even.

The LVP is so easy to install that the instructions can be followed by a child in mid-school. The product I used instructed me to start in the corner of a room, working left to right. The first two rows of the material are installed simultaneously in a staggered fashion. This ensures the pieces interlock, allowing the rest of the flooring to install with ease.

LVP is plastic. Plastics have a high coefficient of expansion and contraction. The LVP is a floating floor, and it will expand if subjected to significant temperature differences. Sunlight hitting an LVP floor will make it grow like a weed. The instructions clearly state that you must leave a 1/4-inch gap around all edges of the flooring to allow for this movement. The floor will buckle and bubble if you don’t provide this gap.

You need a rubber mallet to install the type of LVP my son and I used. Be sure to purchase one with white rubber, not black. The white mallet will not mar the flooring. The mallet is used to lock the ends of each plank to the piece you just installed moments before. You’ll also use the mallet to tap a square-edge piece of wood that ensures the long edges of each plank are tight to the previous row.

I found that it only took me about thirty seconds to install a plank. I would kneel on the flooring I just installed so I could interlock the planks by pulling on them instead of pushing them in place. You’ll discover that great lighting is important. It’s mission-critical that you install each piece tightly. There must be no gap between the planks.

The LVP my son and I installed had the underlayment built into each plank. This made the installation go that much faster. We also made sure the concrete floor was perfectly clean. We had vacuumed it and then wet-mopped the concrete. It was so clean you could eat off it. Grit, small pieces of drywall compound, or slivers of wood can cause great frustration if they interfere with the installation.

There are many videos, some created by the LVP manufacturers, that show how simple it is to install this material. Watch a few of them if I’ve not yet convinced you how easy it is to save thousands of dollars!

Column 1622

Roof Framing Primer

common roof framing 17/12 pitch

This is a steep 17:12 pitch roof I built in 1991. It has a unique structural component up at the peak to ensure the roof doesn’t collapse. Copyright 2025 Tim Carter ALL RIGHTS RESERVED

Roof Framing Primer - The Bones Under Your Roof's Shingles

My guess is you give very little thought to the roof over your head, other than worrying about if it will develop a leak. It’s safe to say you don’t lose a minute’s sleep thinking your roof will collapse. You can thank great carpenters, structural engineers, architects, and to a large extent the modern building code, for the peaceful slumber you experience!

The bones of your roof can be many different materials. Most modern homes today employ roof trusses made in a factory. These are engineering marvels as almost all of them are made using just regular 2x4 dimensional lumber. Carpenters three generations ago would have probably said that was impossible to do as they were used to common-framed roofs using 2x6s, 2x8s, and even much larger pieces of wood.

I was fortunate in my early building career to do lots of remodeling and room additions. I found myself working on housing stock in Cincinnati, Ohio, that was built in the early 1900s. I spent many a day in the dark attics looking at how the carpenters of old framed roofs. I was lucky enough to even see some carpenters' signatures on the roof’s ridge board! I still sign and date much of the work I do.

The average roof structure is just a triangle. You’d be stunned how strong one is when you connect the three pieces of wood together correctly. The sloped sides of the triangle that create your roof need to support a vast amount of weight. The weight might be heavy slate or tile roofing, three layers of asphalt shingles, or all of that and 18 inches of snow and ice.

Gravity is tugging at the sloped part of your roof. It is constantly pulling the sloped parts down. Without the all-important horizontal base of the triangle that creates your attic floor or ceiling below, the center of the roof would sag down like an old swayback horse. The outside walls that the ends of the roof rafters sit on would tilt out. In short order, the entire roof would collapse. The horizontal base of the triangle prevents this collapse.

This horizontal part of the triangle doesn’t always have to be at the bottom of the triangle. We call it a rafter tie when it is at the bottom. This is because the horizontal timber ties together the two rafters into one structural element.

You can slide that horizontal member up the rafters to the middle or even higher. Once they get up near the peak of the roof, that horizontal member is called a collar tie. I think you can see how it got that name as people wear ties high up on their shirt collars.

Years ago, I needed more complex jobs to keep my interest up in building. An architect I did lots of work for sent me plans for a very complex room addition. It was so large, it was actually building a house onto a house. It had the most interesting roof I had ever thought of building.

The original house was built in the 1920s. It had a very steep roof with a 17:12 pitch. This means it rises up 17 inches for every 12 inches of horizontal run. Many traditional church roofs are this pitch.

The homeowner wanted vaulted ceilings in several of the spaces. This meant the horizontal member that prevents the roof from spreading out had to be up very high. The structural engineer designed gusset plates made out of 3/4-inch plywood that had to be nailed to each side of the set of rafters that met at a point up on the roof. There was no ridge board.

Not being an engineer, I never thought it would work. It was critical the gusset plates were nailed a specific way. I followed the structural plan, and the roof was extremely strong. It’s still standing to this day.

There was also another specific structural aspect to this job. In another part of the room addition, there were large 2x12 rafter ties that created a traditional triangle. However, the engineer insisted that the rafter ties be connected to the ends of the rafters using 1-inch through bolts not nails.

I knew from experience the holes had to be 1-inch in diameter. You can’t have any slop, and the bolts had to be hammered through the holes. The engineer showed up one day for an unannounced inspection to ensure I had drilled the holes the correct way.

I get frequent emails from homeowners who want to cut into their roof trusses. I always tell them, “No, don’t do it.” In rare instances, you can modify a pre-engineered truss, but you must have a structural engineer create a drawing. Be sure you follow all instructions with respect to how the wood pieces are connected to one another.

Common roof framing is a true skill, and each day there are fewer carpenters who have mastered it. I love building common-framed roofs using a framing square and large traditional dimensional lumber.

The math is quite simple. My favorite roofs to frame are hip roofs, and those with valleys. It’s a great feeling to do the compound cut for a jack rafter and see it fit so tight that you can’t slide a piece of paper between it and the hip or valley rafters!

Column 1621

Ask the Builder June 29, 2025 Newsletter

Dear Tim,

Are you a new subscriber?
I offer you my protection against all forms of household harm with each issue of this newsletter.
The following quotes are meant to inspire you. One or two may help pry open your mind to things you might be ignoring:
Ask the Builder Axioms
"Truth is like poetry - and most people hate poetry." 
(Uttered by Ryan Gosling's character in The Big Short movie.)
"A tiger hunts best when hungry." 
(Dr. Daniel A. Whalen - When he declined my request for a much-needed loan.)
"What gets us into trouble is not what we don't know. It's what we know for sure that just ain't so.." (Mark Twain)

"You look for treasure in the wrong place, Mr. Lovett. Only life is priceless... and making each day count."

(Old Rose - Titanic 1999 Movie CLICK HERE to watch)


"...Best start putting first things first. 'Cause when the hourglass runs out of sand, you can't flip it over and start again. Take every breath God gives you for what it's worth." (Kenny Chesney - Don't Blink CLICK HERE to listen)


"Is...is there a Heaven? 'Oh yeah...it's the place dreams come true.'...maybe this is Heaven." (Ray and John Kinsella conversation - Field of Dreams CLICK HERE to watch)


animated gif stick man digging


The Past Three Weeks


Three weeks ago Kathy and I received a frantic phone call from my youngest daughter. She was 3,000 miles away in southern California.


A week later, she and her 8-month-old baby were safe in our New Hampshire home. In that span of time, I had flown to CA, arranged for long-distance movers to get her stuff back to NH, and also arranged to have her car transported.


However, two days before flying back to NH, she discovered she didn't have all the required paperwork to get her cat onto the airplane. The logistics of shipping Yeti back were far too difficult to pull off in the tiny amount of time we had left.


I became Yeti's unpaid chauffeur driving both of us back to New Hampshire. Luckily, the transport company had not yet shown up, so I was able to cancel the contract.


I decided that I wanted to get back as fast as possible. I was charged with driving an average of 600 miles each day to get back to NH. I'd always wanted to drive coast-to-coast solo, but not in such a short span of time.


I was so tired from all that happened the previous six days, I only made it to Flagstaff, AZ the first day. I was hoping for Albuquerque, NM, but that would have been another five blistering hours of driving.


Only one sightseeing stop could be fit into my tight schedule. It's been on my bucket list for over 50 years. The treat only cost me 20 minutes. Yeti and I were headed east out of Flag at 7 AM sharp the second day. The corner I was headed to was just 50 minutes east of Flagstaff just off I-40.


A stranger, at 7:58 AM, was kind enough to capture this image of me at the iconic corner. Winslow, AZ is a very small hamlet in the middle of nowhere on historic Route 66. Believe it or not, a girl in a flatbed Ford slowed down to take a look at me!


tim carter in winslow az


I made it to Amarillo, TX late in the afternoon of the second day. I passed thousands of wretched windmills. I should have traveled 1,200 miles by then, but had only put 1,088 miles on the steel belts. I wasn't that far off my goal. It's pretty much a wasteland east of Amarillo, thus it made sense to stop there.


The third day I ended up in Springfield, MO. I was over halfway with 1,628 miles traveled in just over 60 hours.  The great Mississippi River and the amazing Gateway Arch was still three hours away!


Yeti and I hit the hay at 6 PM on that Thursday night. I woke up at 2:30 AM. Yeti and I had a committee meeting. I said, "Listen, we're getting the heck out of here. You and I will be in Erie, PA tonight ready to receive our Road Warrior merit badge at a dinner ceremony. Don't try to hold me back." Yeti didn't put up a fight.


It was pitch black and raining when we took off at 3 AM. Fourteen hours later with 878 miles added to the digital odometer, we were in Erie. I felt as if I had been put through an old washing machine roller press.


old washing machine rollers


I've done the drive from Erie, PA to my New Hampshire house no less than thirty-five times in the past seventeen years. I knew I had one last grueling ten-hour drive facing me the next morning.


Yeti and I pulled down my driveway about 4:30 PM after five days on the road.


I then proceeded to work seven days a week for two weeks solid helping my daughter and lovely granddaughter settle in.


That's why I've been absent from your inbox.


Decluttering - My 2025 Mantra


I've been putting off decluttering my house. It's an easy thing to do.


Moving my daughter and granddaughter back jump started the decluttering process.


If you've not done it, you should. It's LIBERATING.


I believe I'll be getting a certificate from my town dump in July. It will say I'm the resident that used the dump and Free Room the most in the past thirty days. Heck, I might end up in the running for an annual award this year.


Some things are too valuable to give away. Those things I'm selling on Facebook (FB) Marketplace.


Six years ago, I had great success selling things in the FacistBook Marketplace. I went dark and signed off of FB the second or third week of January, 2021.


I logged on days ago to start listing things for sale. My computer screen looked like a spinning Las Vegas slot machine. Countless past notifications were showing up on my monitor.


One of them contained some very sad news. The oldest daughter of my first girlfriend had reached out six months ago letting me know her mom was sent back to Heaven.


I met my first girlfriend in summer school after our freshman year of high school. She needed a deeper understanding of Algebra and I longed for a richer Latin I experience. I was attracted to this quiet and shy brunette with long hair.


Each morning after classes ended, we started chit chatting at the bus stop as we waited for the orange and yellow route 31 bus. This is exactly what the bus looked like, although it was a diesel and not electric as you see in this photo.


cincinnati #21 bus


This young lass got off this bus just a mile down the road at Peebles Corner. She transferred to the #4 bus that would take her to the top of her street. I'd ride the #31 another three miles and transfer to a bus that would take me north on Clifton Avenue.


After several weeks, we discovered we were born on the same day less than a mile from one another. I popped out at Deaconess hospital 90 minutes before she got slapped on the bum at Good Sam. Those two hospitals are less than a mile from one another on Clifton Avenue.


I could go on and on, but suffice it to say we stayed in touch all these years exchanging birthday and Christmas cards. Our common birthday was the super glue that maintained our wonderful friendship.


I sent her a Christmas card last December, but didn't get one back. I feared the worst. She passed away on November 5, 2024. RIP Mary Gene!


I thought of calling Mary Gene last summer to see how she was. I had a feeling based on the birthday card she sent that all wasn't well.


But I didn't call. I thought I'd wait for another day...


While it's not a perfect quote for the situation, it's pretty close. Look at this and see how it relates to your life and your loved ones:


"It was like coming this close to your dreams ... and then watch them brush past you like a stranger in the crowd. At the time, you don't think much of it. You know, we just don't recognize the most significant moments of our lives while they're happening. Back then I thought, 'Well, there'll be other days.' I didn't realize that that was the only day."


Moonlight Graham from the Field of Dreams movie


A Hard Reset


Those two major events over the past three weeks have caused me to do a hard reset. Add to that, I lost another great friend my age this past March.


I'm talking a HARD RESET.


It's now time to put first things first as Kenny Chesney said in his hit song, Don't Blink.


How about you? Are you putting first things first?


If not, you might want to reconsider.


One last comment: If you need my personalized one-on-one services to get you out of a building or remodeling bind, I recommend you set up a consult VERY SOON.


There's NO GUARANTEE moving forward that you'll be able to add a phone consult or ??? to the shopping cart.


If you've put off ordering my digital library, now is the time to pull the trigger.


You NEED TO UNDERSTAND that once I decide to stop publishing this newsletter or suspend Ask the Builder activities, you'll NEVER BE ABLE TO PURCHASE MY DIGITAL LIBRARY in the future. It will VAPORIZE in the ether. Give it a SERIOUS LOOK now. It's priced so you save over $1,200.00. That's NOT A TYPO.


I intend to keep going. I'll continue to publish this Ask the Builder newsletter and write my column, but it's now a MUCH LOWER priority.


If I lose much more interest, it's hard to say what might happen.


Ask the Builder COMPLAINT Hotline


If you have any complaints about anything you see in this newsletter, feel free to call me. Jenny, my new assistant, will take down your information if I'm busy working inside my submarine. Call 603-867-5309.