DEAR TIM: Something tells me we are not going to see lower heating and cooling costs for some time. I want to lower both my winter heating bills and summer cooling bills. I have access to my attic space. Does it make sense to install some reflective foil insulation in the attic? Does one product or method work better than another? Leigh O., Tawas City, MI
DEAR LEIGH: I agree with you 100 percent about the energy bills we all must pay. I can't see significant reductions on the horizon because the demand for natural gas, heating oil, propane, electricity, etc. is on the increase on a global scale. In my opinion, we all need to take this very seriously and do our best to conserve lots of energy. One way to do that is to lower the need for energy and reflective foil insulations do a superb job of minimizing both heat loss in the winter and heat gain in the summer.
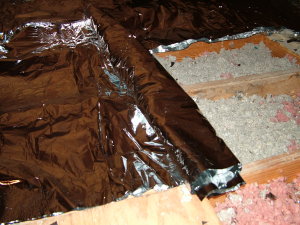
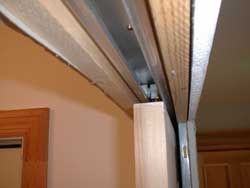
This reflective foil insulation is really a radiant barrier. It reflects a very high percentage of heat back to its source. PHOTO CREDIT: Tim Carter
Reflective foils are available in many forms and most products used in the residential and commercial marketplace are thin sheets of plastic film coated with reflective aluminum. This technology is not new by any means. If you have cooked food in advance for a meal, you probably kept the food warm by covering it with aluminum foil. As we all know, it does a superb job of bouncing the invisible infrared energy light waves back into the food.
Besides your kitchen, the reflective foils operate in high-tech environments as well. For example ultra-high performance reflective foils keep astronauts alive and well inside both spacecraft and the spacesuits they wear as they float outside in outer space to repair satellites and build the huge international space station. But the reflective foils they use often employ thin films of pure gold which works far better than silver or highly polished aluminum.
The reflective foil products will work great in the winter months, but they perform best in the summer. As the temperature of an object goes up, the amount of radiant energy it gives off increases at a far greater rate. Remember that heat is always trying to move to a place that is cooler. For example, a roof surface that is 150F in the summer transfers much more real heat to the inside of your air conditioned house than the frigid attic gains during the winter when the house is heated to 75F.
Many studies have been conducted by universities and independent government testing labs on the best way to install the reflective foil insulation products. The research appears to indicate that you want the foils as close to the heat source as possible. This means in the summer months the reflective foils work very well when stapled to the slanted underside of the roof trusses or roof rafters.
It is recommended that a gap be left at both the bottom and top of the trusses so air can circulate easily on both sides of the reflective foil. These gaps allow any water vapor that seeps into the cold attic an easy escape route to the exterior of the home through roof ridge vents or via wind-powered turbine vents.
You can also roll out the reflective foil directly on top of attic insulation and get a benefit in the winter and summer. If you do this, be sure the reflective foil insulation is perforated so that water vapor can escape and move towards the exterior of your home.
To watch the entire video, please Click Here .
Keep in mind that it is very important to purchase a laminated reflective foil insulation product. This means the foil is comprised of one, two or even three layers of highly-reflective foil. These layers are often separated by thin layers of plastic mesh that creates a tiny air space between the layers of reflective foil. The multi-layered products are immune from any performance loss due to dust buildup. Dust will decrease the performance of single thickness reflective foils.
Be very careful about exposing these reflective foil products to direct sunlight. They are such good reflectors of radiant energy they can melt plastics or possibly start fires. If the foil is stretched tight, it is not a problem. But if the foil droops and forms a shallow bowl, the sun's rays are concentrated just as radio waves are concentrated by satellite dishes many people use for television reception.
This is normally not a problem as most attic spaces rarely receive any direct sunlight. But my house is one of those rare places where sunlight can and does illuminate an attic. I have a small attic window that faces south and the winter sun streams into my attic in the middle of a sunny day.
If you install a reflective foil insulation product on top of insulation, check it on cold days to see if there is any condensation on the underside of the foil. If there is a buildup of liquid water or frost, you need to increase the number and size of the perforations in the reflective foil insulation.
Column 601