DEAR TIM: I am currently building a house and was looking to install an asphalt driveway. Several of my neighbors have done the same and I noticed that they all have installed a 10-foot long concrete apron between the street curb and the remainder of the asphalt driveway that extends back to the house. My asphalt contractor doesn't know why they would have done that. I also checked the covenants just in case I had missed that as a requirement, but found nothing. Do you know of any reason why it is preferred or necessary to have a concrete apron with an asphalt driveway? Christian P., Columbus, GA
DEAR CHRISTIAN: You are one smart cookie to have thought to check your subdivision covenants before you start this job. I know of several people and builders who unknowingly have violated private covenants as well as local government regulations with respect to paving that resides in the public right-of-way.

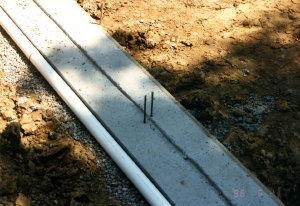
This thick concrete driveway apron may withstand more abuse from heavy trucks than a traditional residential blacktop or asphalt pavement. PHOTO CREDIT: Tim Carter
Often people think their private property extends to the edge of the pavement when in fact it may end 15 or more feet before the edge of the roadway. This buffer zone between the end of a building lot and the actual roadway is called the right-of-way. It is often owned by the local, state or federal government or it is protected with legal easements so that utilities can be extended to reach all property owners along the roadway.
The answer to your question is really pretty simple. If there are no specific paving restrictions with respect to the type of material that must be used, you can use either concrete or asphalt. Both will perform very well as driveway aprons so long as they are installed correctly.
The reason your neighbors have concrete is likely the builder felt it would take more abuse from cars and trucks that might drive onto the apron. Vehicles often turn into private driveways so they can turn around to head the other direction. This is a very common driving practice for people who find themselves going the wrong direction on a road or people who passed up a house and need to go back to it.
The hot summer weather in your region can wreak havoc on fresh asphalt from heavy trucks that might drive on your apron. If you pay attention to the asphalt pavement in front of some bus stops in cities, you will see where the weight of the heavy buses actually pushes and stretches the asphalt as the buses break at the stop. This deformation of the pavement will not happen if you use concrete for the apron.
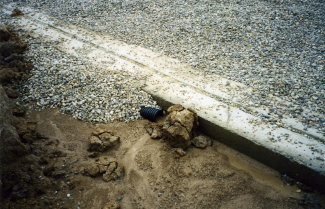
If you do decide to use asphalt, I highly recommend that the crushed gravel base beneath the apron be at least ten to twelve-inches thick. This gravel should be installed four inches at a time and compacted. Extend the gravel base one foot extra on each side of the location of the actual finished blacktop apron. This solid gravel base will prevent chunks of asphalt from breaking off the edges of the drive should a vehicle tire get close to the driveway edge.
If you decide to pour concrete, I would pour the apron a minimum of seven-inches thick. In my opinion, the concrete mix should be ordered at a design strength of 4,500 pounds per square inch which is slightly stronger than the industry minimum strength standard. It would be very wise to include a grid of half-inch diameter reinforcing steel in the concrete apron. This grid is comprised of two layers of steel rods that are oriented at 90 degrees to one another. The rods in each layer should be two feet on center. The steel should be suspended during the pouring process so that a minimum of 2.5 inches of concrete is between the first layer of steel and the compacted soil.
Be sure no water is added to the concrete once it arrives at the jobsite and do not allow water to be sprinkled on the concrete as it is being finished. This added water dilutes the amount of cement paste and weakens the concrete. In cold climates, this weakened upper layer can and does flake off when exposed to repeated periods of cold and warm weather.
Be sure the soil under the apron is well compacted. Concrete or asphalt are destined to fail if they are placed over low-strength soil or soil that has not been compacted. It is also important for the soil to be well drained. Water that saturates soil will cause it to loose strength.
If you decide to use asphalt for the apron, do not seal the asphalt for at least one year. New asphalt is very tender because it still contains lightweight oils that take months to evaporate from the asphalt. Once the oils leave the asphalt, it starts to get very hard. Sealers applied over fresh asphalt can trap the oils and prevent their escape. If this happens, the asphalt will remain soft for a very long time.
Column 602