Skylights – Flared vs. Straight Shafts

Skylights - Flared Shafts

Skylights can make a dim space bright. Flared shafts add even more light by spreading the light beams to other parts of the room.

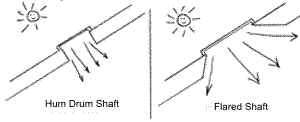
I goofed up many of the first skylight shafts I built. I simply extended the shaft down square from the roof-slope. You can get lots more light if you just expand the opening. It is easy to do and requires very little extra work. Look at the diagrams to see the humdrum shaft vs. the flared shaft. You can see why flared is supreme.

Notice the extra light gained by simply flaring a skylight shaft.

Notice the extra light gained by simply flaring a skylight shaft.

There are several easy ways to flare a shaft. You do not have to be an expert carpenter to achieve superb results. Commonly just the top and bottom are flared. This is often your only option if the skylight shaft is created within trusses. Remember you can't cut and rebuild a truss unless you do so under the direction of a registered engineer.

The more complex shaft is one that is flared on all four sides. This does take quite a bit of skill as you are basically building a complex hip roof structure beneath the skylight. In fact, if you flare it too much the sides actually get twisted into a slight helix. Be careful about trying to get too fancy! Most people are very satisfied with just the top and bottom flare.

Column B348

Dust Control in Homes

DEAR TIM: My seven-year old home is very dusty. After placing small filters on the bottom of each heating vent diffuser in all of the rooms of my house, I wonder if I made a mistake. Will these hurt the performance of my furnace and air conditioner? I have a standard vacuum cleaner and use it every day, but I still have dust problems. What is causing the dust? What can I do to minimize dust? Patti C., Lancaster PA

DEAR PATTI: Oh how I wish my editors would give me more room for this answer! Dust control is a very complicated subject and there are numerous ways to capture and control the pesky particles that are the source of your frustration.

Let's first talk about dust cleanup. Based upon my own testing and years of trying different vacuum cleaners, I have come to the solid conclusion that central vacuums are the best tool to use to vacuum dust. These machines take the dust and dirt and place it in a cannister or a bag that is often in a garage or basement. Any dust that makes it past the bag or cannister is ejected outdoors.

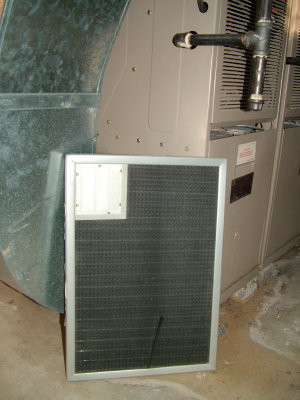
This electrostatic air filter does a superb job of capturing a high percentage of dust in the average home. PHOTO CREDIT: Tim Carter

This electrostatic air filter does a superb job of capturing a high percentage of dust in the average home. PHOTO CREDIT: Tim Carter

Traditional vacuum cleaners like the one you use, exhaust the air inside the room while you are cleaning. Even if you have a great dirt and dust filter bag as part of the vacuum cleaner, some dust may sneak past other parts in the machine and get blasted back into the air. On a sunny day you can often see this dust storm as you vacuum in a room that has sun beams streaming through windows.

Dust on flat and vertical surfaces needs to be wiped off with a damp rag with water or a dust collection liquid. If you use a traditional duster tool, you just broadcast the dust into the air and it will settle back down on the surfaces hours later.

The filters you placed in your heating and cooling vents may hurt the performance of your heating and cooling equipment. The powerful fans that move air through furnaces and air conditioners are designed to do so with minimal resistance to air flow. The filters you installed no doubt are offering some resistance to air flow. Just before you installed them, your system might already have been at the upper allowable threshold for airflow resistance.

The reason adequate air movement within the furnace and air conditioner is so important is simple: In the winter when heating your home, the air must move past the heat exchanger at a given speed to pull off heat; in the summer when cooling your home, the air must be able to readily flow over the air-conditioning coil, where its heat is deposited. If the speed starts to decrease and your system is not designed to sense this change, then efficiency and performance can drop.

I would consult with a seasoned heating and cooling professional about the filters you installed. This craftsman will have special tools and meters that tell him if the static pressure within your system is too high. Static pressure is a measurement of airflow resistance.

If the heating professional tells you to remove the filters from the vents, I recommend that you consider installing a washable electrostatic air filter in the filter rack within your furnace or air conditioner. These wonderful filters attract many dust particles and make them stick to the filter. Every 30 days you take the filter outdoors or into a large sink and rinse it with a high-pressure stream of water. When I do this with my electrostatic filter, the water streaming from the filter is always black and brown.

Many people wonder where dust comes from. The sources can be numerous. If you handle lots of paper in your home, paper fibers naturally become airborne as you read books, newspapers and some magazines. Dust from countless outdoor sources will naturally be sucked into any open windows.

Some inexpensive carpets create dust as fibers from the carpet, carpet backing and even some carpet padding become airborne from simple foot traffic across the carpet. Fibers and dust are released from upholstered furniture, clothes, hobby and craft activities and food preparation.

If you want to try to pinpoint the actual source of dust, take a sample from a surface with a piece of regular cellophane tape. Use a 10x or 20x hand magnifier and look at the actual dust particles. You will be shocked at how different each of the dust particles appears. Dust from newspaper or blank paper is vastly different from flour dust or wood sanding dust. Drywall dust looks completely different from carpet fiber dust. Once you determine what the dust source is, try to stop or minimize the activity that actually creates that dust.

Column 597

A Load Bearing Wall Can Be Deceptive

An Innocent Looking Wall

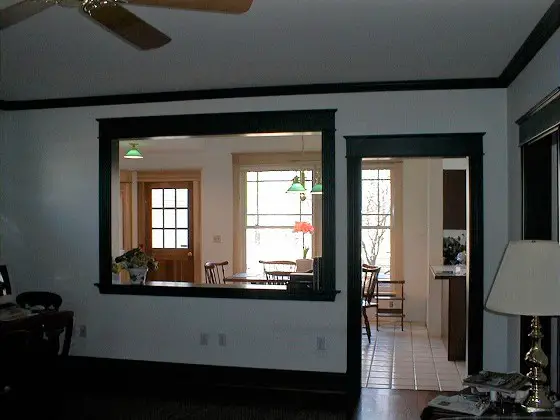
Here is an interior wall of my own home. Sorry about all of the clutter. As I took the photo, I was standing in the family room looking at the breakfast table and the adjacent window on the outside wall.

The average person would think the interior wall with the large opening and doorway is a standard interior non-load bearing wall. The truth is, that this wall has an enormous load upon it. Directly above the wall is a wall that supports part of the roof of my home. In addition, there is a major beam hidden in the ceiling that runs just above and a little behind the crown molding that you see in the upper left corner of the photograph. This beam carries one entire side of the roof, and one third of the second and third floor loads! The beam rests on a column within the wall about one foot to the left of the large pass-through opening. Above the large pass through and the doorway are triple 2 x 12 beams.

This load bearing wall has a large opening and a doorway. © Tim Carter

The point is, that there are large concentrated loads at the edges of these two openings. Beneath the floor, I placed blocking that transmits these loads directly to a 12 inch deep 12x31 I beam, that I work directly underneath each and every day.

Column B397

Load Bearing Wall Photos

Typical Load Bearing Wall Photos

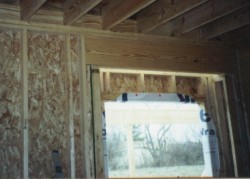
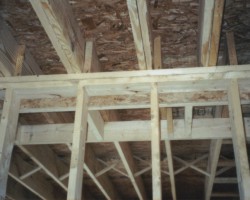
These two photos are typical examples of what you have in your own home. The top photo is an exterior wall with a window opening.

The carpenters did a superb job as the second floor joists are stacked directly on top of the exterior wall studs. Note the double top plate on the wall.

The floor joist load and any roof load above the window are transmitted to the jack studs on either side of the window. The jack stud is the single stud you see just below each end of the beam. The king stud - or full height stud - next to the end of the beam does not really carry much of the weight even though the jack stud is nailed to it and nails pass through the king stud into the end grain of the beam.

The second photo is the top of a typical interior bearing wall. Note the double top plate. Once again, the floor joists are stacked directly above the wall studs. But, there is a double joist that falls between the wall studs. This is why you have a double plate!

Column B397

Affordable Cultured Stone® – The Real Stone Alternative

There is nothing quite like the look of natural stone. It projects a sense of stability and permanence. I feel part of this stems from the fact that many very old buildings around the world were constructed using different stones and rocks. As we know, some of these buildings (Great Pyramids of Egypt) and public works (Great Wall of China) are thousands of years old. The stones or rocks used are often in good shape, only the mortar that was sometimes used needs periodic repair.

Natural Stone

Natural stone used in residential construction can be very expensive to install. The cost to quarry the rock, package it and ship it to the construction site all contribute to the cost. Because many natural stones are heavy, the shipping costs can actually cost more than the stone itself. Once on the job site, the stone must often be extensively trimmed to fit aesthetically into a wall. This adds to the labor cost. Using natural stone also requires a foundation beneath the stone to support the weight. Steel lintels or archway forms need to be used to span over openings. The entire process is labor intensive. As you might imagine, this also adds to the cost of installing the stone. Current costs, here in the Midwest, for labor and material to install natural stone range from $20 to $25 per square foot.

The Alternative Product

About 30 years ago, someone figured out that you could get around the problem of heavy natural stone by using high quality, light weight concrete. This is how Cultured Stone® was created.

The first attempts at producing this product created durable materials, however, they were not very realistic. Necessity, being the mother of invention, spawned experimentation with different forms and colorization processes. In short order, realistic artificial stones were being mass produced.

The idea caught on, as evidenced by the numerous regional manufacturers that still persist to this day. There are many artificial stone manufacturers, however only a few produce large quantities and distribute throughout the United States and Canada.

Column B358

Cultured Stone® Tips

Cultured Stone® Tips

Making the Stone

As mentioned in another article, Cultured Stone® is nothing more than concrete. But for those who have seen this product up close and actually touched it, you know that it does not look or feel like concrete.

Some manufactured stone products cannot be distinguished from the real thing. The colors and textures of these artificial stone products are basically unbelievable.

These realistic results are achieved, in most instances, by using highly detailed rubber molds and special pigments to color the concrete mix. Some manufacturers apply additional pigments directly to the rubber molds for purposes of adding tones to the surface of the finished product. These additional pigments soak into the surface of the concrete so that they can't be easily washed off by the elements.

The key to the entire process is using small, light weight aggregates in the concrete mix. This keeps the weight of the artificial stone to a minimum. It is for this reason that no foundation is required to support these materials. They simply are glued onto the side of your structure, whether it be wood frame, masonry or a steel structure.

Long term durability should not be a concern of yours. This is due to the fact that these products are manufactured under controlled conditions. This allows the concrete mix to achieve maximum strength characteristics. Because the surface of the artificial stones is so realistic, water is not easily absorbed by many of these products.

Discoloration

Some people wonder about the long term effects of weathering on these products. That is a valid concern, as this material could easily have a service life on a building between 50 and 100 years. Just about every artificial stone product has solid color attributes. This means that the concrete mix is colored from the beginning. Secondary coloration achieved by applying pigments to the rubber molds should be the only area of concern. As long as the manufacturer uses high quality, non water soluble pigments, it should never be a problem.

Most manufacturers caution against the use of deicing salts near these products. The salts can hurt the artificial stone and cause surface disintegration.

Manufacturers also caution against the use of harsh chemicals, cleaning solvents or paint thinners. Some of these products can stain the stone products and cause discoloration. Simply use common sense.

The artificial stone products can be cleaned if they become dirty. You simply use a mild detergent and a stiff bristle brush. Never use a wire brush, as this may harm the surface.

"Long term durability should not be a concern of yours. This is due to the fact that these products are manufactured under controlled conditions."

It is also a good idea to avoid using these artificial stone products in swimming pools. The chlorine and other pool chemicals can discolor these rocks.

Column B358

Winterize Your Home

Hello to all National Public Radio listeners. This page is dedicated to you and is a summary of much of what was discussed today on the All Things Considered show. I had the distinct pleasure to conduct the interview in the WMUB studios on Friday, November 25, 2005. John Hingsbergen the WMUB program director produced the Oxford, OH, half of the interview between 12:30 and 1:00 p.m. I was connected to the Washington DC NPR studios via a high-quality ISDN phone line that delivers broadcast sound quality. The interview was conducted by the All Things Considered co-host Ms. Michele Norris and she did a splendid job.

Real Ways to Save on Your Energy Bills

If you want to save lots of money on heating bills during the winter months, you simply need to use less fuel. It is that simple. But the real answer can be far more complex, especially if you decide to spend money in an effort to save money.

But let's talk about saving money now without spending money. You can do that immediately by going over to your thermostat and turning it down. Turn it down as far as you can tolerate. If you normally have it set at 72 F and you turn it down to 65 F or even 63 F, you will save significant money.

Wear long underwear, sweaters and/or fleeces, and thick socks to offset the cool temperatures inside your home. If necessary, wear a hat or hooded sweatshirt indoors. You may look odd, but you will be warm and saving lots of money.

Here I am moments after the interview ended with Ms. Michele Norris. PHOTO BY: John Hingsbergen

Sleep with flannel pajamas and an extra blanket or two. Imagine going back in time 200 years and sleeping in log cabins that had no real insulation or central heating. If our forefathers and mothers could survive below-freezing temperatures, surely you can survive 63 F in your home day and night

Consider operating a humidifier if you have one connected to your furnace. Humidity in the air will make cool air feel warmer. But be careful. Injecting too much humidity in the air can cause hidden problems such as condensation in wall cavities and attics. If you see a slight fog on windows or drops of water forming, then the humidity is too high for the current outdoor temperature. Read my past columns about Condensation and Indoor Humidity to understand the dynamics of water vapor and fluctuating temperatures.

Use towels and other rags to stop drafts under leaky doors. Do whatever you can with what you have to block the movement of cold air into your home.

Spending Money to Save Money

I predict all sorts of scams in the very near future where people will spend thousands of dollars on all sorts of things that claim to save them huge money on heating bills. NEVER forget this: You do not save one penny until such time as you have at least recaptured all of the money you spent, plus any interest that money could have made while you were trying to recapture it.

What does this mean in plain English? Let's say you decide to install new top-quality replacement windows for your home. An average home might have 12 windows and the current average price for a job like this might be $500 - 600 per window. Let's round off the job cost to $7,000.00.

For a real-world example, we will use my employee Ellen. She lives in an average-sized home and it has a new high-efficiency boiler. She recently had Cinergy - our local utility company - give her a revised quote for even billing for the entire year. Ellen needs to spend $314 per month for each of the months in 2006 for both natural gas and electricity to operate all lighting, furnace, air conditioning, stoves, water heaters etc. Her total estimated cost for all of 2006 is $3,768.00.

The breakdown of natural gas cost to electricity cost for Ellen's house based upon her past bills is roughly 55% natural gas and 45% electricity. So this means that Ellen might spend $2,072 in 2006 for natural gas. But wait. This is for all natural gas for heating, cooking, hot water and the clothes dryer. Without getting technical, let's assume heating consumes 65% of the total natural gas usage for the entire year. This means Ellen and her family might spend $1,347 to heat their house in 2006.

If the new replacement windows save 30% on total heating costs, this means in 2006 they will save $404.00. Without adding in interest, it will take Ellen and her family 17.3 years to just break even on the cost of the replacement windows. See what I mean? You don't save money until you break even. It will be possibly 20 years from now that Ellen will save money if all costs stay the same over the next 20 years. If the cost of natural gas does continue to rise, Ellen will break even sooner than 17 years from now.

Real Money Savers

One inexpensive device that will save you real money quickly is a programmable thermostat. Read my past column all about these intelligent devices that work for you while you are gone from home and asleep.

Caulking air leaks is vitally important. If you have painted woodwork and walls, caulk all cracks around each edge of the woodwork trim that surrounds windows and door. Look for very tiny cracks where you see the woodwork touch the walls and where the other edge rests against the jambs of the windows and doors.

Weatherstripping around windows and doors is vitally important. There are new removable caulks you can use to caulk shut windows for the winter. In the spring, you can actually peel these caulks off and do no harm to the window. Doors need traditional weatherstripping kits as you need to open and close doors throughout the season.

Radiant barriers in attics are superb and there is a brand new one that promises to work very well. This new radiant barrier can be found at the Savenrg website. The layers of the radiant film are separated by a fine nylon mesh that enhances the performance of the barrier. You simply roll this product out over your existing attic insulation and it instantly blocks the movement of heat from your home to the cold attic. These products work just like aluminum foil over hot food dishes. The best part is that the radiant barrier will also save you money in the summer as it reflects hot attic heat back outdoors.

High-Efficiency Furnaces

When it is time to install a new furnace or boiler, absolutely buy one that offers the highest efficiency. These are fantastic products and they are good for the environment. But do not rush out to replace a perfectly good furnace or boiler right now that still has 40 percent or more of its useful life remaining. Always do the math, as we did above in the replacement window example, to ensure your payback time is minimal.

Future News and Tips

If you want to receive a constant stream of energy saving tips and other home improvement news, consider signing up for my free newsletter. Just go back up to the top of this page and look in the upper left for the word Newsletter and click on it. I respect everyone's privacy. I never sell anyone's name or email address. Your information is never revealed to anyone.
How Does Insulation Work

DEAR TIM: How does insulation work? I see all different types: fiberglass, cellulose, foam and rock wool. Is one better than the other? Louis K., St. Louis, MO

DEAR LOUIS: Insulation works by slowing the movement of heat from a hot space to one that is cooler. Heat moves in three ways: radiation, conduction and convection.

Radiation is heat transfer through electromagnetic light waves that we can't see. You feel radiant heat from a burning fire or from sunlight streaming into a window that strikes your body. In the winter, warm objects in your home can radiate heat directly through glass to the outdoors unless you have special Low-E glass that blocks this infrared energy.

Conduction heat transfer happens when heat moves through an object. The heat excites the molecules in a heated object and these molecules excite the ones next to them. The closer packed the molecules are in an object, the more rapid the heat transfer. A great example of conduction is a cool spoon that is placed in a hot bowl of soup. Within a few minutes the end of the spoon not immersed in the soup will be warm or hot to the touch.

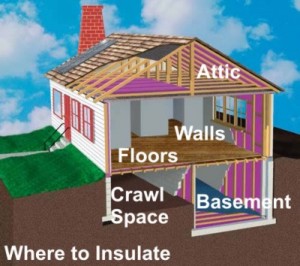
Adding insulation in the area shown above may be the best way to improve your home's energy efficiency. PHOTO CREDIT: U.S. Dept. of Energy from <em>Energy Savers Tips on Saving Energy & Money at Home</em> booklet.

Adding insulation in the area shown above may be the best way to improve your home's energy efficiency. PHOTO CREDIT: U.S. Dept. of Energy from Energy Savers Tips on Saving Energy & Money at Home booklet.

Convection heat transfer happens when a fluid such as air or water gets heated by a hot object that touches the air or water. Forced air furnaces are great examples of convection heat as the air moving over the heat exchanger gets warm and then passes that warmth to objects it touches once it is in the room.

You feel convective drafts in a room in winter as well. If you stand in front of a large pane of glass that is not insulated glass, you can feel a cold draft. That is actually air that has lost or transferred its heat against the glass and the warm air that has not turned cold falls towards the ground.

Insulation stops these different movements of heat transfer. The insulation absorbs the heat and slows its movement. It is important to realize that insulation does not block the movement of heat, it simply slows it down.

This resistance to heat flow or movement is commonly referred to as R-value. The best insulations are the ones that have the highest R-value per inch of thickness. But always compare prices of R-value per square foot. See what it costs per square foot of wall or ceiling space to get an R-value of the same number. Remember, if two insulations have the identical R-value, they perform the same.

Tub Defect in New Home

DEAR TIM: Our son recently had a house built. Everything turned out fine except, after he moved in, he discovered a small C-shaped crack at the drain end of the tub in the extra bathroom. The shape of the crack seems to match the shape of a wrench that possibly was dropped by a workman. The contractor has had the crack repaired by a local company. Should my son insist on replacement of the tub/shower unit? Beverly Matulis, Saginaw, MI

DEAR BEVERLY: This is a common problem and there is never a perfect answer. The issue is always a different shade of gray rather than black or white. When someone buys a new thing, they expect, and rightfully so, perfection or something very close to perfect.

First, imagine if a piece of drywall got damaged and nicked badly. With minimal effort a decent drywall contractor can repair the damage and once painted you will never know the defect happened.

But let's say a new granite countertop is specified for the kitchen and just before moving in a corner is cracked off and then epoxied back on by the builder. The epoxy is stronger than the granite and the piece will be permanently bonded, but it is reasonable to live with the visible crack?

The tub defect is like the cracked granite but there is a separate issue. In the case of the tub, the crack may open up in the future and water may leak under the tub causing all sorts of problems. Your son did not specify to have a used or blemished tub. He contracted to have a new tub in perfect condition. Why should he get anything else?

These problems are perfect examples of where a builder or general contractor should file an insurance claim. Most good builders have policies that cover mistakes similar to this. Is there a deductible cost to the builder? Of course there is. Is it possible his rates will rise if he makes a claim? I am quite certain his rates would rise.

But mistakes happen and the people who make mistakes should own up to them. One option, if your son finds it acceptable, is to renegotiate the price of the home. Since the tub is not in perfect condition, perhaps a price adjustment can be worked out between the builder and your son. Your son has to realize that if he makes this deal, all future claims about leaks and the tub warranty may be ignored by the builder.

If it were me, I would insist on a new tub. Will it be a pain to install? You know it will be. Perhaps the builder or his subcontractors will learn a lesson and someone will be more careful in the future.

To avoid these problems in the future, it is wise to make frequent stops to the jobsite. As the finish work is progressing, a visit to closely check each day's work will uncover these problems while they are still easy to solve. Once a room is completely finished, it is harder to solve some problems.

Column EM0002

Smoke from Chimney

DEAR TIM: After a few minutes of starting a fire in our living room fireplace, we can smell and eventually see some smoke in our downstairs basement. Do you know why this is happening? We have a cap on our chimney, and although our fireplace and gas exhaust do share the chimney they are separate. Rich Peters, Brighton, MI

DEAR RICH: I know exactly what might be happening. There are multiple possibilities. My first inclination is that your living room fireplace does not have a proper separate combustion air intake. When you burn a fire in the fireplace, you can see smoke issue forth from the chimney. The draft from the heat might be producing an air flow of hundreds of cubic feet of air per minute up the chimney.

An equal amount of air must enter the firebox to satisfy this partial vacuum created by the fire. The air will enter your home at the point of least resistance. Since you have another hole in your house immediately next to the fireplace flue - the opening of the gas exhaust from your furnace and/or water heater - the fireplace may pull the needed air back down this handy conduit.

In older homes with traditional masonry fireplaces, it is not easy to retrofit combustion air. If the fireplace is on an exterior wall and the outside of the chimney structure is brick or stone, an experienced mason can install a combustion air intake vent that feeds air directly from the outside into the firebox.

The smoke can also be drawn back down into the basement by any other fuel burning appliance that is operating. Remember, all of these devices need air to burn the gas, propane, wood or oil. If your water heater fires up and needs air while a fire is burning in the fireplace, then smoke might be drawn back down a third adjacent flue that is not being used. This back drafting is very serious as it can draw carbon monoxide into a home.

Column EM0001