DEAR TIM: The house I grew up in had traditional wood lap siding. It seemed to wear like iron and it has a fantastic traditional look and feel. I would like to install some on a new home and wonder if it is still available and what is the best way to install it. Perhaps the biggest question is how do I make sure that paint will never peel or blister on this new wood siding? Phoebe H., Palo Alto, CA
DEAR PHOEBE: You know what they say don't you? Imitation is the highest form of flattery. It seems like all of the non-wood siding products for years have copied the lap wood siding look. Aluminum, fiber cement and vinyl siding have had imitation lap sidings for years. This tells you that not only is the wood siding a timeless material, the lap siding look is perhaps the most popular. My wife and I love the real lap wood siding on our own home.
Lap wood siding is still available but you have to be sure you buy the right one. I prefer wood products that include preservatives injected by Mother Nature. Cedar and redwood are two such sidings. Both of these wood species have a considerable amount of natural preservatives. You may find other soft or hardwood siding materials, but only buy them if you can be sure they have been treated against wood rot.
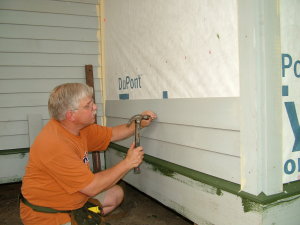
Installing wood siding takes time and is not hard to do. Note the painted ends of the pieces behind my head. Each end is painted before the siding is nailed to the wall. PHOTO BY: Kathy Carter
Be sure to discuss wood grain orientation with the siding salesperson. The best wood siding has vertical grain. Less expensive wood sidings will sport flat grain. You can easily tell a vertical grain wood siding if you look at a freshly cut end. If you see ten, twenty or even 50 of the dark tree rings on the cut edge, the siding is indeed vertical grain. Flat grain wood siding may only have one, two or three dark tree rings visible on the end of a piece of siding. The vertical grain wood siding is more stable and the grain will not raise on the flat surface that you see once it is installed.
Before you even think of nailing up your first piece of siding, there is a critical step you must follow. The wood siding needs to be primed on both sides and all edges before it is installed. Furthermore, each time you cut a piece of siding and are sure it is the correct length, those exposed cut ends must be painted before the siding is nailed to the wall. These critical painting steps help ensure the finish coat of paint will never peel or blister. I feel the best finish paint to use is one that is a blend of acrylic and urethane resins.
If the back and edges of the wood siding are not painted and water soaks into the wood, paint failure is an almost certainty. The water in the wood wants to get back into the atmosphere and it works its way to the front surface of the siding. Once there, warmth, wind and direct sunlight cause the water in the siding to form a vapor which can actually create a real blister in the finish paint. If you paint the back and edges of the siding, water can't get into the wood in the first place.
The sides of the house must also be covered with a water barrier such as traditional asphalt-saturated felt paper or some of the modern synthetic fiber woven water and air barriers. You must use metal flashings and special drip caps moldings above horizontal trim boards, windows, doors and any other dissimilar material other than the siding. The flashings and drip caps help direct water away from the siding and prevent water from getting behind the siding or any trim boards used with the siding.
Be sure the first piece of wood siding or the lowest wood trim board laps over your foundation at least one inch. Water is your worst enemy and you want to ensure that water gets away from the siding and foundation of your home as quickly as possible. Follow all building codes with respect to the height above grade where the siding must start. Not all codes are the same, but I would not have the wood siding any closer to the soil than six inches. The greater the distance between the soil and the first piece of wood the better. If you can adjust your foundation height so there is a ten or twelve-inch space between wood and soil, do so.
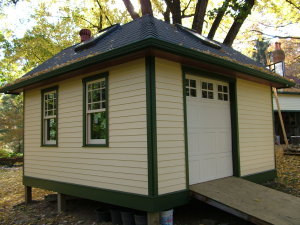
Here is the finished product. Isn't this a handsome garden shed? The wood siding and all trim details match my house perfectly. PHOTO BY: Tim Carter
The nails you use for wood siding are very important. The best nails are specific siding nails which have very blunt points and are made from stainless steel. These nails also have stacked rings on the shank of the nail for extra gripping power. Siding nails often have smaller heads as well so they are not that obvious if you install them flush with the surface of the wood siding. On painted siding, I always countersink the nail and fill the resulting hole with exterior spackling compound.
To make sure the wood siding does not fall off the wall over time, be sure the nails used are long enough. The nail must pass through the siding, then pass through any sheathing such as plywood, foam board or oriented strand board and finally into a wood wall stud. The nail needs to penetrate the wood stud at least one and one-quarter inch. Do the math and you will discover it is best to use a nail that is 2.5 inches long.
Author's Note
I received this email recently:
Tim, We recently bought a fixer upper that we planned on updating with wood siding. However, we've found that underneath the aluminum siding there are block walls. How can we attach the siding to the blocks? Dawn from Williamstown, MA.
-----
Dawn, You need specific instructions to the wood siding you purchase....ask for the instructions at the lumber yard. If they cannot produce them you can try to get them from the mill that cut the siding or from an association.
Here are some lumber associations: International Wood Products Association, North American Wholesale Lumber Association, Southern Forest Products Association, Southern Pine Council, Western Red Cedar Lumber Association, Western Wood Products Association, Wood Component Manufacturers Association.
Column 589