Plywood Manufacturers and Wood Products Associations
The following manufacturers and associations can provide you with helpful literature and information concerning plywood, its characteristics, recommended installation and storage procedures, and care instructions to maximize its useful life. Read as much as you can on each web site!
Many model building codes call for minimum ventilating areas for attic spaces. The requirements in many of these codes are based on net free ventilation area. This means that you must measure the space of the opening without any screening material which slows air flow. This is often overlooked by many builders. Pot vents with insect screening often have the net free ventilating area stamped on them.
1. The minimum net free ventilation area called for in many building codes is 960 square inches for each 1,000 square feet of ceiling area of the house. If you use a continuous ridge system combined with a continuous soffit system, you can reduce the net free area to 480 square inches.
2. NEVER vent exhaust air from clothes dryers, bathroom fans, or kitchen exhaust fans into attic spaces. These devices can exhaust massive quantities of moist, humid air into attic spaces. Kitchen fans can also exhaust grease laden air into attics which can create an extreme fire hazard.
3. Cathedral ceilings require special attention. Each joist space must be separately vented. Interruptions of framing members for skylights must be side vented to adjacent free flowing joist spaces.
4. During construction, be sure to caulk or seal around all pipes and wires that penetrate the top plates of walls. Air can readily leak into attic spaces around these openings.
I have found that it is often best to vent fans and dryers through the roof. I urge you to watch this video of mine to see how easy it is to install the correct vent-cap flashing on a roof. Have no fear - if done right you will have no leaks.
Attic Ventilation - - Its Importance and How to do it
Attic ventilation is probably one of the most neglected areas of home construction and remodeling. All too often not enough thought is given to providing adequate ventilation to these spaces.
Confined Spaces
My guess is that virtually everyone who is reading this Bulletin has entered a closed up car which has been sitting in the sun. The temperature and the air in the car can be stifling. Because the air in the car cannot escape, the energy of the sun heats it up. As the sun continues to 'bake' the car, the air molecules get more and more excited. The temperature begins to rise.
Contrary to this, a car left in the sun with the windows down will not be as uncomfortable. The only difference between the two situations is air movement. The car with the windows down allows air to circulate through the car. This circulation or movement creates a cooling effect simply by allowing the heated air to escape from the car.
Attics and Cars
When you think of it, your attic is really not that much different than a car. If your builder did not provide for adequate air movement, your attic is nothing more than a confined space.
A confined space in an attic can cause serious problems both in the summertime and in the winter. The air which is trapped in the confined attic space almost always contains water vapor. This water vapor can and will damage your home.
Condensation & Steam
If you allow air to circulate, it achieves a balance or equilibrium with the air it is mixing with. The moisture content of the air will be balanced as well as the temperature. These are important considerations in attic spaces.
As air is heated, its ability to hold moisture in the vapor state is increased. In fact, as the air becomes heated, water vapor is actually attracted to it. If this happens inside your attic, the plywood face which is exposed begins to absorb this moisture. It is not unlike being in a large pressure cooker.
As we discussed earlier, this moisture can cause problems with the plywood.
On the contrary, in colder weather the confined air in the attic can also cause problems. The roof framing members and plywood of a roof, when not heated by the sun, usually are the same temperature as the outside air. Air constantly leaks from the inside of our houses into the attic. This air almost always has a higher moisture content than the air inside the attic during winter months. If this air is allowed to collect in the attic space, it possibly will condense on the framing members or the plywood sheathing. This moisture can begin to rot the wood.
The Solution - Air Movement
You can eliminate these problems by allowing air to move rapidly and freely through your attic. Remember the car with the windows down? Attic ventilation technology has advanced rapidly in the past 10 years. New products are available which make attic ventilation simple and easy. They are inexpensive and readily available.
Flow-Thru Technology
The key to effective attic ventilation is air movement. Remember, the trick is to get the air in your attic to mix with the air outside as quickly as possible. This can be achieved with flow-thru technology.
Older homes often have triangular gable vents. Any air which exits the attic from these vents must be replaced. These vents are usually only effective if the wind is blowing directly into the vents. That usually doesn't happen very often.
Virtually, every house has a soffit. This soffit creates an overhang at the edge of a roof. Because of the manner in which roofs are framed, these soffit areas are perfect entry points for air to enter attic spaces.
In new construction, continuous ventilation strips are often installed in these soffits. This provides an ample and excellent source for air to begin its upward flow into the attic area.
To make sure that the air flow is not blocked by attic insulation, baffles should be installed. The space between the roof and the outside walls narrows as the roof passes over the outside bearing walls. Insulation can block these areas if not carefully installed. Baffles prevent this from happening.
The baffles provide an unobstructed channel from the soffit area to the attic.
Continuous Ridge Ventilation
After the soffit has been vented, the air must have a place to leave the attic. This is best achieved by installing a continuous ridge vent along the highest points of the roof. This type of venting can also be installed along roof hips. It is important to install as much of this ridge and hip (where applicable) ventilation as possible. This ventilation material combined with the soffit ventilation strips provides an effective flow-thru ventilation system.
The Vacuum Effect
Wind which flows along an object creates a vacuum effect due to a lowering of air pressure. This vacuum can be beneficial when you use continuous ridge type ventilation.
As wind blows across your roof from any direction, it can create a vacuum effect along the ridge vents. Air is sucked from your attic space as long as it can be readily replaced along the soffits. This is one of the reasons soffit vents must be installed. The vacuum effect happens even in the slightest breeze.
Continuous ridge vents are available in many styles. The original vents were aluminum strips which sat on top of the ridge. These were unsightly and they sometimes leaked.
Newer designs allow these vents to be covered with the standard cap shingles that traditionally appeared at the ridge or along hips. These vent strips are made from either hard plastic or dense coarse plastic interwoven fibers.
When applied properly they provide a sleek look to a roof. All you see is a thin shadow line where the cap shingles are raised above the regular shingles.
Pot Vents & Power Vents
You can also use standard pot vents and power ventilating units to move air from your attic. These items work best when used in conjunction with continuous ridge vents.
Pot vents are simply aluminum covers that cover holes which have been cut in your roof. They come in various sizes and designs.
Power ventilators have electric powered fans attached to a pot vent. Often these are thermostatically controlled to turn on when the attic temperature reaches a certain temperature. They turn off automatically when the attic has cooled to a preset temperature on the thermostat.
Ice dams are weather-caused phenomena that can cause leaks in your home or business. It is virtually impossible to stop them from forming. These 'dams' are just that, they are blockages of ice that can form just about anywhere on your roof. These dams prevent liquid water from flowing off your roof. This water then begins to go backwards up beneath your shingles, tile, slate, shakes, etc.
The net result is a miniature reenactment of Niagara Falls inside your house! However, there are products available that, when properly applied, will minimize or eliminate the leaking caused by ice dams. There are also design features that you can incorporate into your structure to minimize or eliminate the water from entering your living space. Consult this article for more information on these subjects.
Ice Dam Formation
You can better understand how the specialized ice dam products work if you understand how and why ice dams form. Ice dams can develop under the following conditions: #1 Periods of heavy freezing rain; #2 Moderate or heavy snow conditions with an air temperature significantly below freezing.
You must first realize that most roofing products depend upon gravity to keep water from entering your house. A large majority of roofs are not level. Gravity pulls rainwater or snow meltwater down the roof. Most roofing products are separate pieces that overlap. This overlapping effect enables them to shed water. This is true of shingles, slate, tile, cement tiles, etc. You can easily create leaks in these systems if you aim a garden or fire hose underneath these products. This simple system works fine as long as the water keeps moving down the roof. Ice dams, however, cause water to go up the roof.
Ice dams form in the following fashion. If either the sun or loss of heat from your home, causes the snow on your roof to melt, water begins to flow under the snow on its way down the roof. If the air temperature is significantly below freezing, the temperature of the roof deck, gutters, valley flashing and downspouts very possibly will be below freezing. This is especially true of roof decks, gutters, and downspouts that may be shaded. When the meltwater hits these cold surfaces it begins to rapidly freeze. Eventually, the gutters and downspouts are choked with ice. The ice buildup continues at the gutter level and the ice becomes very thick. Meanwhile, the water is still coming down the roof. Depending upon the rate of melting vs. the rate of freezing, you may or may not have a problem. If the water is melting at a faster rate than it can freeze, it begins to back up underneath the roofing materials. This water then finds its way to the roof deck and eventually finds its way into your home. The results can be catastrophic.
Although ice dams can form anywhere on a roof, they form most readily at the bottom edge of roofs, valleys, and areas where the slope might change on a roof.
Stopping the Leaks
It is virtually impossible to stop ice dams from forming. Some methods attempt to use heated electrical wire which is applied to the lower edge of your roof or which sits in your gutter. Often these methods have little effect. In some instances, they can be dangerous.
The newer technology has leaned in the direction of not trying to stop the ice dam from forming, but to simply stop the water from entering your home. As such, roofing manufacturers have developed products that combat just this. They are modified asphalt products.
These products help prevent leaks caused by ice dams as well as wind-driven rain. Some of these products are rubberized, while others include styrene. Some are reinforced with fiberglass mats, while others are not. They work by creating a solid barrier to water wherever they are applied. It is similar to shrink wrapping that portion of your roof. When applied according to the manufacturer's specifications all of them can be highly effective in preventing leakage from ice damming.
These products generally have one side which is very sticky. They are designed to be installed directly on the wood decking of your roof starting at the gutter line. Often these materials are installed at other potential trouble areas. Some of these areas are as follows: low slope roofs, valleys, slope changes, hips, rake edges, dormers, skylights, flashing areas. In certain instances, it can be used as an entire roof underlayment system. These products are designed to have other roofing materials applied over them. Sunlight will harm these products, so they must be covered.
Since these materials are very pliable and manufactured with different compounds, any nails which penetrate the products seal themselves. They are wonderful products. In ice dam situations, most leaking occurs within 3 feet of the gutter line. Because of this, you generally do not have to cover the entire roof with these products. However, low slope roofs, shaded roofs, and roofs that have a northern exposure are candidates for complete coverage. Consult with the manufacturer or a professional roofer for your particular situation.
Design Tips To Minimize Ice Dam Leakage and Damage
There is very little that you can do to prevent ice dams from forming. You can incorporate design features when building a new home or adding on that will minimize the size of ice dams. However, some of these features may not be visually appealing when used in remodeling situations, due to the fact that the overall design of the addition may not perfectly match your existing structure.
These type of situations are perfect examples of where one would make extensive use of the specialized roofing products that were mentioned earlier. Even in new construction, the use of ice dam roofing products is a great idea. They afford you peace of mind in the event of weather conditions that favor ice dam formation.
Design Suggestions
Avoid low slope roofs whenever possible. A low slope roof generally is considered one with a pitch of 5/12 or less. Low slope roofs make it easier for water to backup underneath the roofing materials.
Extend the roof overhang as much as possible from the outside wall of your home. If possible,give strong consideration to a 2 foot minimum overhang. In the event that an ice dam forms, this large overhang may keep the ice dam away from your exterior walls. In the event a leak does develop, in most cases, the leak will come through the soffit on the outside of your home, not your interior ceilings.
Avoid changes in roof pitch on the same plane. This simply means keeping the distance between the ridge of a roof and the gutter a straight line. Don't put a 'kink' in the roof. Snow and ice collect at these points. Usually, the lower roof plane in the 'kink' is also a low slope roof as we discussed above. Avoid these if at all possible.
Consider a raised heel height at the intersection point between the roof framing and the outside bearing walls. Heel height is a common term used by rough framing carpenters. It refers to the vertical distance between the top plate of the exterior wall and the top edge of the roof rafters as they pass over the outer edge of the wall plate.
Low heel heights (4 - 6") create a tremendous problem that aids in the formation of ice dams. Not only that, these low heel heights also contribute to the leakage of water into your house once an ice dam has formed.
Good building practices dictate that you should have a 2 inch airspace between the bottom of your roof deck and any ceiling or attic insulation. If your builder or carpenter uses a low heel height, you may only have 2 to 4 inches of insulation above the ceiling where the roof passes over the outside walls of your house. This condition enables heat to escape. This heat in turn keeps the roof immediately above this location warm enough to keep the water above the ice dam from freezing.This is the water that subsequently leaks into your house. By raising the heel height of your rafters or trusses, you benefit by having more insulation at this very critical location.
Cold Roofs
In climates where snow accumulations can be excessive, consider building a 'cold roof'. This is basically a roof on top of a roof. The upper roof is separated from the lower roof by a generous ventilating space. Outside air can flow freely between the two roofs. This keeps the upper roof, the one with the snow and ice on it, cold. Believe it or not, this is exactly what you want. You want the melt water to freeze as quickly as possible in ice dam situations. This keeps the water from backing up underneath the roofing materials. Also, a cold roof design virtually eliminates the problem we just discussed concerning low heel heights.
In the United States, Canada and the Northern Hemisphere for that matter, try to orient your house with a minimum of roof area having a northern exposure. Roofs with a northern exposure, generally, have more problems, because the snow and ice melt from these at a slower rate. During the winter months, the sun is at a lower position in the sky and these roofs often do not get direct sunlight. The sun is beneficial, because it will allow the snow and ice to melt more quickly. Roof decks, gutters and downspouts in direct sunlight often will have surface temperatures above freezing, while the air temperature will be below freezing. Avoid shaded roofs for the same reason.
Continuous Ventilation
If building new or remodeling, give serious consideration to installing excellent continuous ventilation. This consists of full soffit or eave ventilation used in conjunction with continuous ventilation at the top of your roof.
This type of ventilation permits a constant supply of cold air to flow beneath the surface of your roof. Once again, this is a favorable condition, as it keeps the roof surface cold and can actually cause the entire surface of the roof to freeze. This in turn permits any melt water to run on top of this ice shield on its way to the ground.
Continuous ventilation also has numerous other benefits. It helps to prevent attic condensation in the winter months. In the summer it helps to lower attic temperatures.
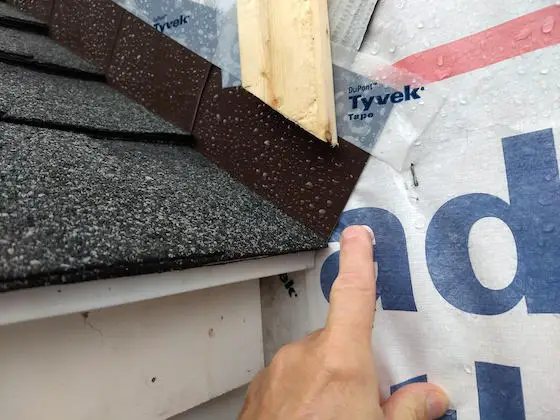
The brown bent aluminum is step flashing. The aluminum extends under the shingle and goes up the roof under the next flashing about 2 to 3 inches. The roofer made a SERIOUS ERROR where my finger is pointing. There should be an additional piece of flashing that's called a kick-out flashing. The lower end is bent and soldered and directs the water out to the front face of the exterior siding or stucco. Copyright 2018 Tim Carter
"Flashings are things that stop leaks around things that pop up through your roof."
Roof Flashing Repair - Most Roof Leaks are at Flashings
The sources of a wide majority of residential roof leaks are roof flashings. For the most part, the correct installation of flashing material is what determines whether or not your roof will leak. The reason for this is quite simple.
What's the Best Way to Repair Roof Flashings?
I feel the best way to attempt roof flashing repair is to acquire full knowledge of what they are, what the best materials are, and how they're part of the entire roof system.
The last thing you should do is grab a can of black goo roofing cement or a few tubes of caulk thinking that's the way to repair a flashing. That's treating the symptom, not CURING the disease.
The vast majority of roofing products are quite easy to install. The manufacturers have engineered these products to be practically leak proof when they're installed on a simple roof.
However, there are very few simple roofs.
What is a Simple Roof?
A simple roof is one that doesn't have anything popping up through it. Examples of simple roofs are:
dog houses
small outdoor sheds
firewood storage rack
Rarely will you find a plumbing vent stack, chimney, fan vent, pot vent, valley, a side wall projecting above the roof, etc. on a dog house.
You will, on the contrary, almost always find one of these items projecting through a residential house roof. The most common thing is a plumbing vent pipe. Watch this video to see how to make it leakproof for decades:
How Old is Roof Flashing Technology?
The engineering concerning flashings has been known for hundreds and hundreds of years. It is, in fact, very simple engineering. The system depends almost entirely on gravity. Gravity works with the flashing material and sheds the water onto the regular roofing materials.
If you use a flashing material that depends on some other method to shed water you can quite possibly develop a leak. Caulks, roofing cement, pitch, and similar materials depend on their stickiness or adhesive qualities to seal out water. These qualities can easily break down under constant exposure to the elements. If you want a leak-proof roof, stay away from these type of compounds.
Flashings are things that stop leaks around things that pop up through your roof. Here's a list of common things that pop up through a roof:
chimneys
plumbing vent pipes
dormers
bath vent fans
roof vents
How Long Should Flashings Last?
Roof flashings should last longer than the original roofing material.
Many people expect roofs to perform for a minimum of 15 to 20 years. Some roofs can be expected to last 50 to 80 years. This means that the materials which are used for flashings must have the same, or greater, lifespan as the roofing material itself.
What are the Best Flashing Materials?
The best flashing materials must also be able to be shaped easily and have the capability to be easily soldered, brazed or welded. This second point is crucial.
Copper, tin coated steel, lead, and galvanized steel are examples of fantastic traditional flashing materials.
Why Do Flashings Have to be Soldered?
The reason the flashing materials must have the capability of being soldered or brazed is quite simple. The soldering or brazing process of metal is similar to welding. These processes take two separate pieces of metal and make it one.
There are many, many times in flashing work where one has to bend around corners or splice two pieces of metal together.
These instances create seams which must be soldered or brazed. As I mentioned earlier, the flashing material must have a projected lifespan equal to or greater than that of the roofing material. Soldering or brazing metals together passes this test.
Do Flashings Have to Expand and Contract?
Flashing systems must also pass another test. They must be able to handle the constant expansion and contraction between roofing products and those things which are not roofing products. This battle of expansion and contraction can take place on a daily or seasonal basis.
The sun can create extremely hot surface temperatures during daylight hours, causing roofing materials to expand. At night, the temperature drops and the materials contract.
Do Flashings Move Because of Lumber Shrinkage?
Seasonal changes can cause the framing lumber to shrink and swell depending upon humidity and wood moisture content.
This shrinking and swelling cause the roof sheathing and rafters to move. The flashing materials must be able to withstand this movement and continue to be leak-proof. Well-engineered and installed two-part metal flashing systems can handle this movement with no problem.
On new construction, the framing lumber can shrink dramatically in the first year after construction. If one-part flashing systems are used, leaks can easily develop from the gaps that develop from the shrinking lumber.
Two-part flashing systems consist of a base or step flashing which is usually in contact or laced into the primary roofing material, and these are then covered by a counter flashing. The counter flashing is a separate piece of metal or building material which laps over the base or step flashing.
Should Counter Flashing Be Attached to the Flashings it Covers?
Counter flashing should not be attached (mechanically or soldered) to the base or step flashing. The two materials must be able to move independently of one another. The counter flashing can be made of a wide variety of materials. It can be wood siding, stucco, vinyl or aluminum siding, or other material which forms the outside surface of a wall.
In chimneys and along brick walls, the counter flashing is almost always the same metal which is used for the base or step flashing.
Two-part metal flashing systems are not harmed in any way by the sun's ultra-violet (UV) rays. UV rays can easily defeat caulking, plastic roof cement or most other flashing substitutes. UV radiation can remove the elasticity of these products and make them brittle.
When they become brittle, they can no longer handle the daily expansion and contraction. Also, very few of these products have a lifespan equal to or greater than roofing products. They are temporary remedies at best. Only consider using them for emergency type repairs.
Should You Paint Roof Flashings?
Flashing materials that can rust (tin coated steel or galvanized steel) should always be painted. They often are not painted correctly by roofers. These metals must have special primers applied first and then the proper number of finish coats of paint.
Also, it's extremely important to wash these metals with soap and water or paint thinner before painting!!! These metals have a very light coating of oil which is applied during the milling process. If the oil is not removed, the paint job will fail. You will be battling peeling paint long into the future.
Is Aluminum a Good Flashing Material?
Aluminum is not a bad flashing material if you watch where you use it. Two big downsides to aluminum are:
it can't be soldered with ease
it corrodes if it touches brick or stone mortar
Avoid using aluminum flashing material. Aluminum cannot be soldered. Also, if it is used in flashing chimneys or brick walls, it will rapidly corrode. The chemical makeup of the mortar attacks and eats the aluminum! Do not allow your roofer to use aluminum!!!
Are Flashings the Most Complex Part of a Roof?
Yes, flashings are, for the most part, the most technical aspect of roofing. Their installation requires an experienced individual in almost all cases. Soldering vertical surfaces requires skill and knowledge. Professional roofers possess these talents. Professionals realize the importance of flashings. They know that flashings are the weak link in the chain. You should realize this also.
Many of these are available at libraries or larger bookstores. I highly recommend that you consult several publications to get a full understanding of the complexity of roof flashings. The more you realize how complicated flashings are, the better your chances of hiring the best professional. Good luck!
Roofing: Step-by-Step Projects Creative Homeowner Press, 2004. "Everything homeowner's need to install a roof properly. Provides detailed instructions for jobs such as flashing and fixing leaks..."
Roofing Materials & Installation William P. Spence, Sterling Publishing Co., 2004. "Learn how to make repairs, prepare the roof for the construction process, and choose the best materials for your home."
The Roofing Handbook. Robert Scharff, McGraw-Hill, 2nd ed., 2000. "The most complete A-to-Z handbook on the basics of residential roofing, with over 250 illustrations."
Asphalt shingles are by far the most prolific roofing material used in residential construction today. Virtually 80 percent of all residential roofing materials are manufactured by asphalt roofing product companies. The industry has come a long way since its beginning in 1893. Today's asphalt shingle products are far superior to products made just 25 years ago.
Operator Error
The construction industry (of which I was a participant for 20 years) has a major flaw. The learning process in virtually every field is either visual or verbal. Young people beginning to work in the industry simply learn by doing what they are told or by watching more experienced individuals. There is very little reading that takes place. The only widespread exposure of written learning material that I am aware of is the textbook material available to vocational students or those few who go through apprenticeship programs (plumbers, electricians, some HVAC).
Relying on verbal or visual information is simply not acceptable in today's world. Professionals in fields other than building and remodeling are formally educated and continue to read on a regular basis about changes in their profession.
A construction worker who is just entering the field may be taught by an individual who has been doing something wrong or against manufacturer's recommendations for years. In many instances, these individuals do not even realize that they are making mistakes.
Many individuals who install asphalt roofing shingles do not follow written, established roofing practices as outlined by manufacturers and roofing associations. This is prevalent in the industry. In fact, in my own hometown, I am aware of only one roofing contractor who correctly installs asphalt shingles! That means that 98 to 99 percent of all the asphalt roofs installed in Cincinnati are susceptible to leaks or premature failure. The same thing quite possibly is happening in your city or town.
The Basics
The performance of asphalt roofing shingles is dependent upon several factors. A mistake in any one area can cause failure of the system which manifests itself to you as a leak. Some of these factors are roof slope, ventilation, roof deck to which shingles are applied, drip edges, flashings, fasteners (nails or staples), application of fasteners, quantity of fasteners, placement of fasteners and condition of asphalt shingles prior to application.
Roof Slope
Asphalt roofing shingles cannot be successfully installed on each and every roof. These products depend heavily on gravity to keep water from entering your house. As the slope or pitch of a roof increases (gets steeper), gravity can pull the water off of your roof faster. Thus, the steeper your roof, generally, the better asphalt shingles perform.
Roof slope is commonly called out as the amount of vertical rise per amount of horizontal run. By convention, the amount of horizontal run is commonly called out as 12 inches. A common roof slope (pitch) used in many ranch houses is 4 inches of vertical rise for every 12 inches of horizontal run. This is called out as a 4/12 pitch roof.
Asphalt shingles can be applied on roofs with a slope (pitch) as low as 4/12 and as high as 21/12 using standard installation practices. Low slope roofs between 2/12 and 4/12 require special application methods, as do roofs that exceed 21/12 pitch.
Ventilation
Poor attic ventilation can adversely affect shingle life. Prolonged exposure to high temperatures can accelerate the aging process of asphalt shingles. Excessive moisture buildup in attic spaces can cause water vapor to penetrate asphalt shingles. This water vapor in turn is boiled by the sun and causes blisters in shingles. Excessive attic moisture can also cause the roof framing and decking members to swell. Excessive swelling can buckle shingles, which in turn can fracture them. Leaks may develop as a result of fractures. Proper ventilation of attic spaces will remove excess heat and moisture. The minimum ventilation requirements are a net free ventilation area of 1 square foot for every 150 square feet of ceiling area. Net free area refers to the unobstructed area of ventilation systems. Remember that insect screening restricts air flow! You can't simply use the area of the holes you cut in your roof to determine the free net area. Virtually every well made ventilation cover or system tells you the net free area of the vent or per linear foot of ridge vent.
Roof Deck
The roof deck or surface to which the shingles are going to be applied must be solid and rigid. It has to be able to support with minimal deflection the weight of the roofing materials, snow loads and anyone who is walking on the roof. The decking must also be installed properly. Plywood installed improperly can and will buckle. I addressed this subject in this plywood article.
Drip Edges
Water can easily penetrate roofs at the bottom and side edges of roofs. This is especially true when rain is accompanied by wind. Drip edges are corrosion resistant metal which protects the wood roof decking from this water. They usually project a minimum of 3 inches onto the deck. The metal at the edge of the roof decking is then bent down a minimum of 1 inch onto the rake trim and gutter boards.
Flashings
My guess is that over 90 percent of roof leaks are flashing-related failures. Flashings are the transition materials used to blend roofing materials into things that are not roofing materials (chimneys, sidewalls, skylights, plumbing vent pipes, etc.) The installation of flashings and the use of proper flashing materials is vitally important. For example, I have seen countless chimney flashing failures due to the use of aluminum. A roofer, thinking that he is providing a maintenance free flashing, installs aluminum flashing around a masonry chimney. Little does he (she) know, aluminum is rapidly corroded by the alkalies in the mortar between the bricks! After several years, the aluminum simply dissolves. Also, aluminum cannot be soldered. Chimney flashings almost always require soldering at the corners of the base and head flashings! The only ones that do not are pre-engineered chimney flashings, and these are rare.
Flashings require skill to fabricate and install. Step flashings, for example, need to be specific sizes and need to be laced and overlapped into each layer of roofing. They need to be bent just right so as not to hold up a shingle. Step flashings are an integral part of a two component flashing system. They require a separate free-floating counter flashing. I addressed flashings in this related article. Do not underestimate the importance or necessity of proper installation of metal roof flashings. Trust me, those difficult and troublesome leaks are probably being caused by a flashing.
Fasteners
Fasteners are the nails and staples used to apply asphalt shingles to a roof deck surface. Virtually every manufacturer of asphalt roofing approves the use of staples. However, the Asphalt Roofing Manufacturers Association recommends that roofing nails are the preferred fastening system for asphalt shingles.
Believe it or not, you just can't use any nail or staple to install asphalt shingles. Nails and staples need to be corrosion-resistant. Moisture does collect beneath shingles, both in liquid and vapor form. This moisture will rust non-protected iron nails.
The shank diameter of nails must be a minimum of 0.105 inch (12 gauge) and the head of the nail must not be less than 3/8 inch. Staples must have a minimum outside crown (width) of 15/16inch. They should be made from wire that is a minimum of 0.0625 inch (16 gauge).
Fasteners must be of a sufficient length to completely penetrate at least 3/4 inch into the roof deck. If the roof decking material is less than 3/4 inch thick, the nail must penetrate the decking completely and extend a minimum of 1/8 inch past the inner surface of the roof decking.
Fasteners must be placed correctly. They should be driven so that the bottom of the nail head or staple crown is flush with the shingle. Fasteners driven too deep, crooked or not far enough are simply not acceptable.
Quantity & Placement of Fasteners
There are many different shingle types available today. The standard 3 tab shingle is common to many homeowners, however dimensional type asphalt shingles are becoming ever more popular. Most of these shingles are designed to expose 5 inches of the shingle to the weather. In cases such as these, the manufacturers usually require that you place the fasteners in specific locations along a line 5 5/8 inches from the bottom (exposed) edge of the shingle.
In all shingles that have a thermoplastic asphalt self sealing compound, the nails are to be placed below this strip!
Virtually, every manufacturer requires a minimum of four per to determine the proper location of the fasteners.
The location of the fasteners is critical for a very simple reason. As each successive course of shingle is applied, it is offset from the course below. This offset is needed to adequately cover the butt joint of the course below. This butt joint is where water leaks into your house. Fastener locations are designed so that they receive the maximum protection from the course of shingles immediately above them. Any deviation from the nailing pattern increases your chances of a leak!
High Wind Area Nailing Pattern
Asphalt shingles applied in areas subject to high winds need two extra fasteners (total of six) per shingle. These two extra fasteners are attached along the same line as the original four. The two fasteners within the body of the shingle are moved slightly to the left and/or the right and an extra fastener is applied so that it is 2 inches away. Once again, the locations are specific to each type of shingle and you (or your roofer) need to read the shingle wrapper to determine the correct location.
Condition of Materials
Asphalt shingles can absorb water. Waterlogged shingles cannot be successfully applied to a roof and achieve maximum performance. Thus, it is imperative that they be stored in such a way as to remain dry prior to application. They should always be stored on a flat surface. Buckled shingles should never be applied. Modern asphalt shingles also become very brittle at temperatures below 40 degrees F. Care must be taken so as not to fracture them if applying them in cold weather conditions.
Reroofing over existing roofs
There are many considerations which must be studied before applying new asphalt shingles over an existing roofing material. Weight, fastener holding capability, smoothness of existing roof, local code requirements, etc. must be investigated. Do not assume that you can simply apply a new layer of asphalt shingles over an existing roof. Remember that asphalt is a plastic material. When the shingles get hot, they will conform to the surface upon which they lie.
Check out the following web sites. The Asphalt Roofing Manufacturers Association has an excellent publication called Residential Asphalt Roofing Manual. It is the best book I have seen which clearly explains what you need to know about having your roof installed properly. Various manufacturers, such as Certainteed, also have excellent installation literature. Read as much as you can, and good luck on your next project!
Asphalt Roofing Manufacturers Assoc.
National Roofing Foundation
Roofing Industry Education Institute
Column B59
Expert Advice For Your Home
Subscribe to the FREE Ask the Builder newsletter to receive professional advice for your home. Complete the form below and each week you'll get:
DIY Tips
Tool Reviews
Project Guides
Product Discounts, Giveaways & more.
Unsubscribe at any time. We respect your email privacy.